Quick Start: Handle a Sales Order (Dropshipping Case)
Confirming the Sales Order (SO)
After Delivery: Tracking Completed Orders
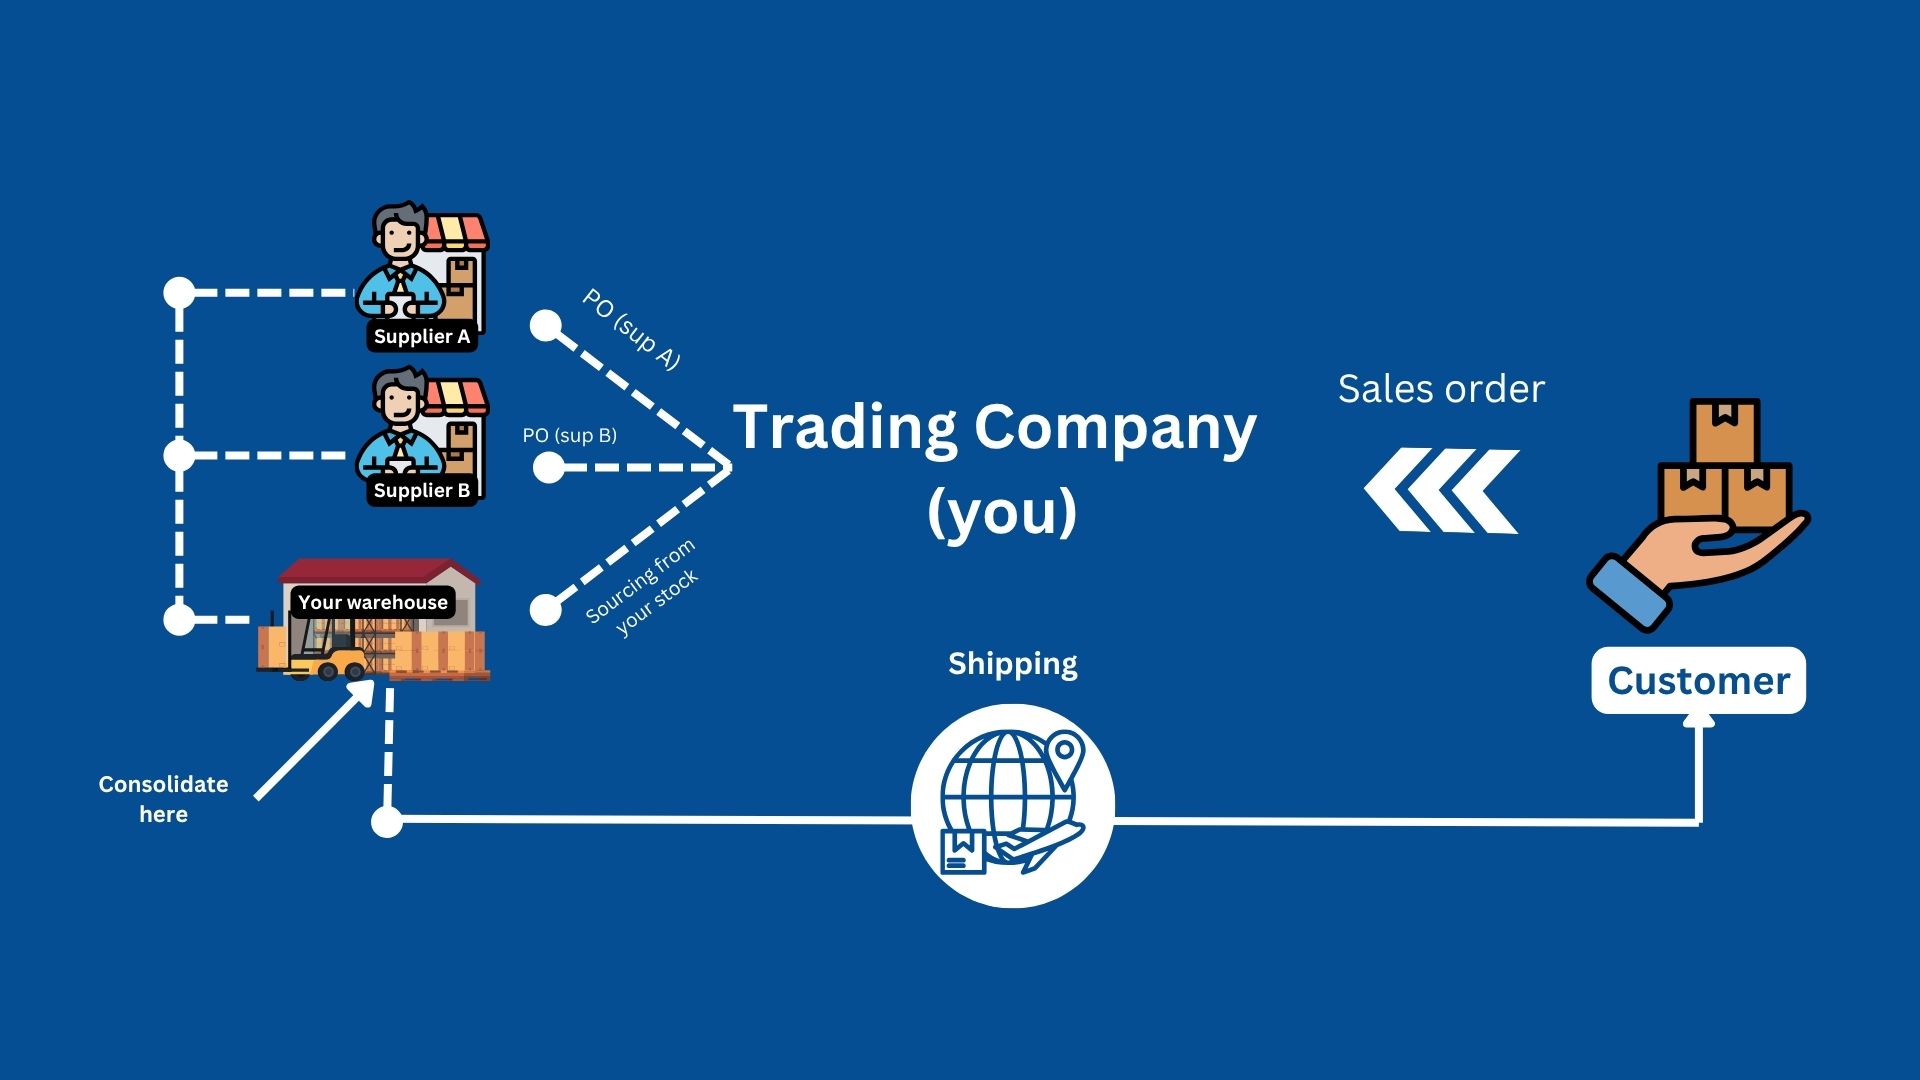
Quick Start: Handle a Sales Order (Warehouse Consolidation Case)
If your business consolidates goods from multiple suppliers before shipping to your customer, this guide is for you.
In Sourcemaster, the Sales Order (SO) brings everything together — your customer’s request, the items you need to source, and the suppliers involved. You’ll consolidate all items at your warehouse first, then ship everything out in one combined delivery.
This setup is ideal when you source from several suppliers or mix supplier products with your own warehouse stock to fulfill one customer order.
What You'll Learn
In this article, we’ll walk you through how to:
- Create a Sales Order that uses warehouse consolidation
- Allocate items to multiple suppliers or your warehouse stock (POs are generated automatically)
- Consolidate incoming items at your warehouse before shipping
- Track progress from order confirmed → items received → shipped → delivered
- Mark the order as complete after your customer receives all goods
Before You Start
Here’s a quick example you can follow along with:
Your company Greenthreads (GT) received an order from Urban Bloom Co. (US) for
🎒 Drawstring Bags, sourced from a mix of:
Supplier A (China)
Supplier B (China)
Your warehouse stock (China)
Since the goods will be collected from multiple sources and shipped out together from your warehouse, this case uses the Consolidate and ship fulfillment type (and select your warehouse).

You will handle consolidation in this workflow — items come in from multiple suppliers (and your own stock), get gathered at your warehouse, and ship out as one final delivery to the customer.
.jpg)
Understanding the Sales Order Lifecycle (Compared to Real Trade)
This chart shows the full journey of a Sales Order (SO) in sourcemaster, from the moment you create the order to the moment all consolidated items reach the customer.
And if you compare it to real-world trading, the steps are almost identical — the difference is that Sourcemaster keeps everything organized, traceable, and linked.
1️⃣ Drafted SO – Order Created
🔵 In Sourcemaster:
You’ve created a new Sales Order. It’s still in draft mode, so you can edit:
-
product details
-
quantities
-
prices
-
consolidation method
-
warehouse
-
shipping terms
Nothing is locked yet.
🚚 In Real Trade:
This is when a customer sends you an inquiry or request for quotation.
You prepare a quotation or proforma invoice but no one has confirmed yet.
➡️ Still “quotation/negotiation mode.”
2️⃣ Confirmed SO – Order Locked In
🔵 In Sourcemaster:
Click Confirm, and the order becomes an active, trackable order.
This will trigger:
-
automatic PO generation to one or more suppliers
-
stock allocation if you are using your warehouse inventory
-
preparation for inbound receiving
🚚 In Real Trade:
This is the moment the customer confirms the order and payment terms.
Your sourcing team then books production slots or reserves stock from suppliers.
➡️ It’s now an official deal.
3️⃣ Allocated SO – Goods Allocated
🔵 In Sourcemaster:
The system links each SO item to:
-
one or more suppliers, or
-
your own warehouse stock
Based on your allocation, Sourcemaster prepares:
-
POs for suppliers
-
stock reservations inside your warehouse
This means items are now assigned and awaiting arrival at your warehouse for consolidation.
🚚 In Real Trade:
This is when suppliers confirm:
-
stock availability, or
-
production schedule
You reserve those goods for your customer — no longer available for other orders.
➡️ The order is now in supplier and warehouse hands.
4️⃣ Received & Consolidated – Goods Arrived at Your Warehouse
🔵 In Sourcemaster:
As suppliers deliver items to your warehouse, you record:
-
inbound receipts
-
quantities received
-
QC results
-
expected final consolidation date
Once all inbound items arrive, Sourcemaster shows that the order is ready for outbound shipment.
🚚 In Real Trade:
Your warehouse team:
-
receives boxes from different suppliers
-
checks product quality or quantity
-
stores everything in one location
-
prepares for final packing and export
➡️ This is the warehouse consolidation stage.
5️⃣ Shipped SO – Goods Dispatched
🔵 In Sourcemaster:
You create a Shipment entry for the outbound shipment, including:
-
shipping method
-
container/airway bill
-
freight cost
-
delivery forecast
The system now tracks the outbound movement from your warehouse to the customer.
🚚 In Real Trade:
Your warehouse ships everything to the customer or freight forwarder.
You start tracking via:
-
AWB (air)
-
B/L or container number (sea)
-
courier tracking (express)
➡️ This is the export/dispatch stage.
6️⃣ Delivered SO – Order Delivered
🔵 In Sourcemaster:
Once the customer confirms delivery, the SO moves into Deliveries.
You’ll see:
-
lead time metrics
-
supplier performance
-
shipping efficiency
🚚 In Real Trade:
Goods arrive at the customer’s destination. Delivery is confirmed via:
-
POD
-
receipt
-
import clearance documents
➡️ The trade is complete.
💡 In Short
| Sourcemaster Stage | Real Trade Equivalent | Key Meaning |
|---|---|---|
| Drafted SO | Quotation / Order Negotiation | Still editable and unconfirmed |
| Confirmed SO | Order Confirmed / Payment Agreed | Official order placed, sourcing begins |
| Allocated SO | Supplier Confirmation / Stock Reserved | Items allocated to suppliers or warehouse stock (waiting to arrive for consolidation) |
| Received & Consolidated | Goods Arrive at Your Warehouse | Inbound items received, QC done, ready for final shipment |
| Shipped SO | Goods in Transit | Outbound shipment from your warehouse has started |
| Delivered SO | Customer Received Goods | Trade completed |
Why It Matters:
This flow gives you a complete view of your entire trade — from customer order, to supplier sourcing, to warehouse consolidation, to final shipment — all in one system.
You can instantly see:
-
where your order stands
-
which supplier or warehouse step is happening
-
what needs attention next
…without chasing emails, chats, or spreadsheets.
Create a New Sales Order
Every order in Sourcemaster starts here — with a Sales Order.
This is where you record key details like customer, terms, and shipping method before starting the purchasing or delivery process.
Step 1: Open Sales Orders
-
Go to Order Management › Sales Orders
-
Click Create New Order at the top-right corner.
A pop-up form will appear for you to enter your order information.
Step 2: Enter Order Details
Fill in each field in the Create New Sales Order window:
| Field | What to do |
|---|---|
| Sales order code | Enter your order code. We recommend using the structure set in Settings › Automated Codes › Sales Order Code for consistency. You can also read our Automated Codes Guide for more details. |
| Sales order date | The system fills in today’s date automatically. You can change it if needed. |
| Seller | Select which entity or branch is selling. |
| Customer | Choose the buyer from your customer list. |
| Settlement currency | Select the currency used for the transaction. |
| Trade terms | Choose trade terms such as FOB, EXW, or CIF. You can also read our Trade Terms Guide for more details. |
| Location | Select where the order will be managed or shipped from. You can also read our Location Guide for more details. |
Once everything looks correct, continue to the next step.
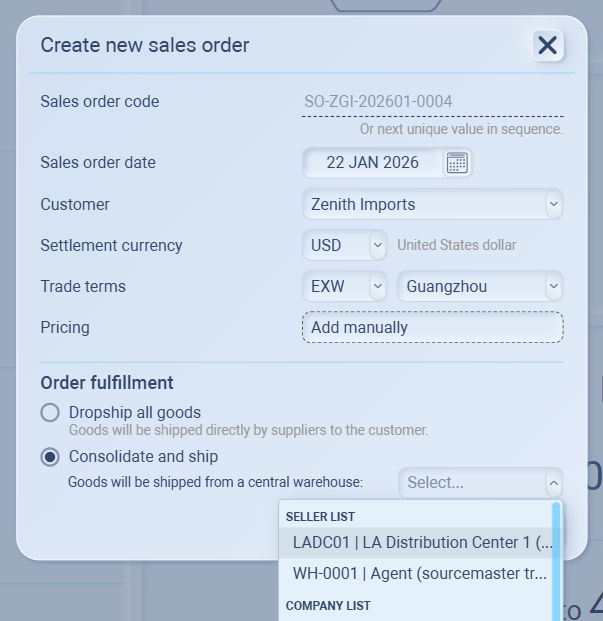
Step 3: Select Order Fulfillment
Under Order Fulfillment, check Consolidate and ship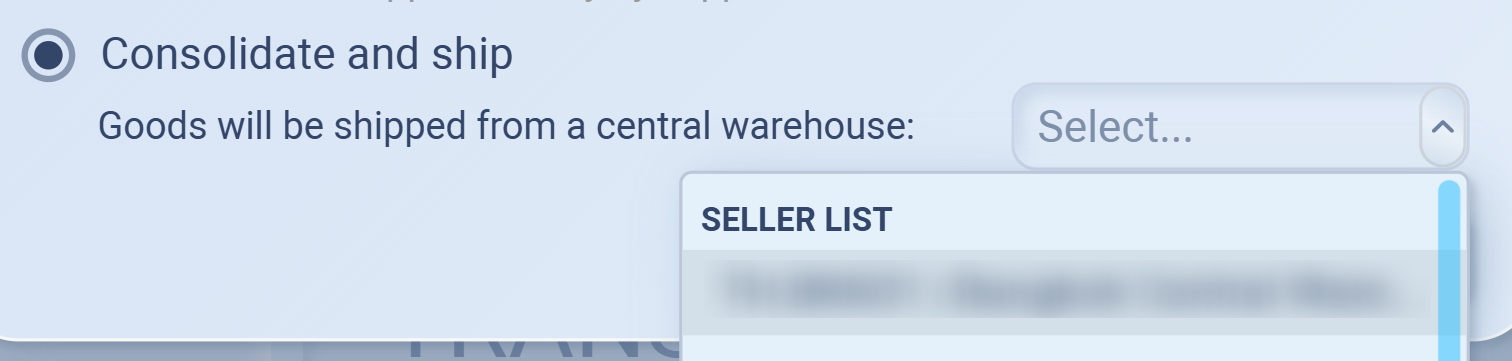
Dropship All Goods
Flow: Supplier → Customer
Supplier ships directly to the customer.
You don’t receive goods or hold stock.
System automatically creates a linked PO (Dropship) for supplier cost tracking.
Use when: You operate as a trading intermediary or sourcing business.
PO: ✅ Required
Inventory movement: ❌ None
When you’re done, click Add to create the Sales Order.
You’ll be redirected to the Order Details page where you can:
-
Add products (items to sell)
-
Attach files like artwork or product specs
-
Track and update the order as it moves forward
-
Follow your automated code format (e.g., SO2025-001) to keep records clean and easy to search.
-
Reuse customer profiles to auto-fill currency, terms, and contact info.
-
You can edit or update open orders anytime before purchase or shipment begins.
Next Step
Now that your Sales Order is created, move on to Add Products to a Sales Order to start fulfilling it.
Drafted Sales Order (SO) phase
Add Products to a Sales Order
After creating your Sales Order, the next step is to add the ordered products.
This defines what the customer is buying, along with quantities and prices.
Step 1: Add a New Product Line
-
Click the “+” (Add) button on the right side.
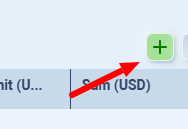
-
Click the “+” (Add) button on the right side to create a new product entry.
A new row will appear for you to fill in product details.
Fill in each field as follows:

| Field | What to do |
|---|---|
| Product code / Product name | Select your product from the dropdown list. You can search by code or name. |
| Quantity | Enter how many units the customer ordered. |
| Unit of measure | The system will show the unit of measure of the item |
| Allocation (recommend) | Allocation means deciding where each ordered item will come from — for example, assigning it to a supplier, an existing purchase order, or stock in your warehouse. If applicable, click Allocate to link this order to specific inventory or supplier. (See how allocation works below) |
| Price / unit | Set the selling price per unit. (You can toggle “Auto-fill prices” to YES if you’ve pre-defined product prices.) |
| Sum | The system will calculate automatically based on quantity × price per unit. |
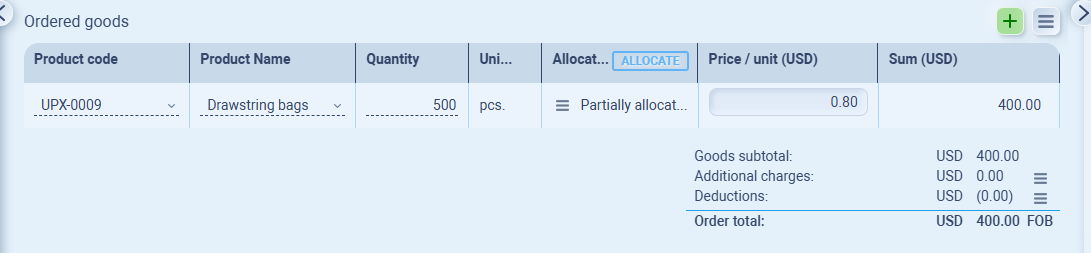
It'll look like this once you add the items

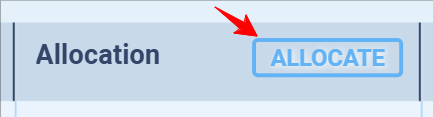
Step2 : Allocation & Consolidation (optional)
If you see No supplier assigned mean you haven't set it yet, you may wonder what Allocation for?
Step 1: Open Item Allocation
-
In your Sales Order, find the product you want to allocate.
-
Click Allocate on Allocation.
-
Hover over the item list and click To Item Allocation
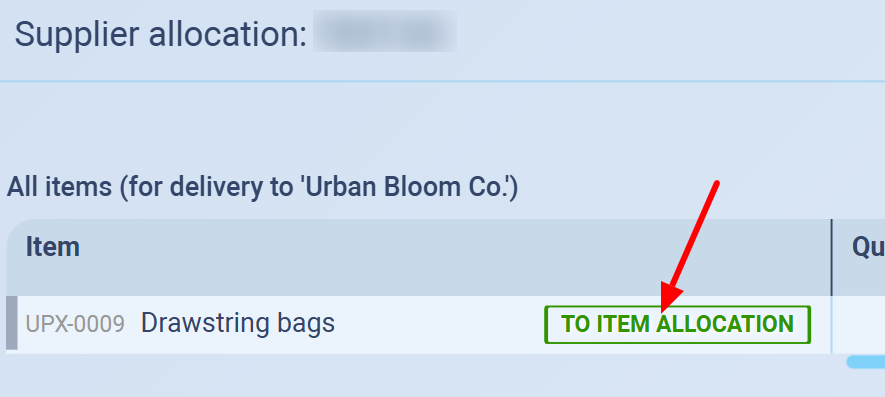
- In case you've single supplier (if not, skip to 5th step)
- Choose supplier in Source from

- Choose PO in Purchase order, you can choose either Create new purchase order (issue new PO) or Add to existing purchase order (add to the PO that has the same supplier) if there's available.
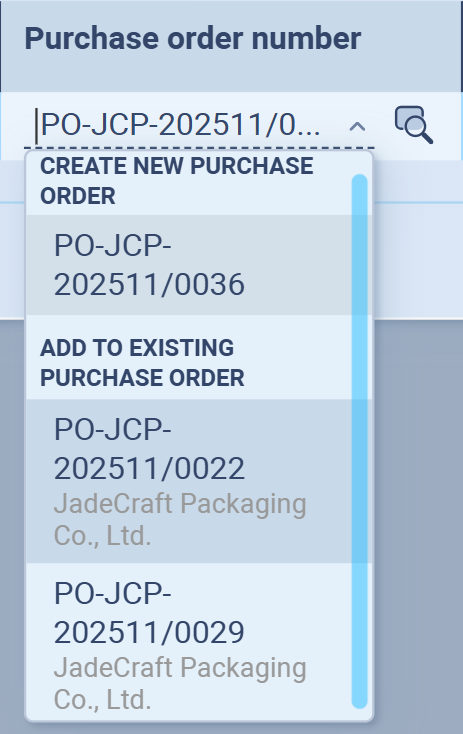
- Choose supplier in Source from
Once you done with Allocation, you can move to the next step.
Step : Review the Line Item
-
Double-check that all product details, quantities, and prices are correct.
-
You can add multiple products by repeating the same step.
-
To remove an item, click the delete icon at the end of the row.
Order Summary and Adjustments (Bottom Section)
At the bottom of your Sales Order, you can review your total amount and make adjustments before confirming or sending it to your customer.

| Field | Description |
|---|---|
| Goods Subtotal | Total value of all products in the order. Calculated automatically based on quantity × selling price per unit. |
| Additional Charges | Add extra costs such as shipping, packaging, or service fees. |
| Deductions | Apply discounts or reductions agreed with your customer. |
| Order Total | Displays the final total after all adjustments. Shows the total in your selected sales currency and trade term (e.g., EXW, FOB, CIF). |
Add Additional Charges or Deductions
You can adjust the total value of your Sales Order by adding extra costs or customer discounts.
To Add Additional Charges
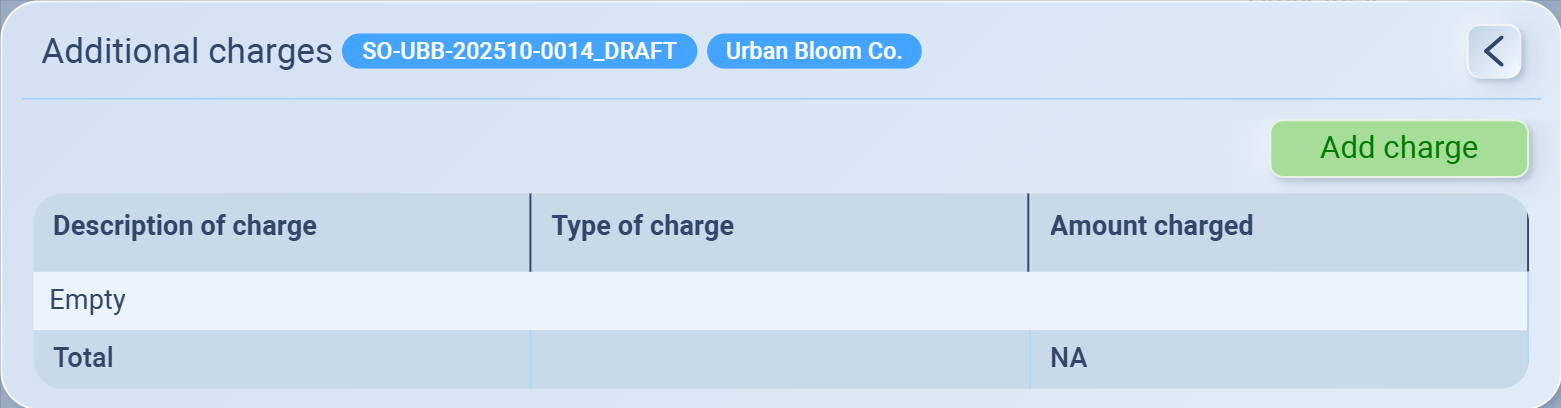
-
Click the three-line icon (≡) next to Additional Charges.
-
A pop-up window will appear.
-
Click Add Charge.
-
Fill in:
-
Description of charge (e.g., Shipping, Handling, Packaging)
-
Type of charge (fixed or percentage)
-
Amount charged
-
-
Click Save to apply.
💡 Once saved, the charge will appear in the list and automatically update your Order Total.
To Add Deductions
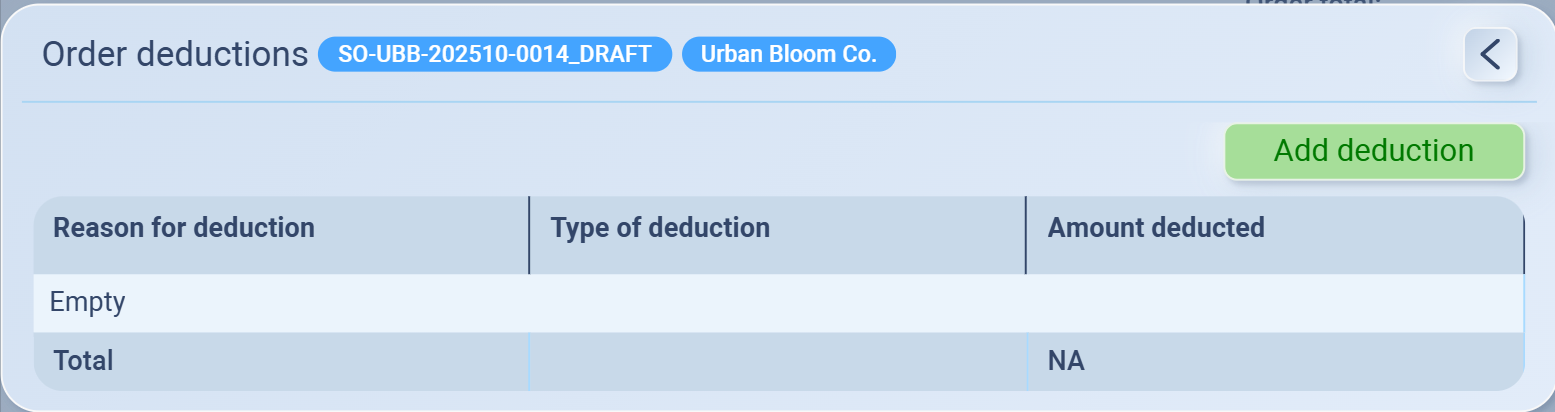
-
Click the three-line icon (≡) next to Deductions.
-
A pop-up window will appear.
-
Click Add Deduction.
-
Fill in:
-
Reason for deduction (e.g., Customer discount, Promotional offer, Credit note)
-
Type of deduction (fixed or percentage)
-
Amount deducted
-
-
Click Save to apply.
💡 Deductions will reduce the total Sales Order amount and are instantly reflected in the Order Total.
Step 3: Review Pricing Details
Pricing Details
The Pricing Detail window shows a full breakdown of your order’s buying and selling flow — how much you buy from suppliers, how much you sell to customers, and what profit (or loss) is made in between.
It helps ensure your selling prices, margins, and transfer pricing (if any) are accurate and transparent.
Think of it as the financial flow of your order:
Flow Meaning Example Supplier → Your company Purchase side — how you buy goods Guangzhou Cottonworks sells to GreenThreads Your company → Customer Sales side — how you sell goods GreenThreads sells to Urban Bloom Co. (Optional) Internal entities in between Transfer pricing between your own companies GreenThreads HK buys from CN branch and sells to US branch So when you open Pricing Detail, Sourcemaster shows:
Who sells to whom
What pricing method applies between them (manual, cost-plus, fixed margin, etc.)
How costs, transfer prices, and profit are distributed through the path
To open Pricing detail, click the three-line icon (≡) on the Ordered goods section.
What You’ll See Here
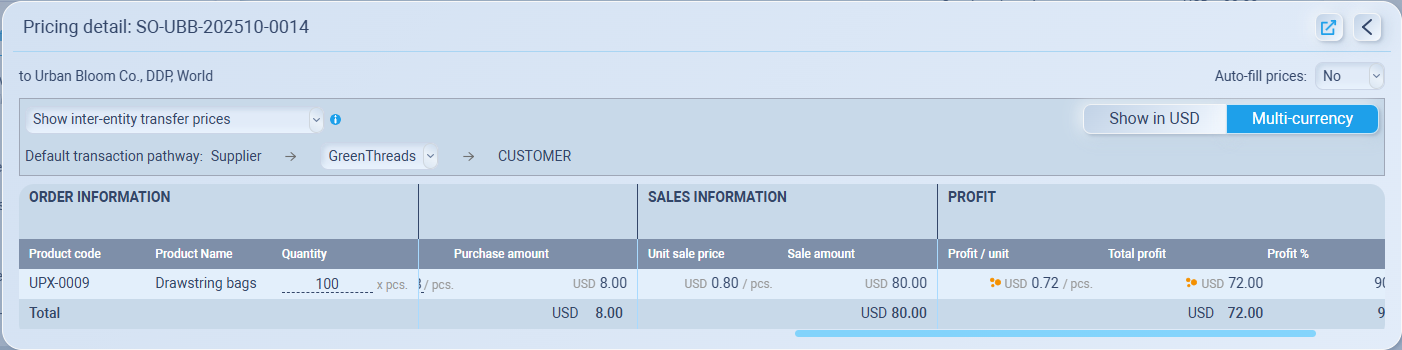
When you open Pricing Detail, you’ll see:
-
The product details (code, name, quantity, etc.)
-
Purchase price – how much you buy from your supplier
-
Sales price – how much you sell to your customer
-
Profit or margin between each step
In default, you’ll usually see a transaction pathway like this:
Supplier → Your company → Customer
This already includes your supplier cost, customer price, and profit automatically
View Modes
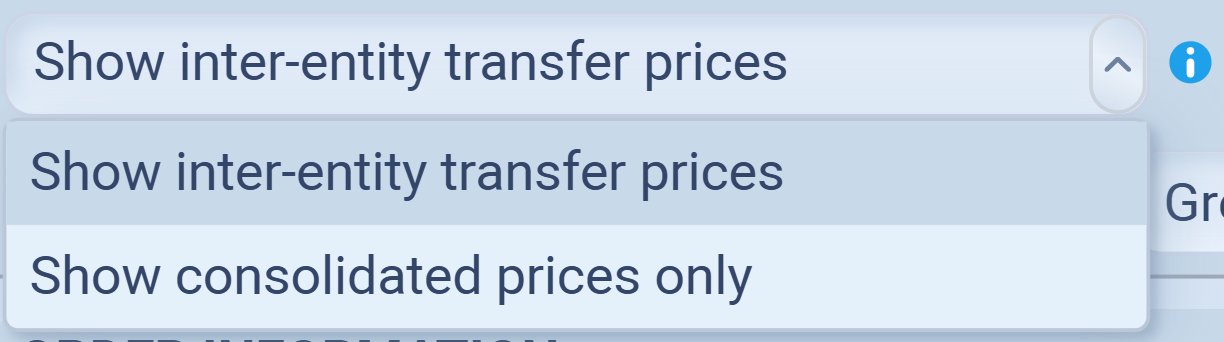
You can switch between two display modes:
-
Show inter-entity transfer prices — Displays all transaction layers between supplier, intermediaries, and customer.
-
Show consolidated prices only — Combines all layers into a single customer-facing price.
Transaction Pathway
Below the pricing mode, you’ll usually see the default transaction flow, for example: Supplier → your company → Customer

This means your trade path runs from an external supplier, through your company, to an external customer — which is the most common setup, also called a Single-entity model.
Single-Entity Model
Your company handles both buying and selling in one flow.
Example: Chinese supplier → Your company (in Bangkok) → US customer
In this case, you don’t need to add any extra entities.
The system already:
-
Shows supplier cost and customer price automatically
-
Tracks your margin between the two
-
Lets you open the transaction window anytime to review cost and price consistency
So if you only operate under one legal company, you’re already good to go — no extra setup needed.
Multi-Entity Model
If your business has more than one internal company (for example, a sourcing branch, trading company, or sales office under the same group), you can map those internal transfers here.
Example: Chinese supplier → Your company (in Bangkok) → Your company (in US) → US customer
In this case, you’ll need to add or adjust intermediate entities (for example, a Hong Kong sourcing branch or a U.S. distribution office).
This makes your internal pricing and profit tracking accurate across multiple companies
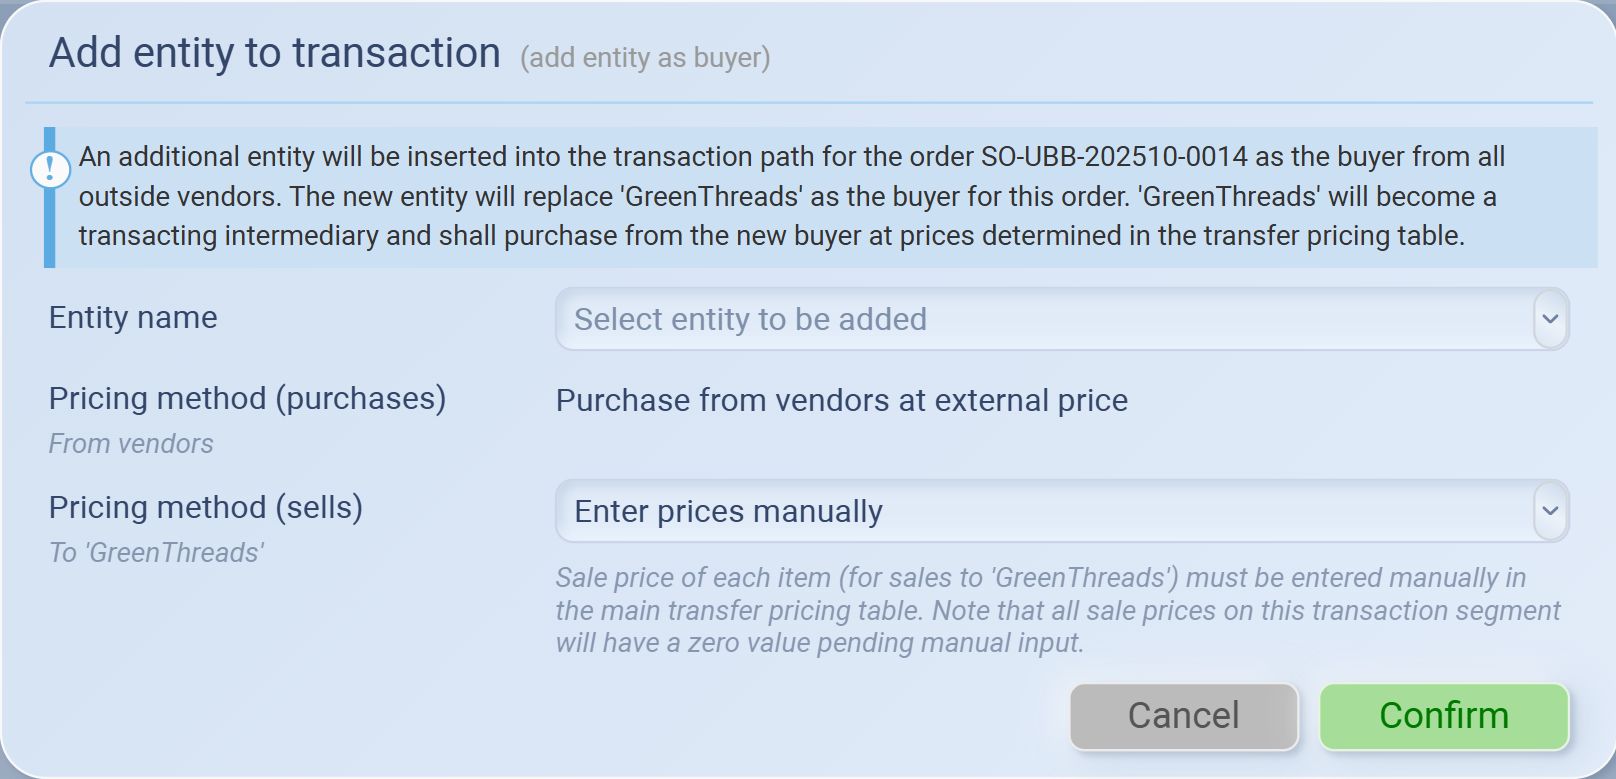
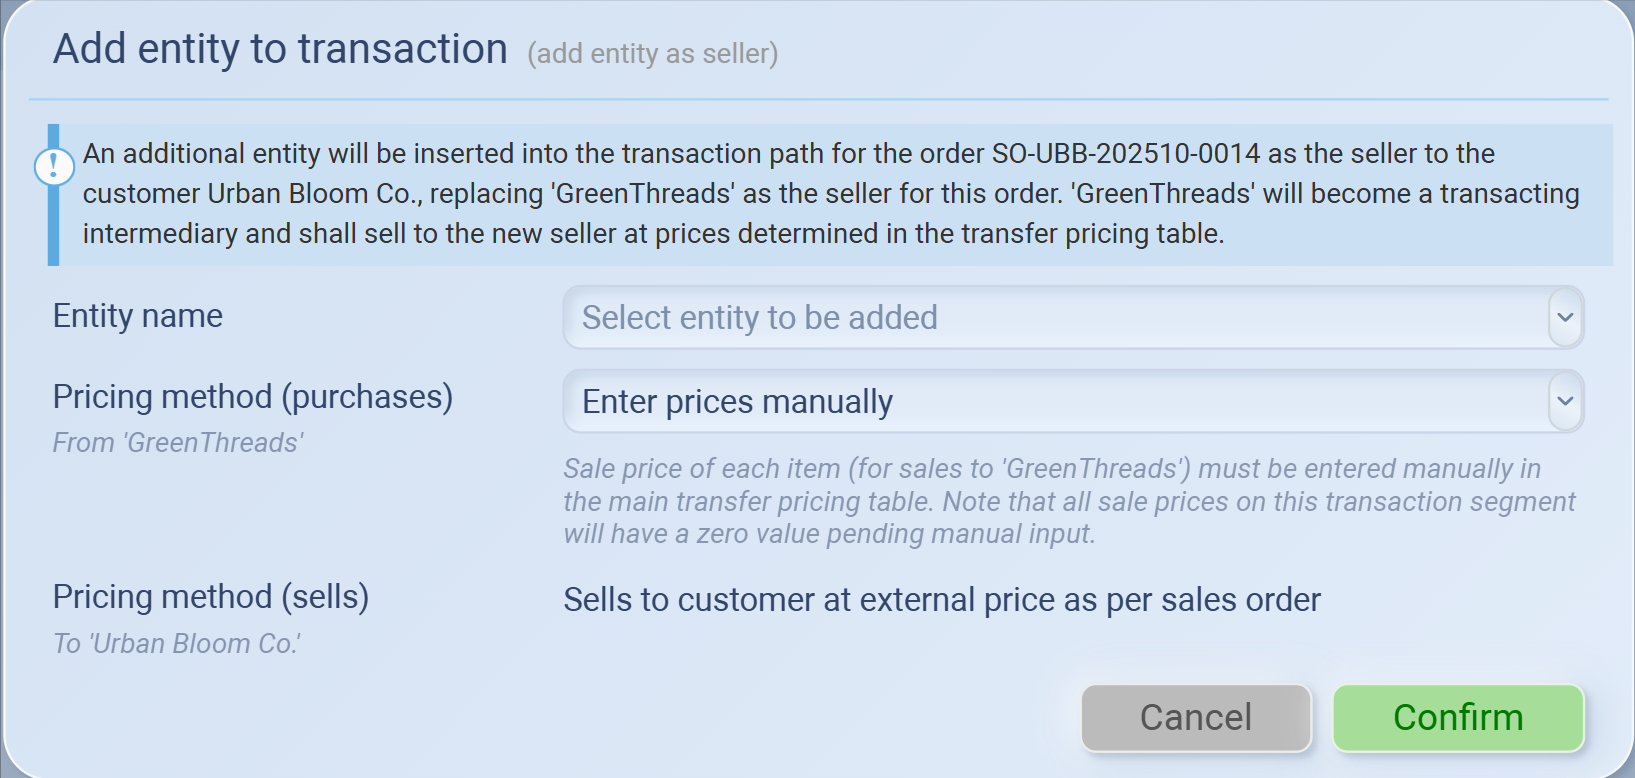
How to Add an Entity
You can insert new entities directly into the transaction pathway:
Hover between two entities** in the pathway — the system will highlight where the new entity will be inserted.
Click ➕ Add Entity between entity:
If inserted between a supplier and your trading company, it acts as a buyer.
If inserted between your trading company and a customer, it acts as a seller.
A popup window appears (the system automatically determines whether it’s added as a buyer or as a seller based on where you clicked).
Select:
Entity name – choose the company you want to insert.
Pricing method (purchases) and Pricing method (sells) – define how the entity’s internal buy/sell prices are calculated (e.g., External purchase price, Cost plus, Fixed resale margin, etc.).
Click Confirm to save.
Once confirmed, the new entity appears in the pathway, and the pricing table below updates with the revised purchase, sale, and profit details for each step.


-
You can switch between Show in USD and Multi-currency to view prices in one base currency or by each entity’s local currency.

-
Click the Export icon to download the pricing details as an .xlsx file for record keeping or reporting.
Step 4: Add Order, Shipping and Billing details
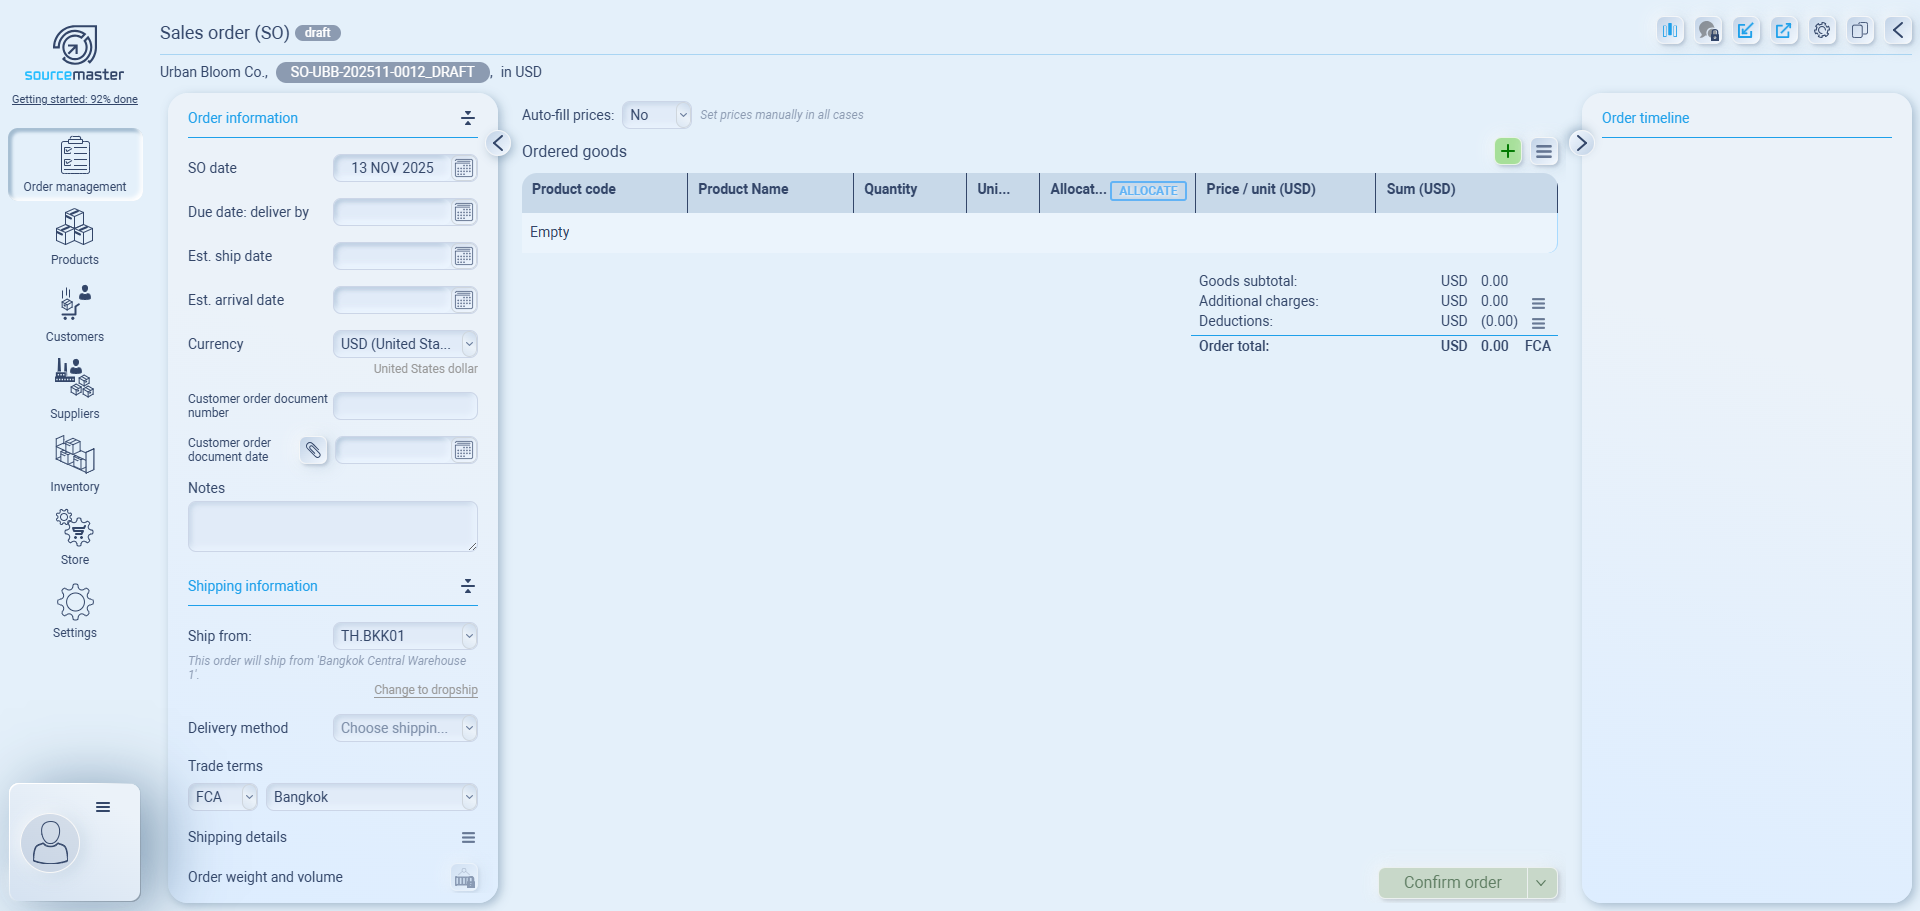
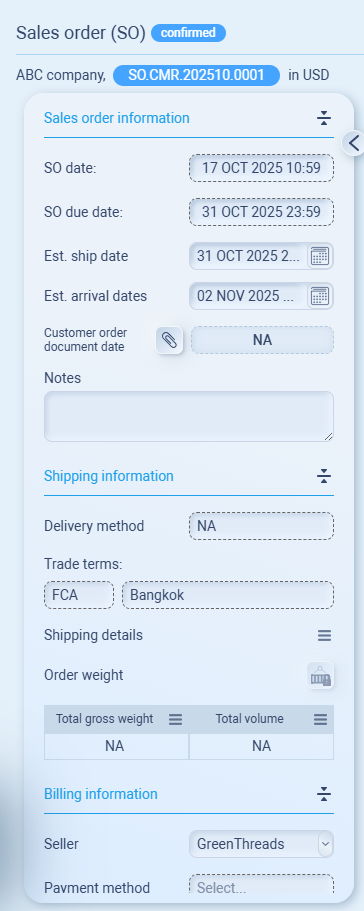
Order Information
The Order Information panel keeps all important details about your order’s dates, currency, and customer documents in one place.
It helps your team track timelines and ensure everything stays aligned from creation to delivery.
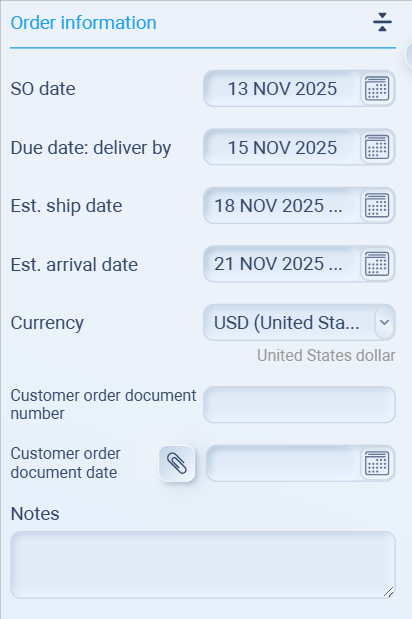
On the left side of your Sales Order page, you’ll see Order Information, Shipping Information, and Billing Information panels.
Start with Order Information.
| Field | Description |
|---|---|
| SO date | The date the Sales Order was created. It fills automatically but can be changed if needed. |
| Due date: deliver by | When the customer expects the order to be delivered. Use this to track internal deadlines. |
| Est. ship date | Enter the expected date when the goods will be shipped. |
| Est. arrival date | Enter the estimated arrival date (especially useful for international orders). |
| Currency | Select the currency used for this Sales Order. (The system will auto-convert based on your rate settings.) |
| Customer order document number | Optional: Add your customer’s reference number (e.g., PO number). |
| Customer order document date | Add the date of the customer’s order document if available. |
| Notes | Enter any internal remarks or special instructions related to the order. |
Tips
-
Keep dates accurate — they’ll sync with shipping and purchasing timelines.
-
If your customer’s order includes a formal PO, always fill in Customer order document number for easier cross-reference.
-
Use Notes to record information like “urgent shipment,” “awaiting design approval,” or internal handover remarks.
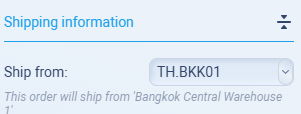
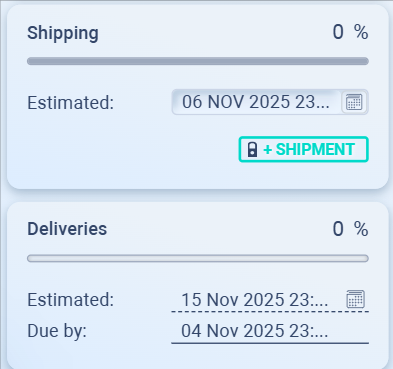
Shipping Information

The Shipping Information panel defines how and where the goods will be shipped.
It covers everything from warehouse origin and delivery method to detailed addresses for both buyer and seller.
Make sure this shows as Ship from: {your warehouse}
Main Fields
| Field | Description |
|---|---|
| Delivery method |
Select how goods will move:
|
| Trade terms |
Define who handles freight, insurance, and duties.
|
| Shipping details | Add notes such as tracking number, carrier, or packaging info. Click the detail icon to open the field. For the full guide, read below. |
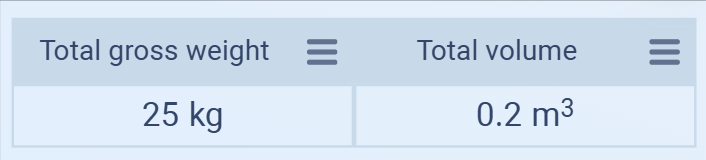
| Order weight and volume | Shows the total gross weight and total volume of all items in the order. These values are automatically calculated from each product’s weight and size in Product Details. You can also click the three-line icon (≡) beside each column to view a full breakdown of item weight or volume — calculated per product and multiplied by quantity.
 This opens the Shipping Estimator, where you can calculate freight cost based on container type, volume, and delivery method For the full guide, read below. |
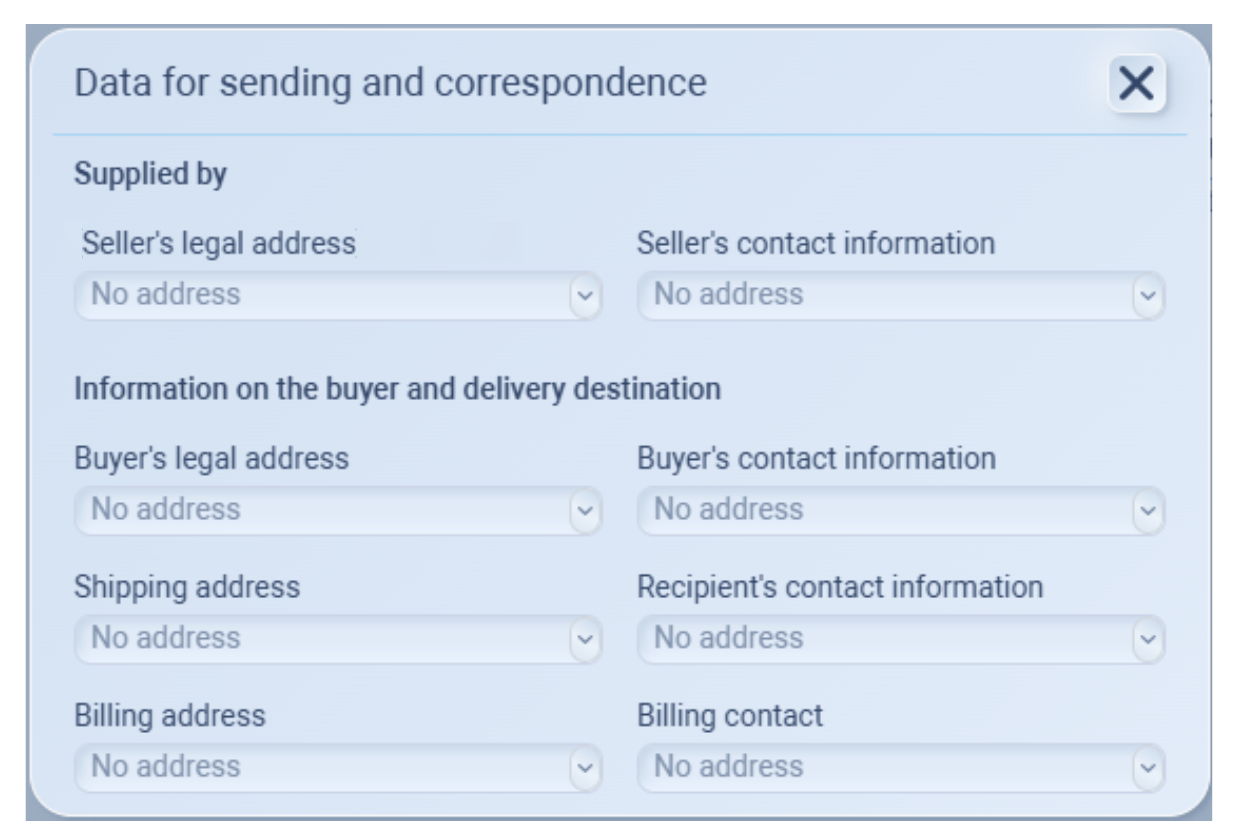
Shipping Details (Expanded View)
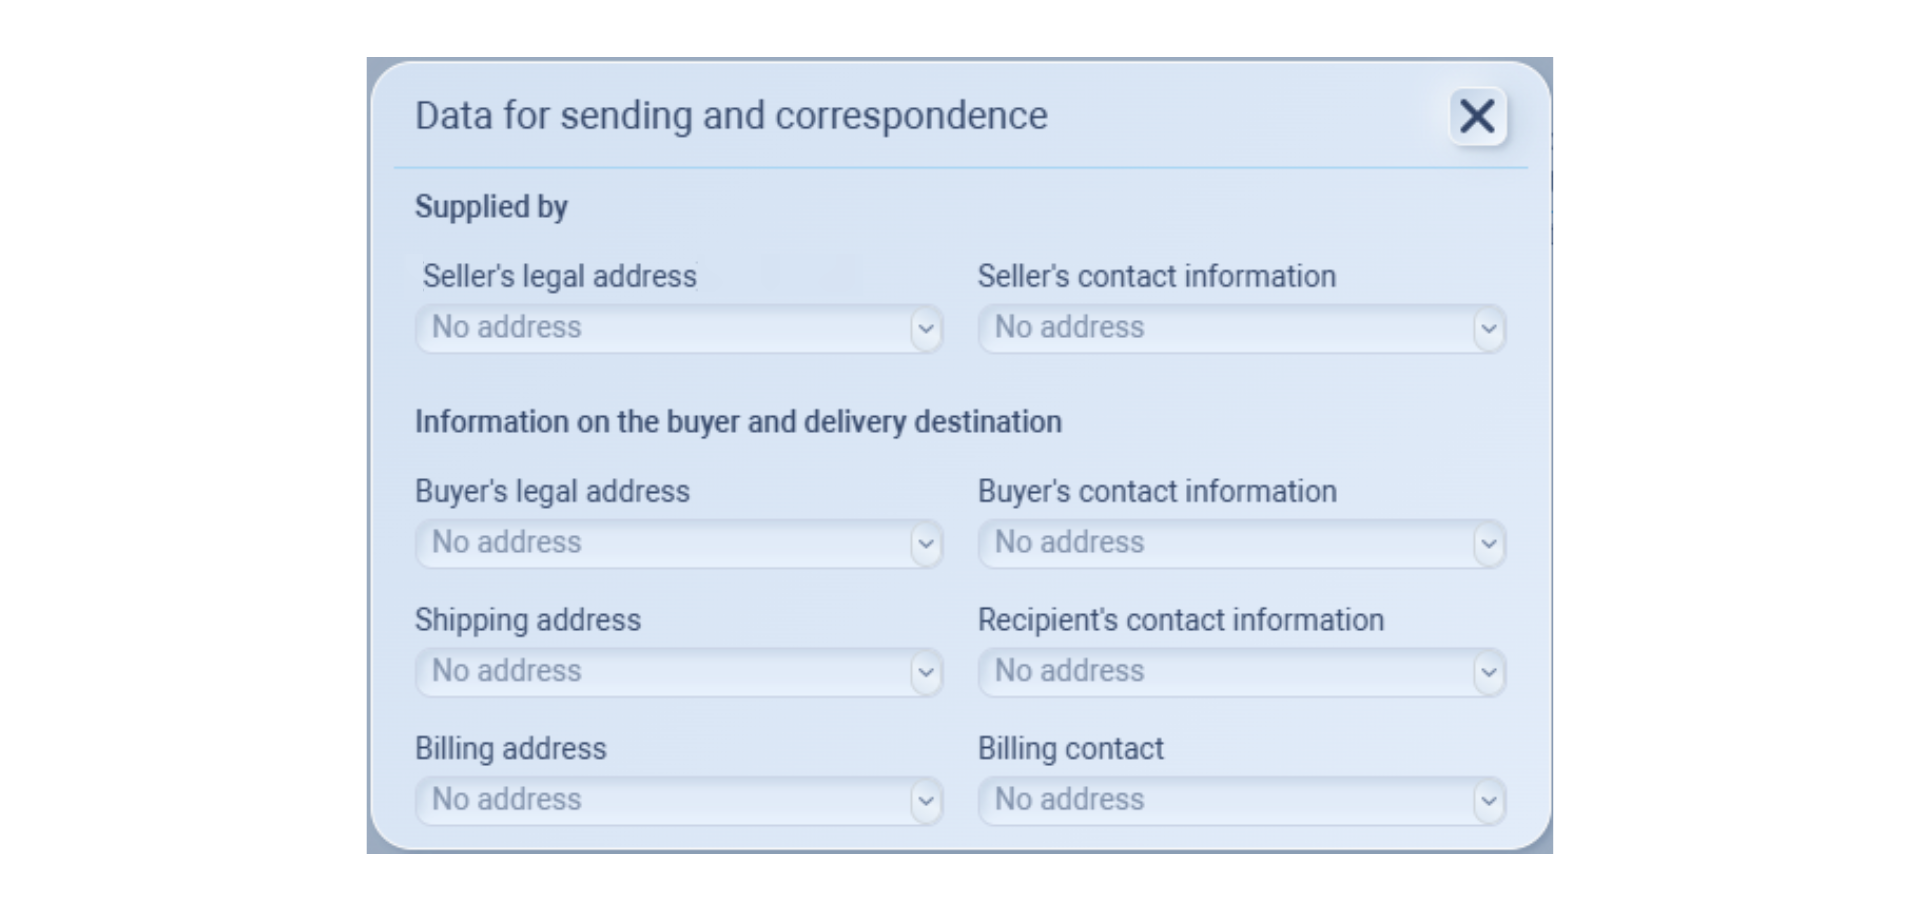
When you click Shipping Details, a pop-up titled Data for Sending and Correspondence appears.
This is where you manage all contact and address information related to the shipment.
Section Field Description Supplied by Seller’s legal address / contact info Select your selling entity’s legal address and contact person. Information on the buyer and delivery destination Buyer’s legal address / contact info Choose the customer’s registered business address and contact details. Shipping address / recipient’s contact info Define the actual delivery destination and contact person who will receive the goods. Billing address / billing contact Add the billing address and the person responsible for invoices or payments. This section ensures that all correspondence, shipping, and billing information is correctly linked to the order.
Tips
For Dropship, make sure the Supplier’s location matches the delivery point.
Always verify that weight and volume values are accurate in the product setup — they are automatically reflected here for logistics and freight planning.
.png)
Shipping Estimator
Overview
The Shipping Estimator helps you calculate approximate freight costs based on your order’s total weight and volume.
Step-by-Step
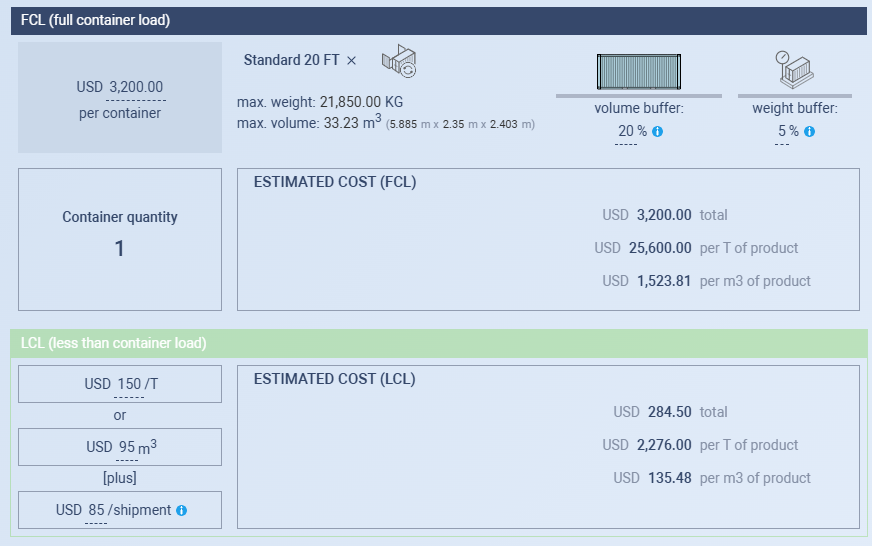
You can compare both FCL (Full Container Load) and LCL (Less than Container Load) options to see which one is more cost-efficient before confirming your order.
1️⃣ Review Order Data
At the top, verify:
Order number – Automatically filled.
Total weight and total volume – Calculated from your ordered goods.
Currency – Choose your working currency (e.g., USD).
You can toggle between:
FCL – Full container load.
LCL – Less than container load.
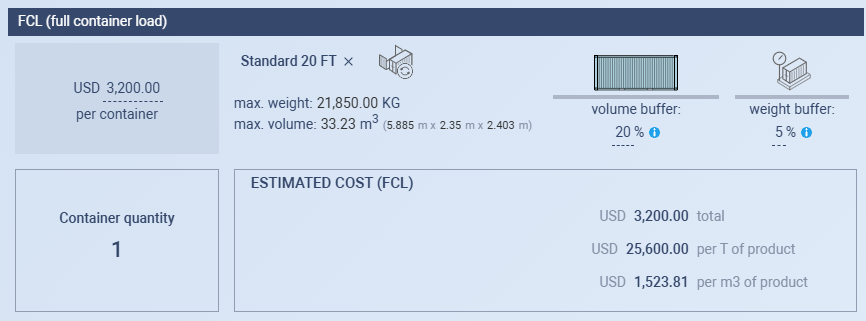
Enable one or both depending on your shipment type.2️⃣ FCL (Full Container Load)
If your goods fill a container or nearly do:
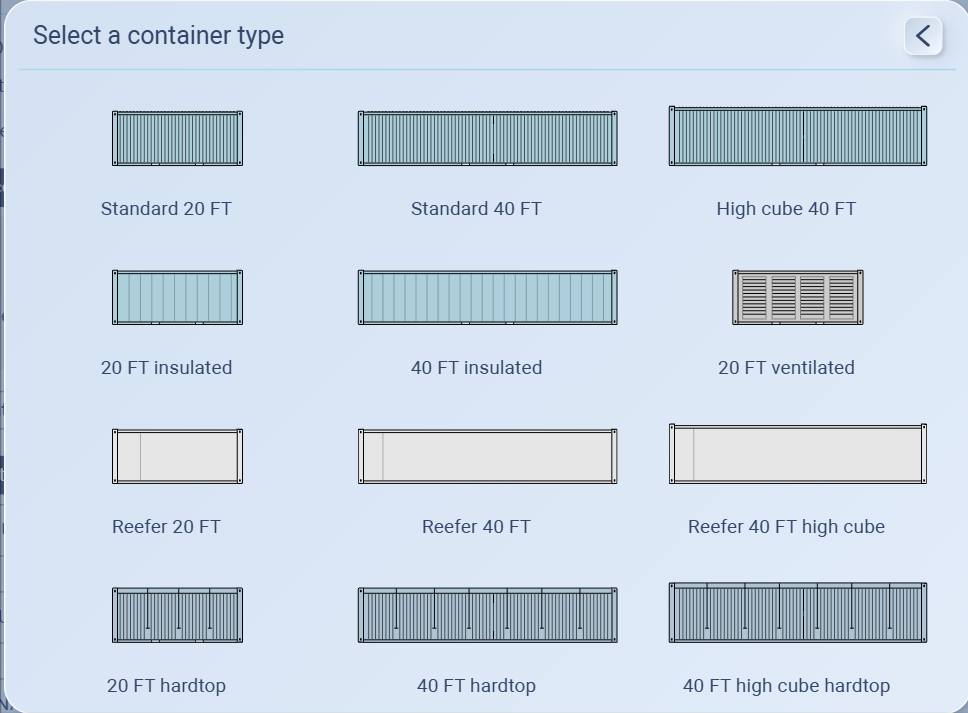
Click Select a container type and choose from the list (e.g., 20 FT Standard, 40 FT Standard, 40 FT High Cube).
Enter your freight rate per container
Review or adjust buffers:
Volume buffer (20 %) – Adds extra space margin for packaging.
Weight buffer (5 %) – Accounts for pallet or box weight.
Enter container quantity (e.g., 1).
The ESTIMATED COST (FCL) will be calculated automatically based on your input.
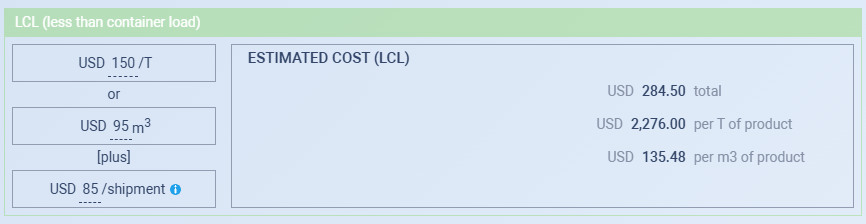
3️⃣ LCL (Less than Container Load)
For smaller or shared shipments:
Enter a freight rate per ton (T) or per cubic meter (m³).
Example: 80 USD/m³
Add any fixed cost per shipment (e.g., 30 USD for documentation/handling).
The ESTIMATED COST (LCL) is automatically calculated by the system.
4️⃣ Compare Results
Both estimated costs appear in their respective sections.
Use them to decide whether FCL or LCL is the better choice for your shipment.
Tips
Use FCL if cargo exceeds ~15 m³ or nearly fills a container.
Use LCL for small or partial shipments.
Keep default buffers (20 % volume / 5 % weight) for realistic calculations.
Estimates are for internal planning only; final charges depend on your forwarder.

Billing Information
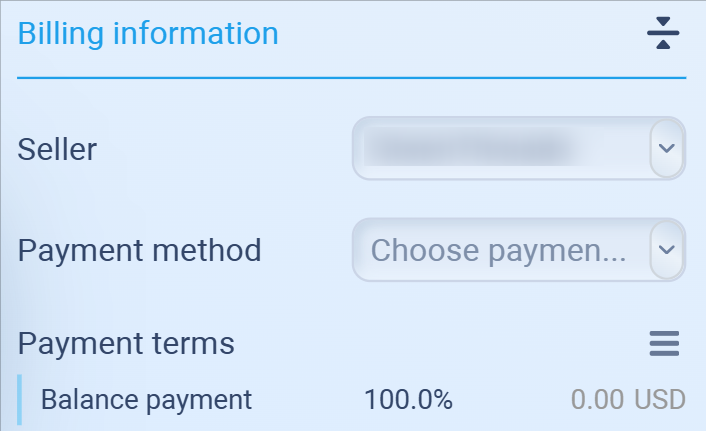
The Billing Information panel manages how payments are handled for each Sales Order.
It includes the seller’s billing identity, the customer’s payment method, and detailed payment term setup.
Main Fields
| Field | Description |
|---|---|
| Seller | The selling entity or branch responsible for invoicing this order If you're running a single entity, just choose your company; if you're running a multi-entity, choose the company that is responsible for the selling activity (for this order). |
| Payment method |
Choose how the customer will pay (currently, sourcemaster only supports bank transfer). |
| Payment terms | Define how and when payments are due. Click the list icon to open detailed terms and conditions. For the full guide, read below. |
Payment Terms

Click the three-line icon beside Payment terms to open the Payment Terms pop-up.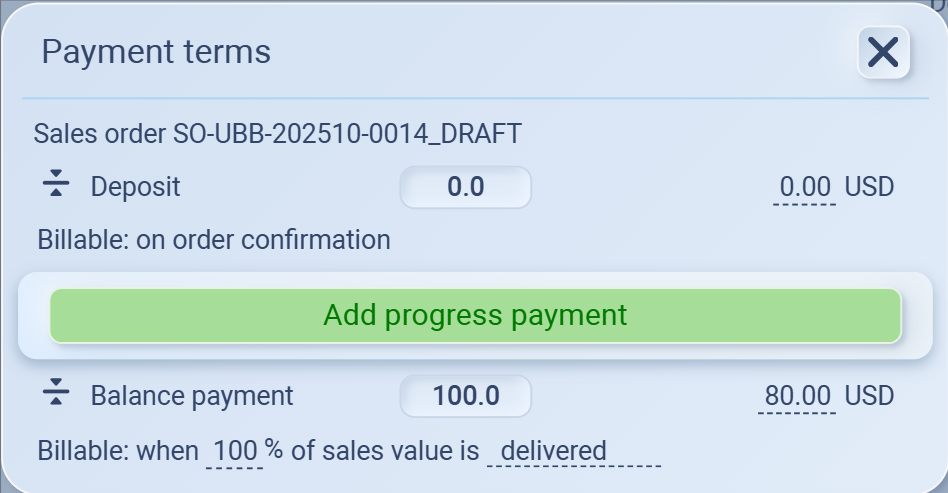
Here, you can define the structure of payments — such as deposits, progress payments, or final balance payments.
| Field | Description |
|---|---|
| Deposit | Set an upfront payment percentage or amount (e.g., 30%). You can mark it as Billable on order confirmation. |
| Progress payment | Optional. Click Add progress payment to define additional payments at specific production or shipment milestones. |
| Balance payment | The remaining amount to be paid after earlier payments are made. You can set the trigger condition — Produced, QCed, Shipped, or Delivered. |
Tips
Always confirm the Payment method and terms before sending order confirmations or invoices.
Use progress payments when handling large or multi-stage orders (e.g., custom production).
Choose the correct billing trigger to align with your internal policy — QCed for inspection-based billing or Delivered for completed orders.
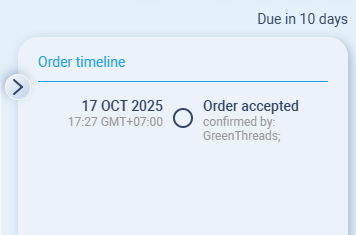
Order Timeline
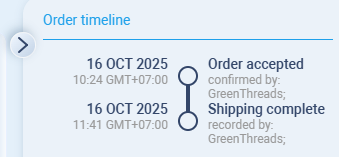
The Order Timeline panel shows the full activity history of your Sales Order — from creation to delivery.
It helps you track every key action, who performed it, and when it happened.
What You’ll See
Each timeline entry includes:
-
Date and time of the activity (with timezone).
-
Action performed (e.g., Order accepted, Shipping complete, Delivered).
-
Recorded by the user or entity who performed that action.
Why It Matters
-
Keeps all order events visible in one place.
-
Improves transparency across teams (sales, purchasing, warehouse, finance).
-
Useful for audits, customer service, and performance tracking.
Tips
-
The timeline updates automatically as actions are completed (e.g., allocation, shipment, invoice).
-
You can hover over entries to view additional details when available.
-
Use this to confirm key milestones before closing or invoicing an order.
Confirming the Sales Order
Once all details in your Sales Order are complete — including products, shipping, billing, and allocation — the next step is to confirm it.
Confirming an order moves it out of the draft stage and begins the fulfillment process.
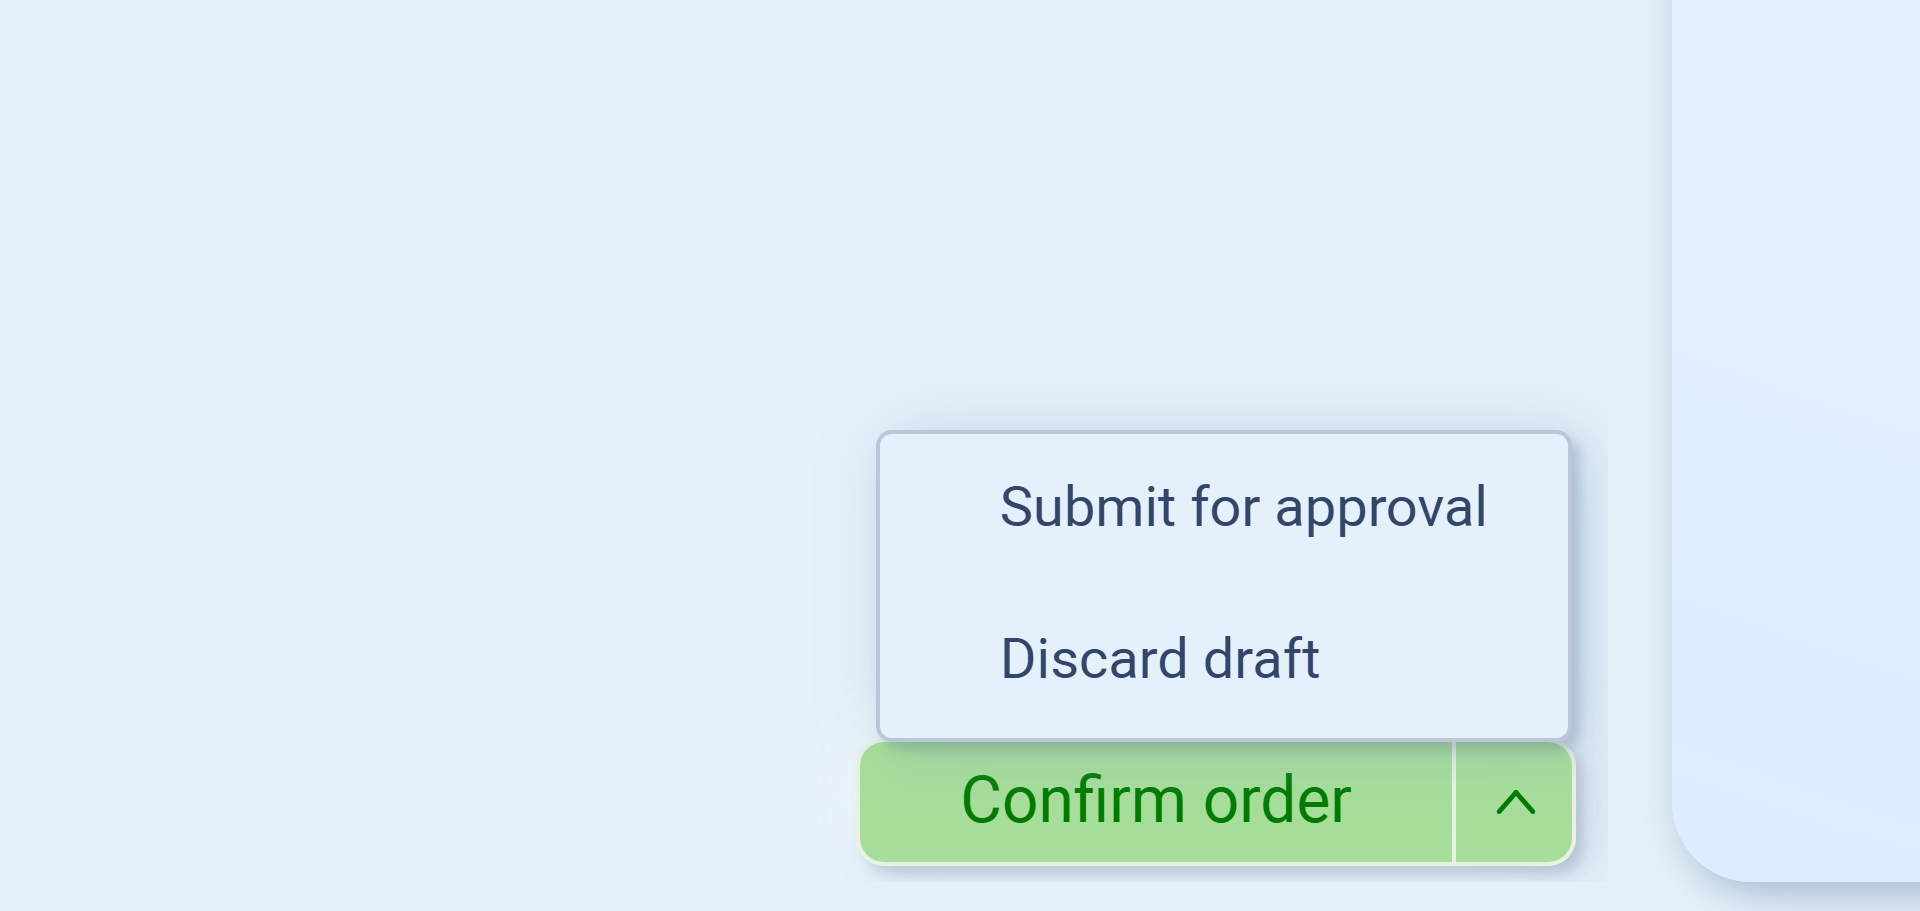
Actions Available
| Action | Description |
|---|---|
| Confirm order | Finalizes the Sales Order and records it as an active, confirmed order. This allows related actions like purchase creation, shipment, and invoicing to proceed. |
| Submit for approval | Sends the Sales Order for internal review if your company uses an approval workflow. Use this when another person (e.g., manager or supervisor) needs to approve before confirmation. |
| Discard draft | Cancels the draft order. Use this if you want to delete or restart the Sales Order creation process. |
How to Confirm
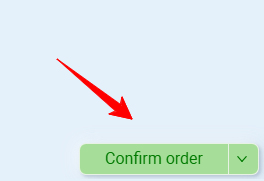
Click the green Confirm Order button in the lower-right corner of the Sales Order page.
If approval workflows are enabled, you can also click the dropdown arrow to choose Submit for approval instead.
Once confirmed:
-
The order status changes from Draft to Confirmed.
-
The order becomes visible in Order Timeline as Order accepted.
-
Linked workflows (like Purchase Orders or Deliveries) can now be created.
Tips
Always review the order carefully before confirming — once confirmed, changes may require revision or cancellation.
Use Submit for approval when multiple team members handle validation or pricing review.
You can monitor all order events and status updates in the Order Timeline panel on the right.
Before Confirming the Order
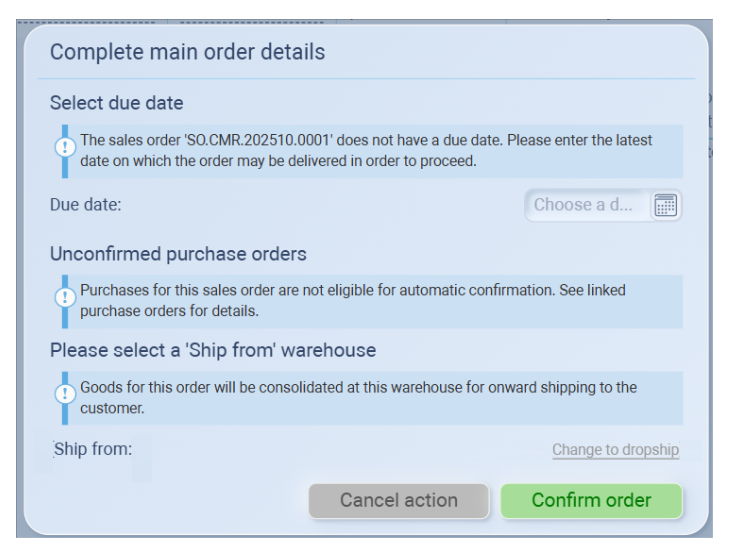.png)
When you click Confirm Order, the system checks whether all key order details are complete.
If anything important is missing, a window titled Complete Main Order Details will appear.
Fields to Review Before Confirmation
| Field | Description |
|---|---|
| Due date | The system requires a delivery due date before the order can be confirmed. Enter the latest date the goods are expected to be delivered to the customer. |
| Unconfirmed purchase orders | If there are linked Purchase Orders that are still drafts, you’ll be reminded to review them first. These must be confirmed before automatic confirmation can proceed. |
| Ship from | Specify the warehouse where goods will be consolidated for shipment. If your fulfillment is direct (suppliers ship to customer), click Change to dropship instead. |
Tips
Always set a Due date to help track delivery expectations and production timelines.
Confirm all related Purchase Orders if you want automatic fulfillment to trigger correctly.
Choose the correct Ship from warehouse to ensure items are dispatched from the right location.
Once all fields are complete, click Confirm Order again to finalize.
Confirmed Sales Order (SO) phase
Once the Sales Order (SO) Is Confirmed
Once we confirm the SO, the order becomes official.
The system moves it out of draft and marks it as active.
You’ll also see the update in the Order Timeline, where the status changes to “Order accepted”.
At this stage, the customer has placed the order, payment is recorded or verified, and now it’s time to prepare the goods and plan the inbound shipments from suppliers.
Since this is a consolidation-at-our-warehouse case, you’ll be handling the goods directly.
You’ll confirm your Purchase Order (PO) with each supplier, have them ship to your Bangkok warehouse, and prepare everything for a single outbound shipment to the customer.
Think of your warehouse as the central hub: suppliers send goods to you, you consolidate them, and you manage the final delivery to the customer.
🧭 Tabs Overview
After confirming the order, you’ll see five main tabs appear at the top:
These tabs let you switch between different operational views and track your order across departments.
| Tab | Purpose |
|---|---|
| Ops View | The main operational view. This is where you handle fulfillment — shipping details, supplier updates, and delivery confirmation. This tab defines the next step in your process. |
| Sales View | Shows product details, sales prices, and supplier allocations. This is where you review the main order information — what was sold, at what price, and who’s supplying it. |
| Inter-Entity View | Displays pricing and profit flow between supplier, you, and customer. For single-entity workflows, it helps you check cost, sale price, and profit margin. |
| Collections | (Coming soon) Designed to track payment collections and customer balance. |
| Profitability | Gives a full summary of your total cost, sales revenue, and margin once the order is fulfilled. |
Next, we’ll walk you through each tab step-by-step —
starting from Sales View, then Inter-Entity View,
Profitability, and finally Ops View,
which is the most important tab to finalize before marking your order as Delivered.
Sales View
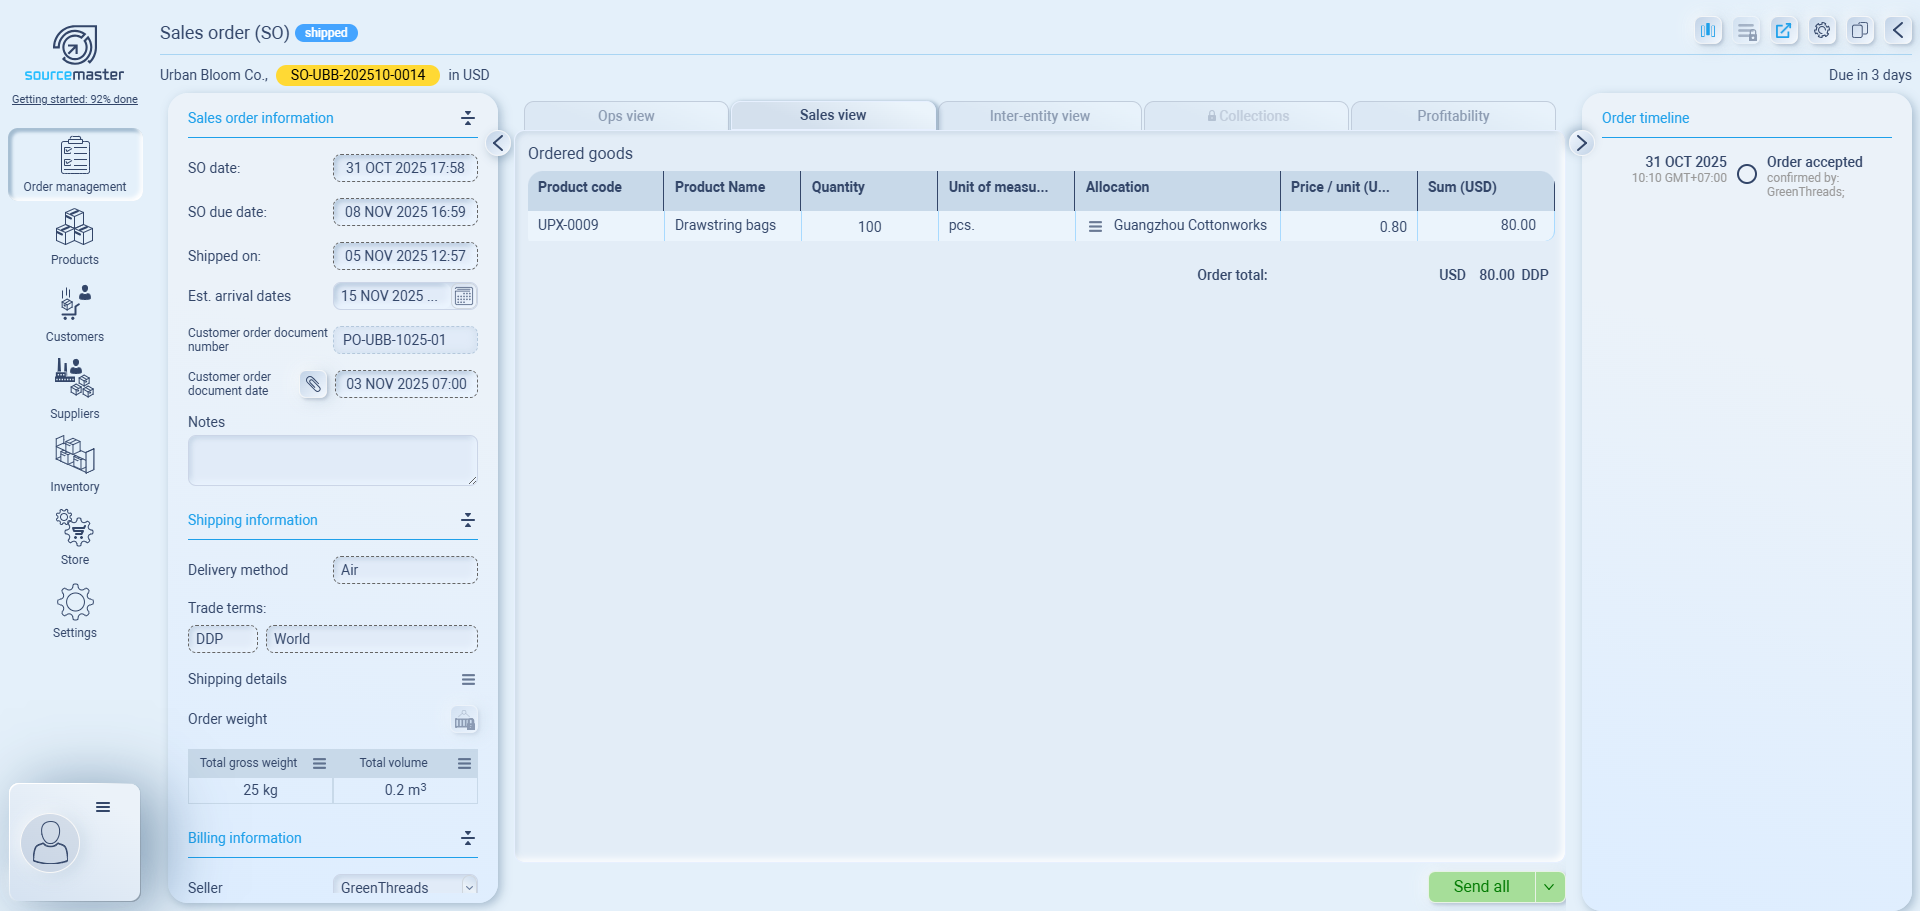
The Sales View tab lets you review all sales-related details of the order after it’s created.
It’s similar to what you set during the Sales Order draft, but presented in a complete, read-only format for tracking and updates.
You can see:
-
Sales order information – SO date, due date, shipment date, and estimated arrival.
-
Customer order details – their PO number, document date, and any internal notes.
-
Shipping information – delivery method, trade terms, and order weight/volume.
-
Ordered goods – product list, quantities, selling prices, and supplier allocations.
-
Order timeline – tracks when the order was accepted, shipped, or completed.
It’s mainly used for checking order accuracy, tracking shipment progress, and confirming alignment between your sales records and supplier actions — especially useful in dropship or direct-fulfillment orders where everything happens quickly.
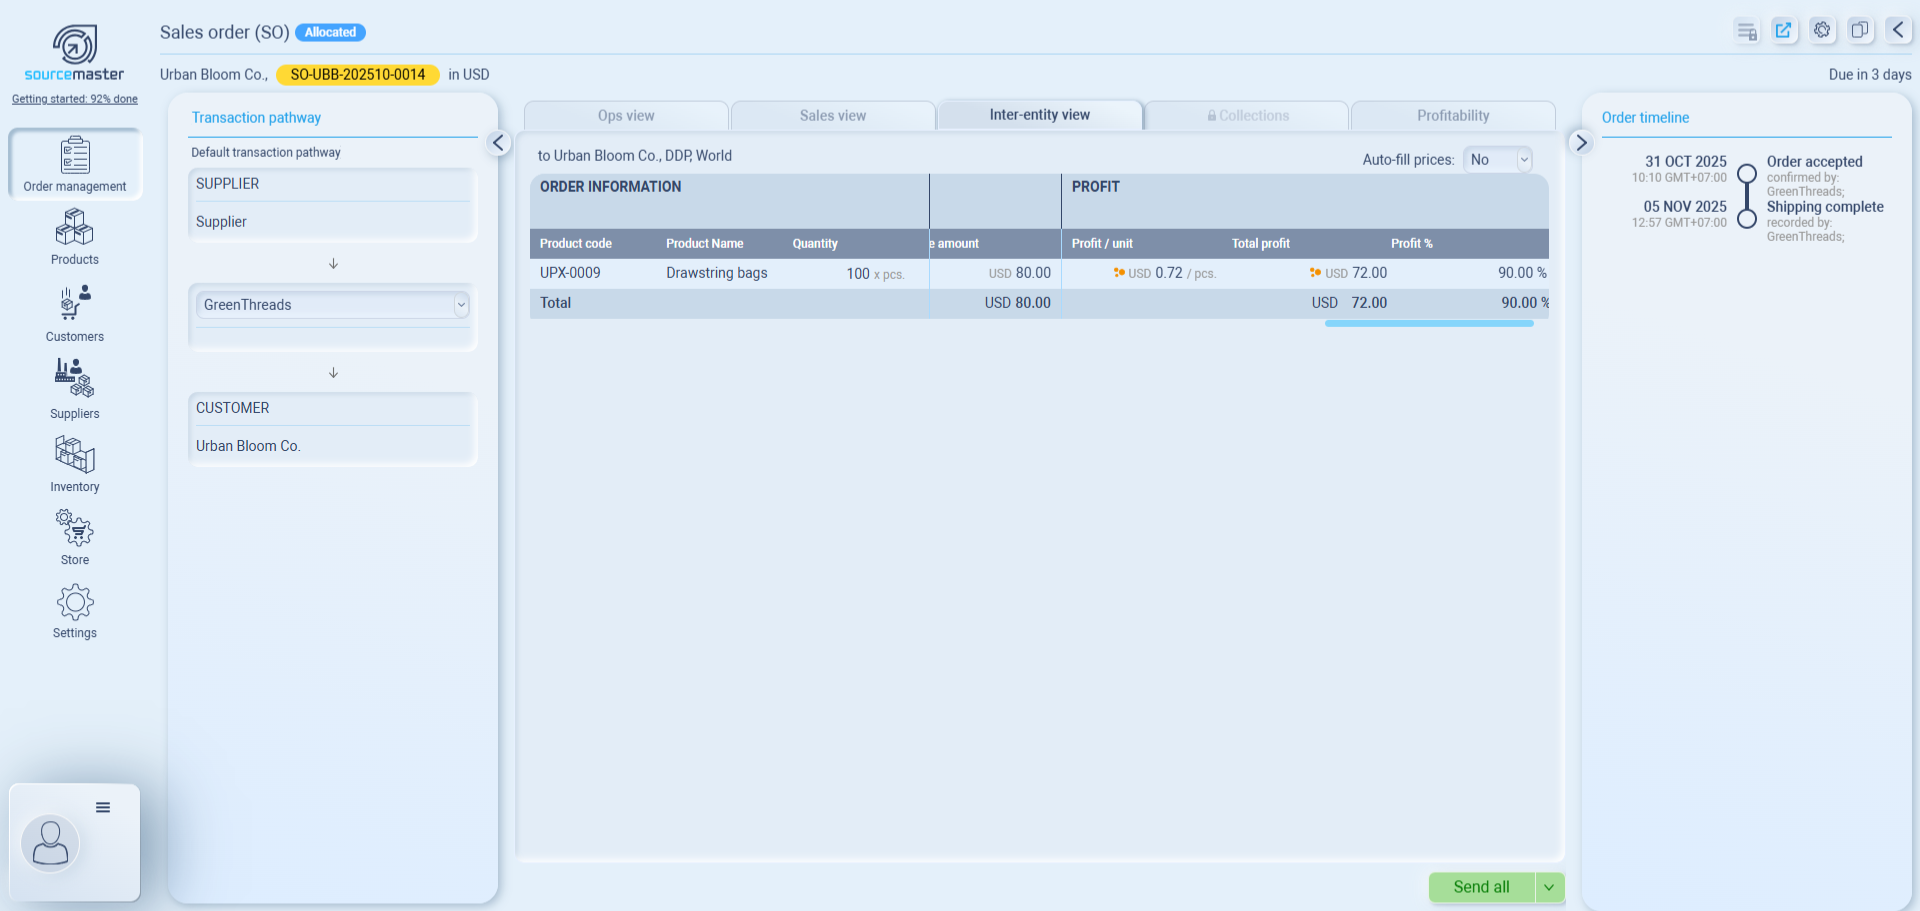
Inter-Entity View
Inter-Entity Pricing Detail
.png)
The Inter-Entity View helps you review how goods, prices, and profit flow between your supplier and customer for each sales order.
Even if you’re operating under a single entity (as in most dropship cases), this view is useful for checking cost, sales price, and margin in one place.
What You’ll See
On the left, you’ll see your Transaction Pathway, which outlines who’s involved in the trade:
Supplier → Your Company (e.g., GreenThreads) → Customer
On the right, you’ll see a detailed table showing:
-
Purchase amount – total cost from the supplier.
-
Sales information – your selling price per unit and total sales value.
-
Profit – how much you earn per unit, total profit, and percentage margin.
This makes it easy to confirm that your pricing structure is correct before finalizing or reporting the order.
Why It’s Helpful
For dropship and single-entity operations:
-
You can instantly see your profit margin for each product.
-
Verify that cost and sale values match what you agreed with the supplier and customer.
-
Confirm that the system correctly applies all pricing data from your Pricing Detail setup.
For multi-entity users:
-
The same view expands to show transfer prices between branches, helping track profit across each entity.
🧩 Example
In this case:
Guangzhou Cottonworks → GreenThreads → Urban Bloom Co.If the supplier sells at USD 0.08/unit and you sell to the customer at USD 0.80/unit,
the table automatically calculates:
Profit per unit: USD 0.72
Total profit: USD 72.00
Profit margin: 90%
So at a glance, you can confirm that the trade flow and profit breakdown make sense.
💡 Tip
- You don’t need to add extra entities for dropship orders. Simply review the Inter-Entity View after confirming your Pricing Detail — it gives you a quick, transparent summary of the deal’s cost, price, and margin before closing the order.
-
If you see this orange dot icon, it means the current exchange rate used in your order was set a while ago.

The system suggests updating it to ensure your pricing and profit calculations stay accurate.Click the icon to open the Update Exchange Rate window.
Here, you can:-
Review the existing rate (shown as the default rate).
-
Enter a new, more accurate exchange rate.
-
Set the effective date for when the new rate applies.
Once done, click Confirm — the system will automatically recalculate all currency conversions in the order based on the new rate.
-
Profitability View
The Profitability View gives you a clear snapshot of how much you’re making from an order — comparing your supplier costs to customer sales and showing the profit margin in real time.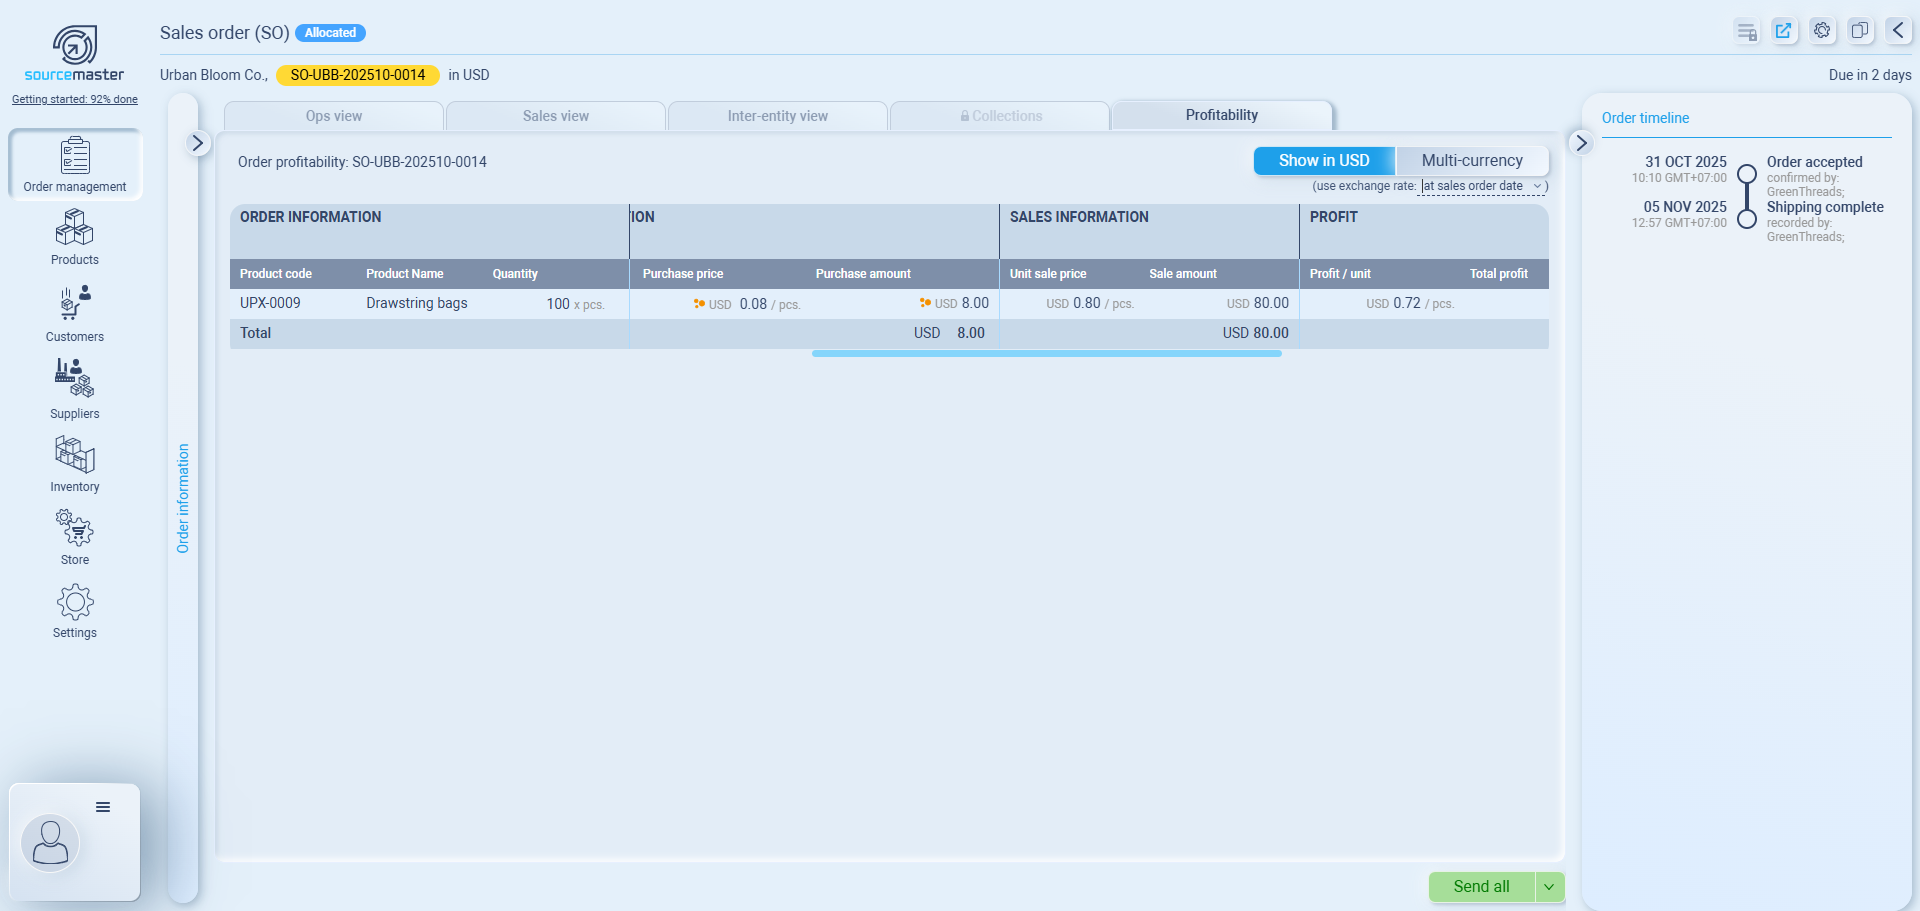
If you’ve already looked at the Inter-Entity View, this table will look familiar.
It works the same way but focuses more on the final profit analysis, not internal pricing layers.
.png)
🧾 In a Dropshipping Case
In a dropship order (where there’s just one supplier and no internal entities),
the Profitability View is quite straightforward:
you’ll only see the supplier’s cost, your customer’s sale amount, and the system-calculated profit.
| Section | Details |
|---|---|
| Purchasing Information | Displays the supplier, purchase price per unit, and total supplier cost (from the linked PO). |
| Sales Information | Shows the unit selling price and total sale amount as per the SO. |
| Profit | Automatically calculates your profit per unit, total profit, and margin percentage based on purchase vs. sale values. |
💱 Viewing in Main or Multi-Currency
You can toggle between Show in USD (main currency) and Multi-currency at the top-right corner.
-
Multi-currency: Displays both supplier and customer currencies (e.g., CNY for supplier, USD for customer).
-
Main currency (USD): Converts all values into your main company currency for easier comparison.
When viewing in main currency, Sourcemaster automatically converts costs and prices based on the exchange rate.
You can choose which rate to apply from the dropdown under the toggle: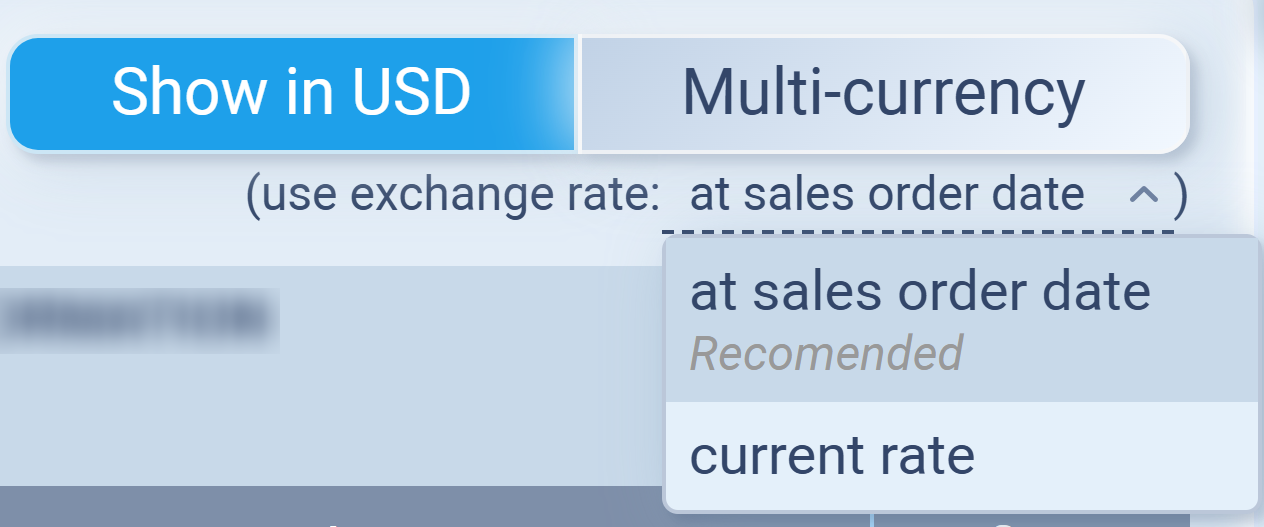
-
At sales order date (Recommended): Shows conversion using the exchange rate active at the time the SO was created. This gives a consistent snapshot for reporting and audit purposes.
-
Current rate: Updates the numbers using the most recent exchange rate available, useful for reviewing today’s equivalent value.
💡 Tip: If you see an orange rate icon ⚪, it means your exchange rate might be outdated — click it to review or update to the latest rate.
Example
In this order:
Supplier: Guangzhou Cottonworks (CNY 0.60 / pcs → CNY 60 total)
Customer: Urban Bloom Co. (USD 0.80 / pcs → USD 80 total)
Profit margin: 90% (≈ USD 72.00 total profit)
Once you’ve reviewed the profitability and confirmed that your exchange rate and margin look right,
you can move on to the Ops View, where you’ll handle shipment and confirm delivery.
The Profitability View gives you a full picture of your confirmed sales order — showing how each product contributes to your total cost, sales value, and margin.
It summarizes both operational and financial performance of the order.
1. ORDER INFORMATION
Shows the same breakdown as in the inter-entity view, including:
-
Product code / name – identifies each item in the sales order.
-
Quantity – number of units ordered.
This section helps you see each item’s source and quantity distribution.
2. COST INFORMATION
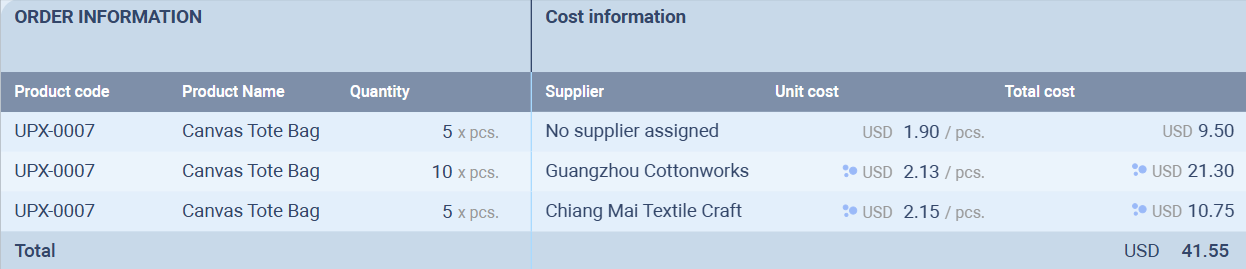
Displays how much the products cost you to acquire or produce.
Columns include:
-
Supplier – where the product comes from (or No supplier assigned if from inventory).
-
Unit cost – cost per piece (converted to your reporting currency).
-
Total cost – total purchase or production cost per product line.

That blue icon next to the currency (USD) indicates that the value shown has been converted using your configured exchange rates.
In other words:
-
The system automatically converts supplier or inter-entity costs into your base reporting currency (USD).
-
The conversion rate applied depends on your Exchange Rate Settings at the time of the transaction or confirmation.
So when you see this symbol, it means:
“This amount was originally recorded in another currency but is displayed here in USD according to your exchange rate setup.”
📊 3. SALES INFORMATION
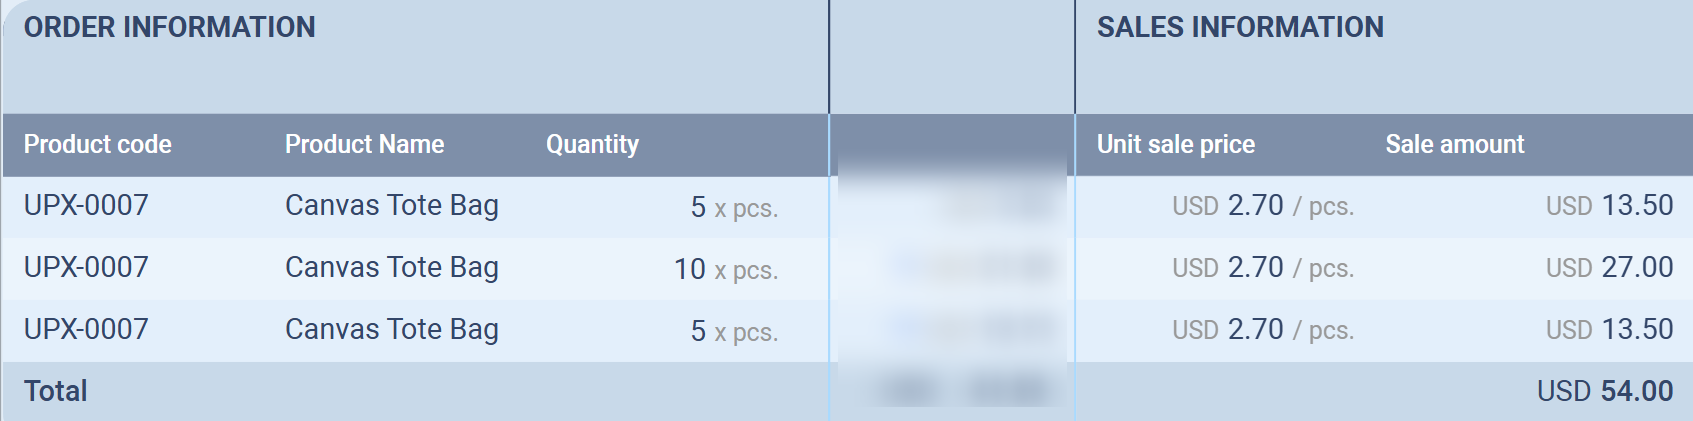
Lists your selling prices to the customer for comparison:
-
Unit sale price – selling price per unit.
-
Sale amount – total value of that line item.
These values are pulled directly from the Sales Order details.
📈 4. PROFIT

This section automatically calculates your profitability per product line and overall:
-
Profit / unit – difference between sale and cost per item.
-
Total profit – profit from that product line (quantity × profit/unit).
-
Profit % – profit margin relative to the sale price.
🌍 Currency & Exchange Rate Settings
At the top-right of the Profitability View, you can choose how to display your financial data:
-
Show in USD – converts all figures into your reporting currency for clear profit analysis.
-
Multi-currency – displays each item in its original transaction currency (useful for supplier or regional comparison).
Below that, you can select how the system applies exchange rates:
-
At sales order date (Recommended) – locks the exchange rate based on the date the Sales Order was confirmed.
This ensures consistency between recorded costs, sales, and profit over time.
-
Current rate – uses the most recent exchange rate available.
Useful for reviewing how currency fluctuations would affect your profitability today.
Sales Order Information
-
Displays key dates and reference details:
-
SO Date – When the order was created.
-
SO Due Date – The committed delivery deadline.
-
Est. Ship Date / Est. Arrival Date – Your planned logistics timeline.
-
Customer order document – Optional reference from the buyer (e.g., PO number).
-
-
You can still add notes for internal reference.
Shipping Information
-
Shows the trade terms, delivery method, and ship-from location.
-
The Order weight and volume fields will automatically calculate once item details and product weights are set.
-
This section helps logistics teams understand how and from where the goods will move.
Billing Information
-
Displays the seller entity (e.g., GreenThreads), payment method, and payment terms.
-
These details will be used when generating invoices later in the process.
Order Timeline (Right Panel)
-
Tracks real-time order events, such as:
-
Order accepted by [Seller]
-
Shipping complete
-
Delivered
-
-
This timeline updates automatically as fulfillment progresses through linked Purchase Orders or delivery documents.
Ops View
The Ops View gives you full visibility into how your confirmed Sales Order will be fulfilled.
.png)
Here, you can see where each item will come from — which suppliers are producing it, which warehouses are providing stock, and how far along each source is in the fulfillment process.
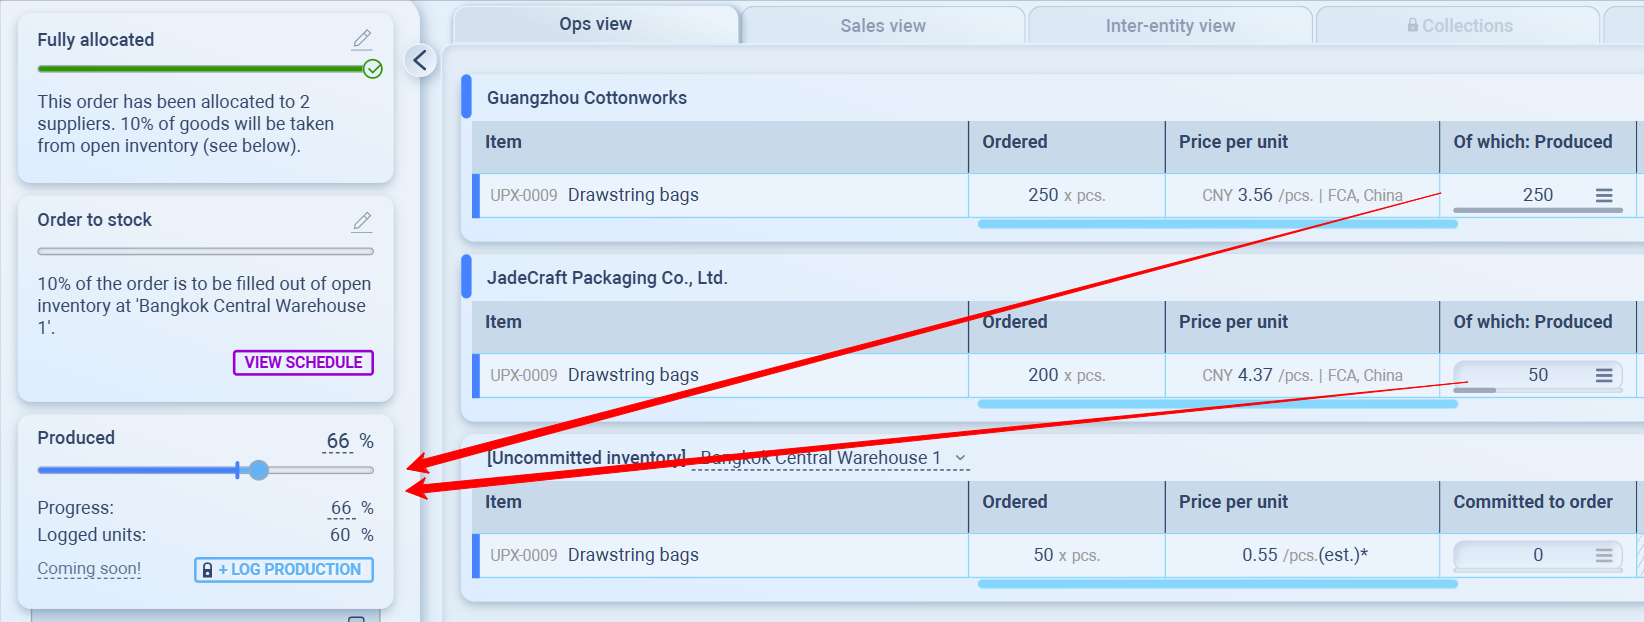
🔎 Track Supplier & Inventory Progress (Seller Consolidation)
When your Sales Order reaches the Allocated stage, the Ops View shows exactly how the order is being sourced.
In this case, the 500 pcs of Drawstring Bags UPX-0009 are coming from three places:
two suppliers + your own warehouse stock.
Each supplier row shows how many pieces they’re producing, the unit cost, and the linked Purchase Order (PO).
Your inventory row shows how many pieces you already have in stock and will use for this order.
Because this is a seller consolidation workflow, all sources — supplier goods and your stock — are scheduled to arrive at Bangkok Central Warehouse.
This is where you handle QC, timing, and final consolidation before shipping everything out to the customer as a single shipment.
1️⃣ Open the Linked Purchase Order

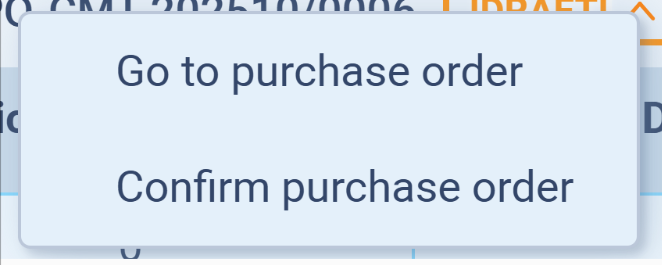
Click the DRAFT tag beside the PO number.
You’ll see two options:
-
Go to purchase order → to review and edit details.
-
Confirm purchase order → to confirm supplier acceptance.
We strongly suggest choosing Go to purchase order.
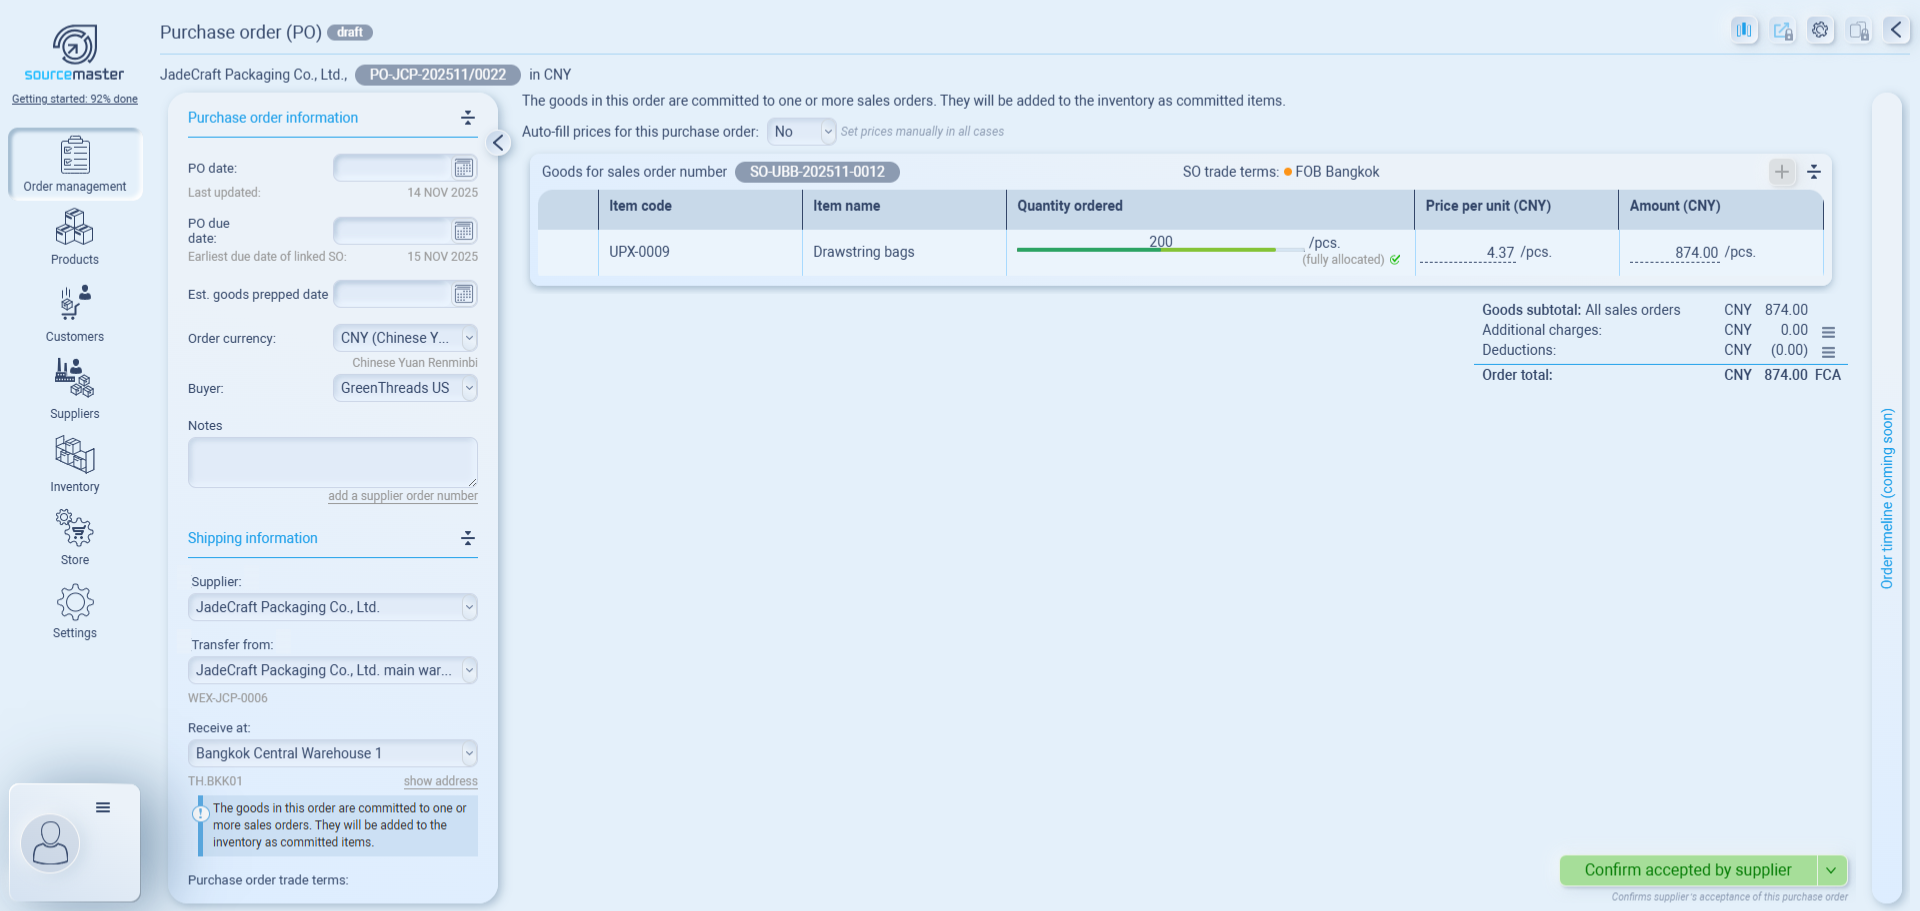
2️⃣ Review and Update PO Information
.
Once you go to the purchase order (PO), the PO is still in Draft, which means the system assumes it hasn’t been sent to the supplier yet.
.png)
Before confirming, make sure to: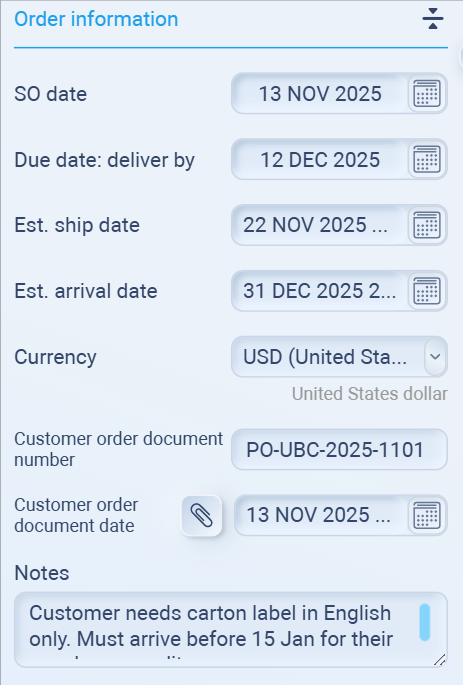
-
Set PO Date and PO Due Date.
-
Add Estimated goods prepped date based on your supplier’s schedule.
-
Coordinate with your supplier for confirmation.
Once the supplier accepts, click Confirm accepted by supplier to mark the PO as Confirmed. This indicates the supplier has acknowledged and begun processing the order.
But sometimes, you might need to get internal approval or wait for your supplier’s response before confirming the PO.
Or, if plans change, you might even need to cancel the PO entirely.
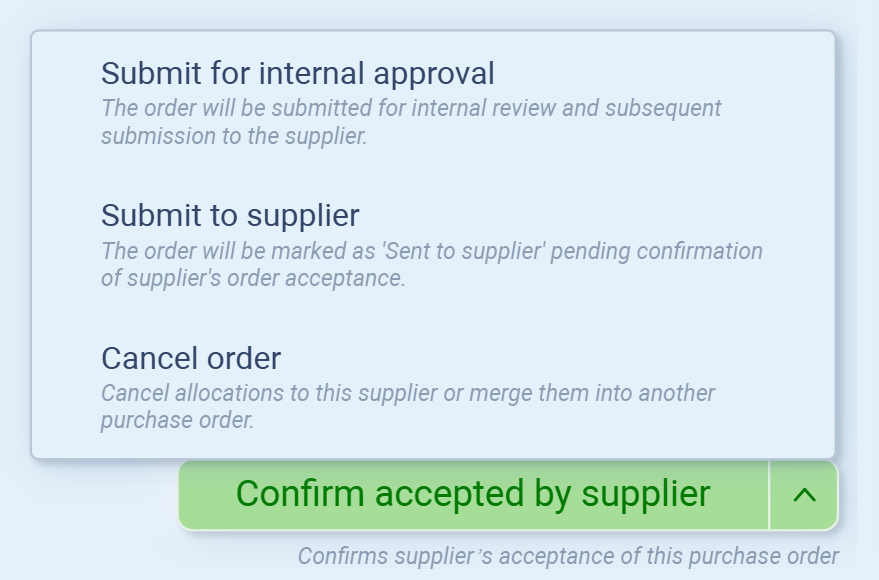
You can do all that by clicking the arrow next to the Confirm accepted by supplier button:
-
Submit for internal approval – send the PO for internal review before sending it out.
-
Submit to supplier – mark the PO as Sent to supplier while waiting for their confirmation.
-
Cancel order – cancel or reassign the order if it’s no longer needed.
Once your supplier confirms, click Confirm accepted by supplier to finalize and mark the PO as confirmed.
3️⃣ Add Estimated Dates
We recommend adding:
-
Estimated Shipping date — when goods are expected to leave the supplier.
-
Estimated Deliveries date — when goods are expected to reach the customer.
These help keep your SO timeline updated and give visibility to your sales or logistics team.
4️⃣ Review Additional Views
Inside the PO, you can also access:
![]()
-
Sales view – see which Sales Order this PO belongs to.
-
Inter-entity view – if your business involves multiple internal entities.
5️⃣ Return to the Sales Order
After confirming the PO, return to your Sales Order.
You’ll now see that supplier progress (production, inspection, shipping) can be updated directly from the Ops View panel.
💡 Tip: Even in dropshipping, tracking these stages helps maintain transparency and ensures smooth coordination between supplier and customer.
🚚 After Confirming the PO
In this case, you’re working with two suppliers, and both of them will ship to your Bangkok warehouse.
Each supplier has their own workflow and PO, so you need to complete the process for each supplier separately:
-
Confirm PO
-
Track production
-
Track inspection (if any)
-
Track shipping
-
Mark the goods as arrived at your warehouse
You must finish every supplier’s flow.
If even one supplier hasn’t shipped or hasn’t delivered, the order cannot move forward.
📦 Once All Goods Arrive at Your Warehouse
When both suppliers’ shipments arrive at Bangkok Central Warehouse, the order moves to the next stage.
Now you can:
-
Consolidate all items into one final shipment
-
Prepare the export documents
-
Arrange the freight to the US
After consolidation, the order progresses into the delivery process, where you handle the final shipment to your customer.
Track Progress in Operations
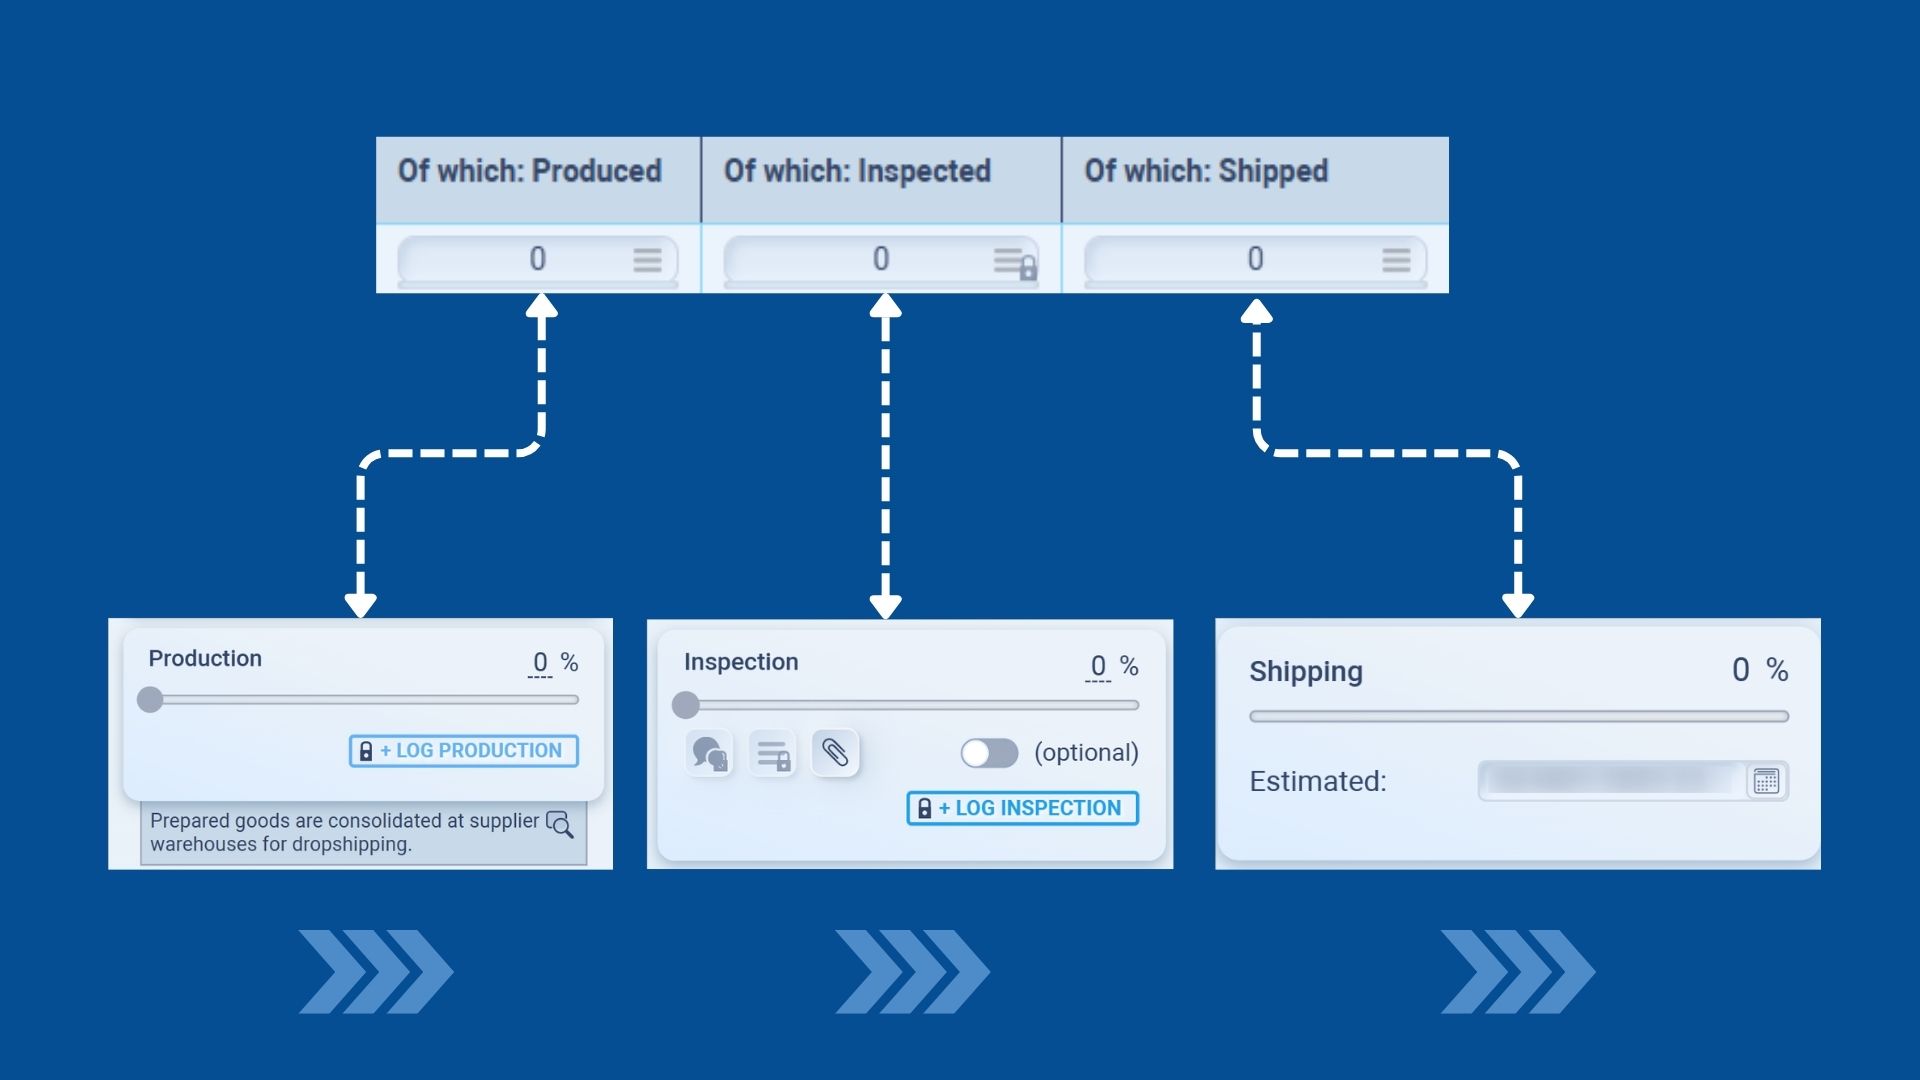
In Sourcemaster, each Purchase Order follows four key progress stages:
Production → Inspection → Shipping → Delivery
.jpg)
During this step, we’ll update progress up to Shipping, since Delivery happens once the goods are sent out to the customer.
How to Update Progress
-
Go to your confirmed PO, or open it from Ops view.
See the first two was from suppliers.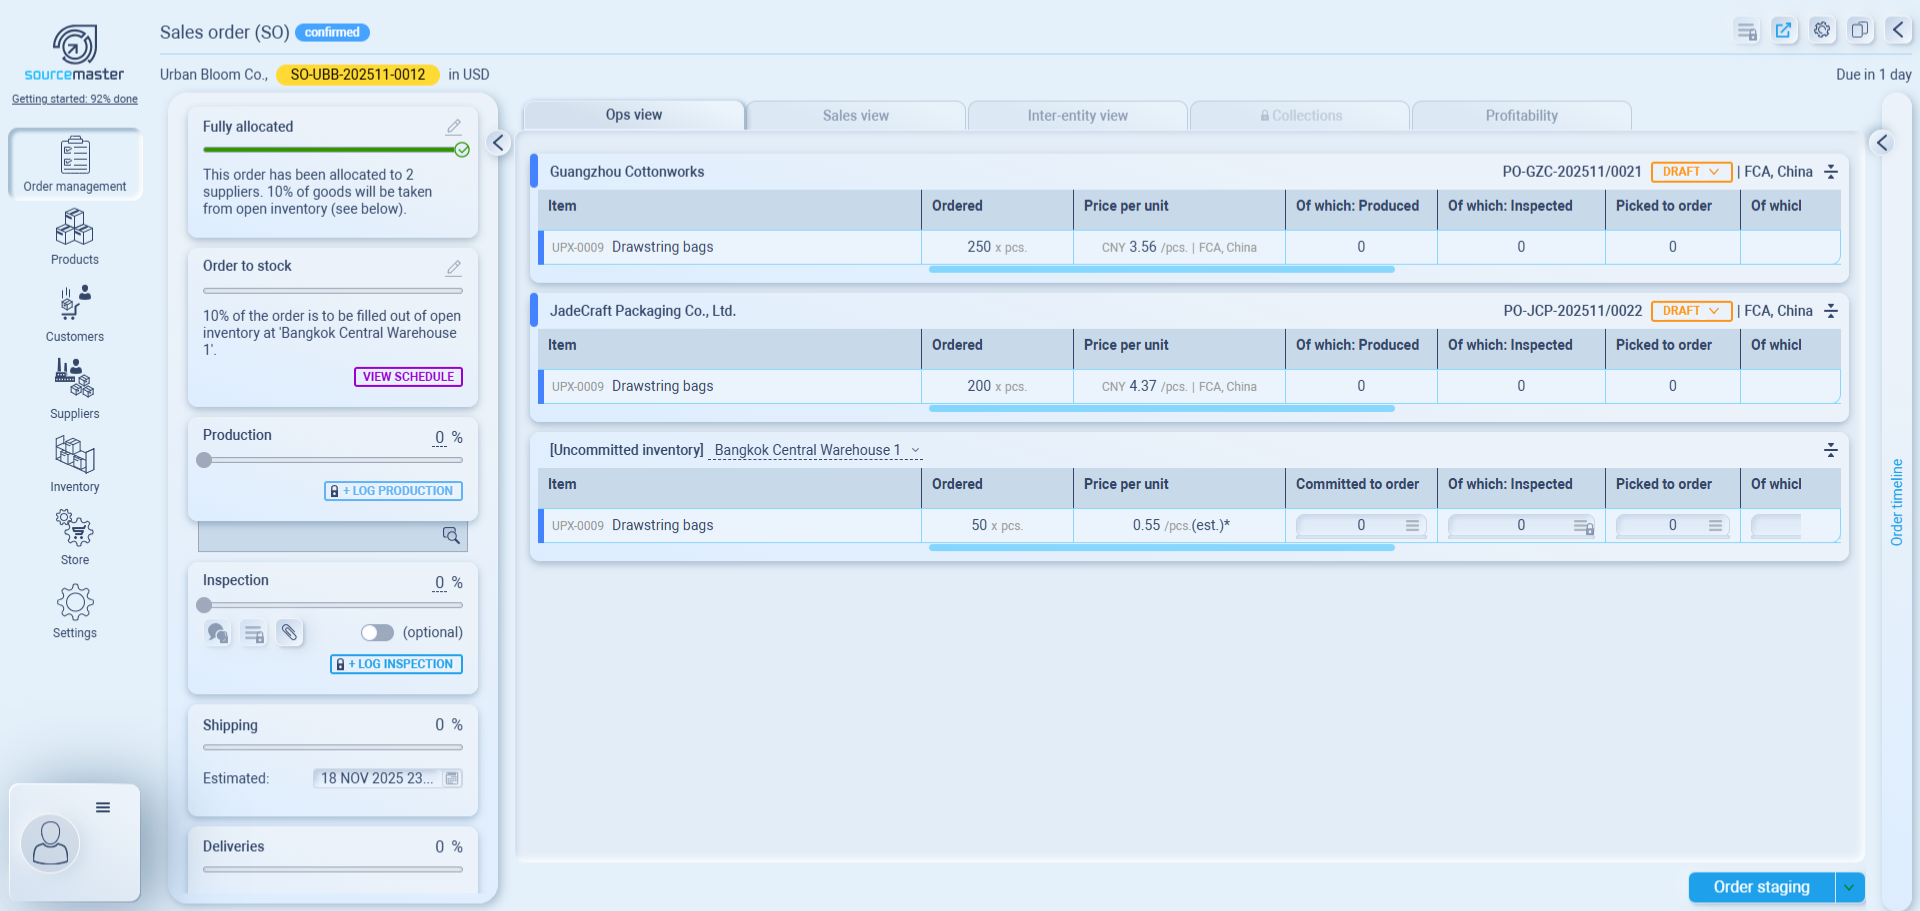.png)
-
Slide the table to the right — you’ll see these fields:

-
Of which: Produced
- This is the quantity the supplier has finished producing.
Update this when the supplier confirms how many units are completed.
- This is the quantity the supplier has finished producing.
- Transfer pending
- Goods are finished but still waiting at the supplier’s warehouse.
Update this when the supplier confirms the items are packed and ready for pickup.
- Goods are finished but still waiting at the supplier’s warehouse.
-
Transfer in transit
- Goods have left the supplier and are on the way to your warehouse. Use this when the supplier or forwarder confirms the shipment is moving.
-
Transferred
- Goods have arrived at your warehouse and are officially received into your inventory. You can update this manually, or it will update when you “Mark as Received” in Inventory in Transit.
-
Of which: Inspected
- How many units have passed your quality check.
Update this after you finish your QC process.
- How many units have passed your quality check.
-
Picked to order
-
Units that are taken from inventory and assigned to this Sales Order. Use this when the goods are moved to packing or are allocated for shipment.
-
-
Of which: Shipped
-
Units that have already been shipped out from your warehouse (for this PO or SO). This updates when you confirm outbound shipping or complete the export step.
-
-
- For Inspection and shipped part, I suggest to read more detail below.
-
Update each number (and mark the date) according to your supplier’s progress.
-
The Produced is working according to item cost per unit.
Example: You ordered item A 10 pcs. x $5 each and 2 pcs. x $25 each.
Making 2 pcs. at $25 each will be 50% of order progress.
-
-
The values you update here are synced with the left-side progress panel — both reflect the same status in real time.
You can update from either side:
-
From the PO table – faster if you’re tracking multiple items.
-
From the left panel – convenient if you’re updating one PO in detail.
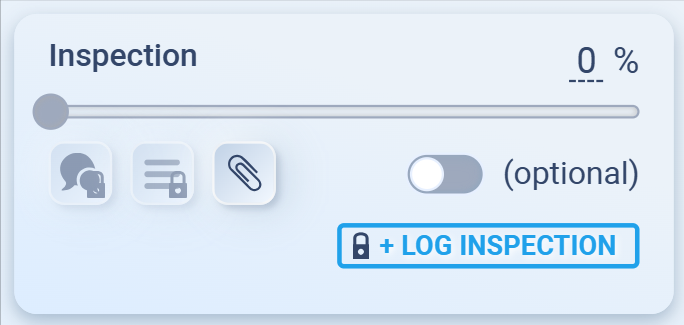
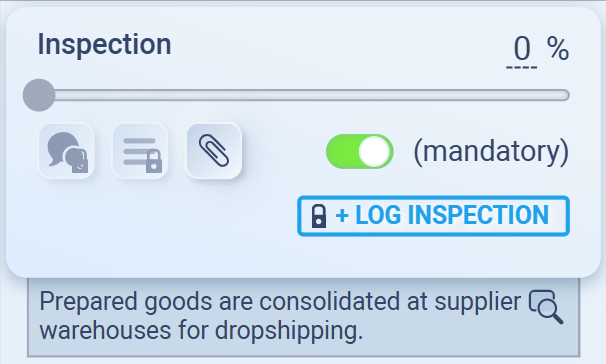
For Inspection
Inspection (QC) is optional by default, but you can make it mandatory by toggling (optional).
When enabled, you’ll need to complete inspection before proceeding to Shipping.
Attach any QC reports by clicking the 📎 clip icon.
For Shipped
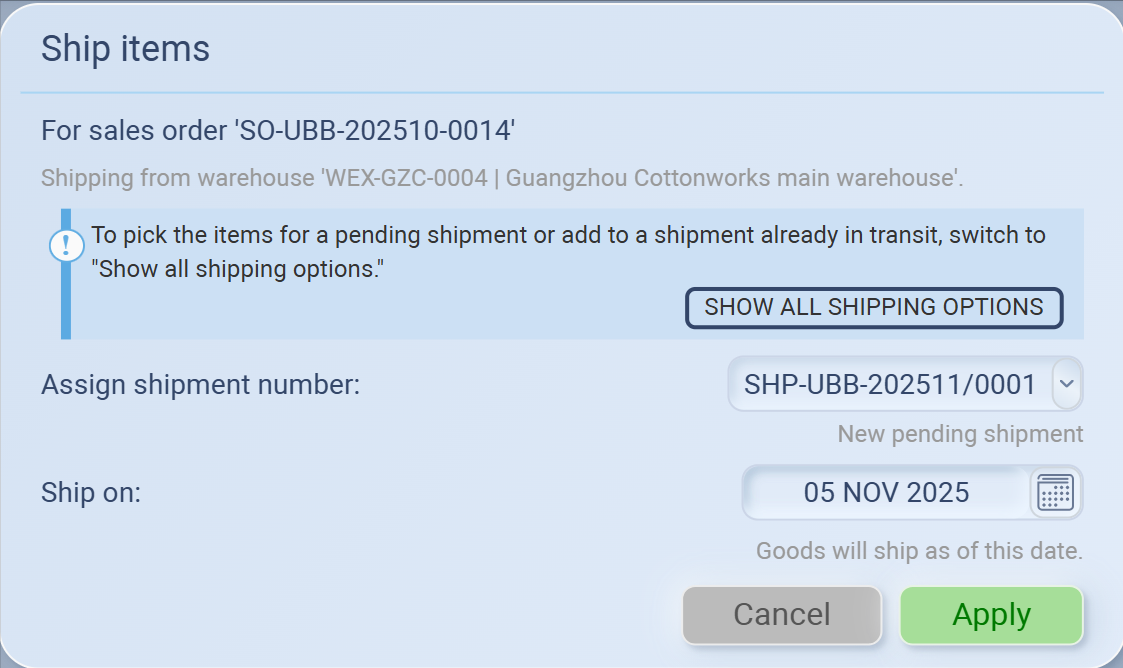
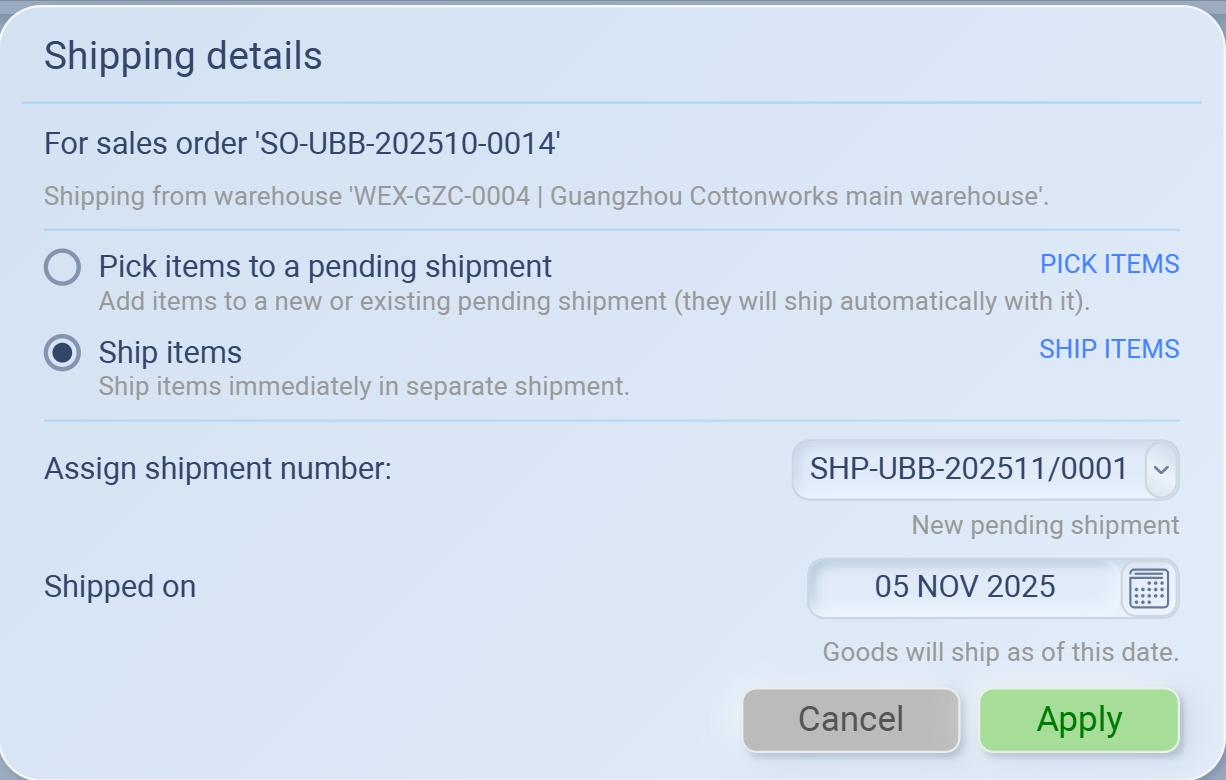
🚚 Confirm Shipment (After Updating the Shipping Field)
Once you update the Shipping field in the Ops view, sourcemaster will show a Shipment window.
This is where you confirm how and when the shipment will be created.By default, the system selects Ship items, meaning the goods will be shipped immediately in a new shipment record.
If needed, you can also choose to combine the goods with another pending shipment instead. By clicking Showing All Shipping OptionsHere’s how each option works:
1️⃣ Default option: Ship items
Choose this if the goods are ready to be shipped immediately.
Sourcemaster will generate a new shipment record for this order.
Set the Ship on date to confirm when the supplier officially dispatched the goods.
2️⃣ Alternative option: Pick items to a pending shipment
Use this if the goods will be combined with another shipment that hasn’t been dispatched yet.
Select an existing shipment number or create a new one.
The items will automatically ship once that pending shipment is sent out.
Once ready, click Apply to confirm.
Your shipment will then be recorded and reflected in the order’s Shipping progress under the Ops view.


💡 Before You Go
If you ever need to make changes before confirming shipment, click the arrow next to Send all for extra options: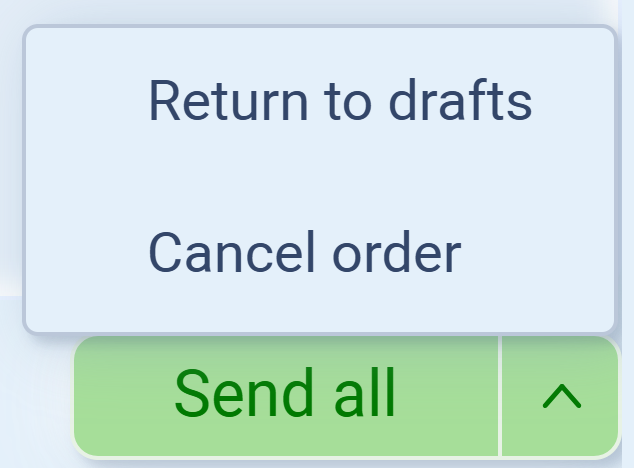
-
Return to drafts – Revert the order to draft mode if you need to edit or review details again.
-
Cancel order – Cancel the entire order if it’s no longer valid or needs to be merged into another.
These options give you flexibility before finalizing the shipment. Once you click Send all, the order will be marked as Shipped and move forward in the fulfillment process.
Before Proceeding to the Next Step
Once your Sales Order (SO) is confirmed, you can manage or reuse it directly from the top-right corner of the screen — before moving to the next stage.
📤 Export Sales Order
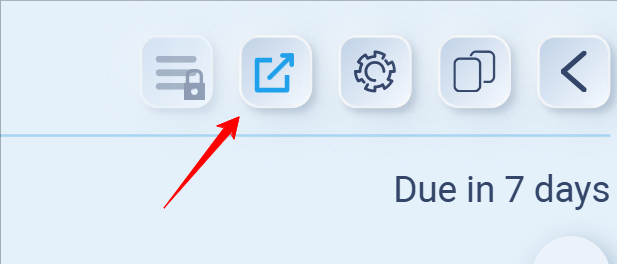
Click the Export icon to download your confirmed order.
You can export it in Excel formats for record-keeping, reporting, or sharing with customers and suppliers.
📄 Copy Sales Order
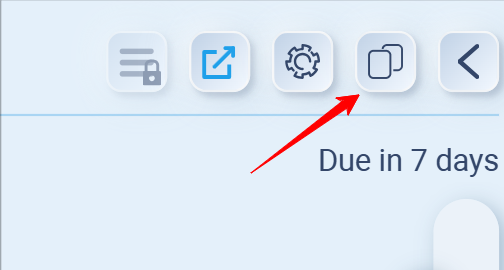
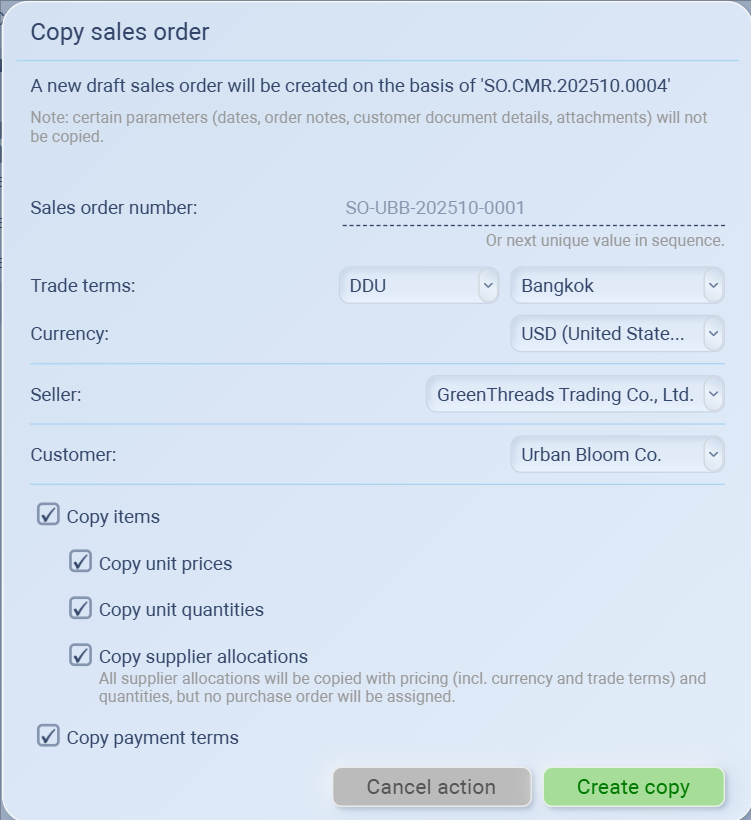
If you need to create a new order based on the current one, click the Copy icon.
This will open the Copy Sales Order window, where you can choose what details to include:
-
Items, prices, and quantities
-
Supplier allocations
-
Payment terms
A new draft Sales Order will be generated automatically — perfect for repeating or similar transactions.
⚙️ Additional Order Settings
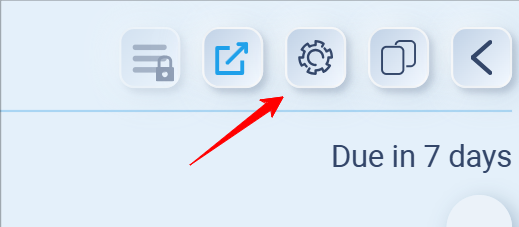
You can also open Additional Order Settings to review or edit key details such as: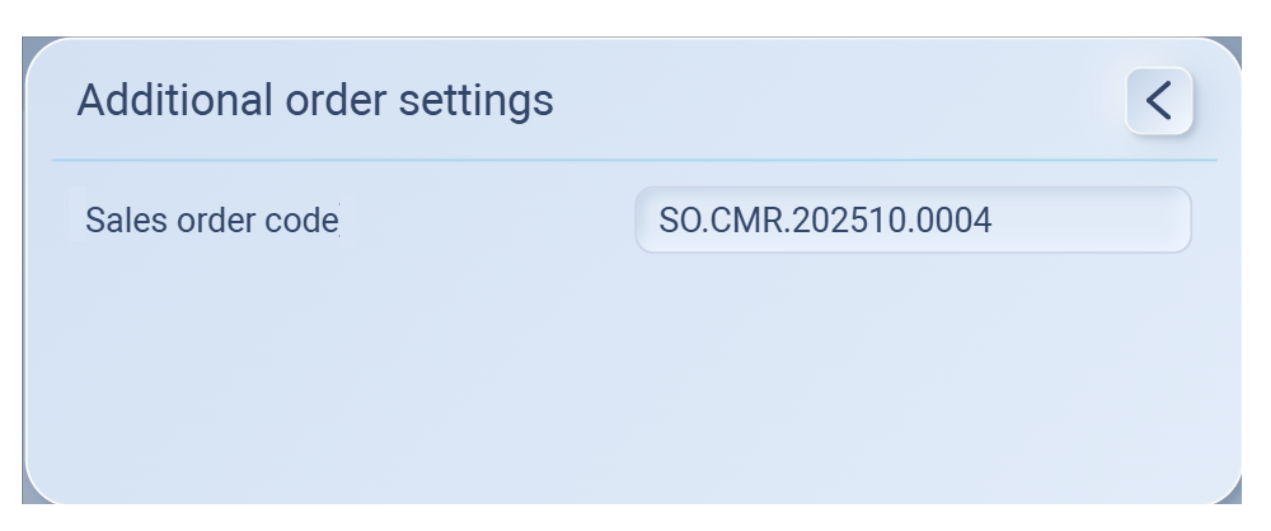.png)
-
Sales Order Code
-
Other configuration parameters that define this order.
💡 Tip:
Exporting or copying your confirmed order before moving to the next process helps ensure data consistency and gives you a backup reference for all linked purchase and delivery stages.
🚚 Shipment Management
Once all goods are shipped from the supplier, your Sales Order (SO) status will automatically update to Shipped, and the Order Timeline will record the shipment date and time.
This means the items have officially left your supplier’s inventory and are now in transit to your customer.
📦 Checking Shipments
To review or update shipment details:
-
Go to Order Management → Shipments.

-
You’ll see the shipment record linked to your SO, tagged as Shipped.

-
Each shipment entry displays key details:
| Column | Description |
|---|---|
| From Warehouse | Shows which supplier or location the goods were shipped from. |
| To Destination | Displays the customer or receiving warehouse. |
| Shipping Date | The date the goods were dispatched. |
| Delivery Date | The forecasted or actual delivery date (if available). |
| Goods Weight & Volume | Auto-calculated from the order’s product data. |
| Freight Amount | Enter shipping or handling costs here (if applicable). |
🛠 Managing a Shipment
If you need to update any information, click the pencil icon ✏️ under the Freight amount column to Manage Shipment.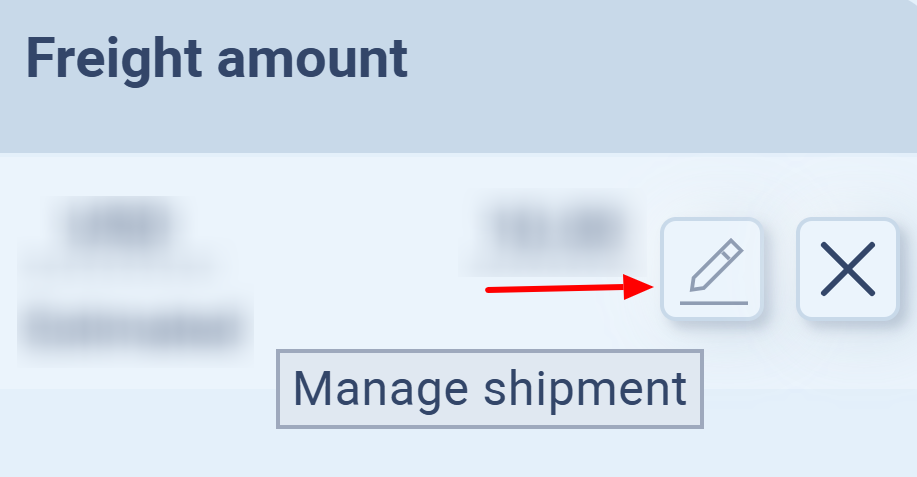
This view helps you double-check key shipment information before confirming delivery.
Here’s what you’ll typically see and what to do with each field:
🧾 Shipping Information Overview
| Field | What it means / what to do |
|---|---|
| Shipped on | Date when the goods were actually dispatched from the supplier. |
| Delivery estimated for | When the goods are expected to arrive at the customer’s destination. For international dropship, ~10 days is typical. |
| For customer | Auto-filled with the customer’s name from the SO. |
| Shipping warehouse | Origin warehouse or supplier location. |
| Shipped via | Optionally record the courier or freight method, e.g. DHL, FedEx, or Air freight. |
| Approx. shipping weight / volume | Pulled from product data, you can adjust if necessary. |
| Approx. shipping cost (Freight amount) | The shipping or freight cost for this delivery. |
| Shipping details | Optional field for tracking number, notes, or internal instructions. |
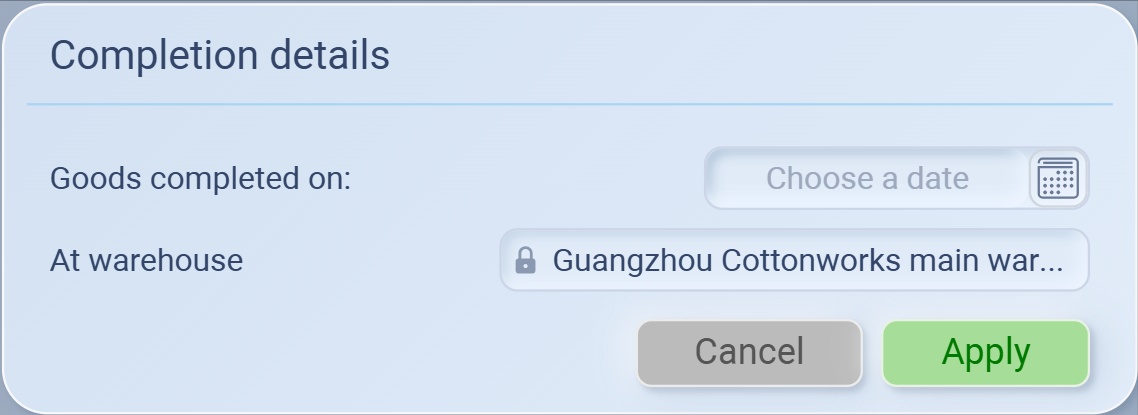
✅ Next Step: Mark as Delivered
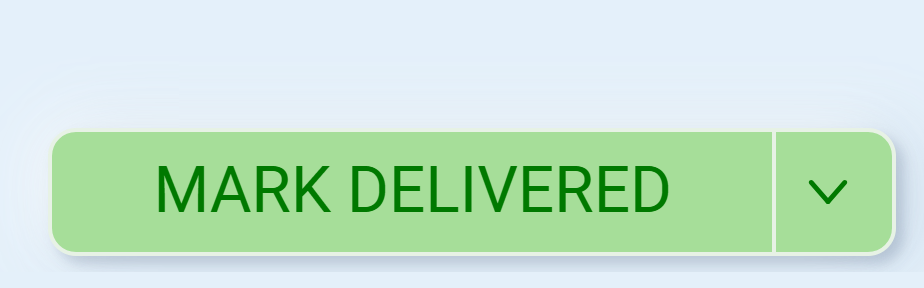
After the goods are successfully received by the customer,
you can return to this page and click Mark Delivered.
A small window will pop up, asking you to confirm the actual delivery date — this is the date your customer received the goods.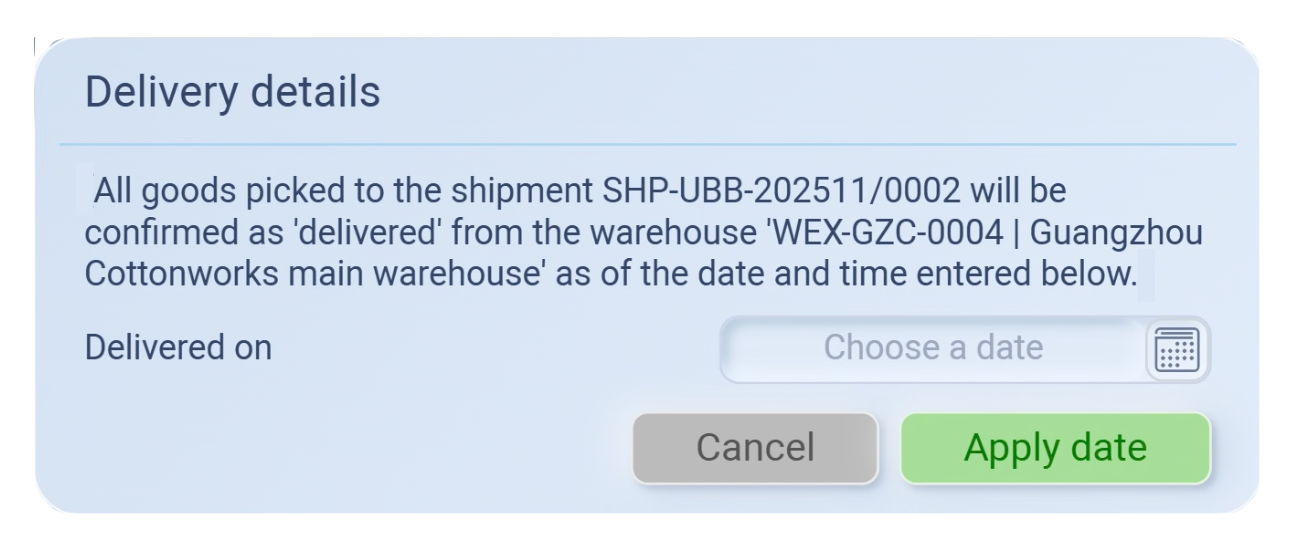.png)
Then click Apply date to confirm.
That confirms the order is fully completed and the items are officially in the customer’s hands.
This will update the Sales Order status to Delivered, and the order timeline will record the delivery completion.
After Delivery: Tracking Completed Orders
Once the shipment is marked Delivered, the Sales Order (SO) will automatically move out of the active “Sales Orders” list and appear under the Deliveries section instead.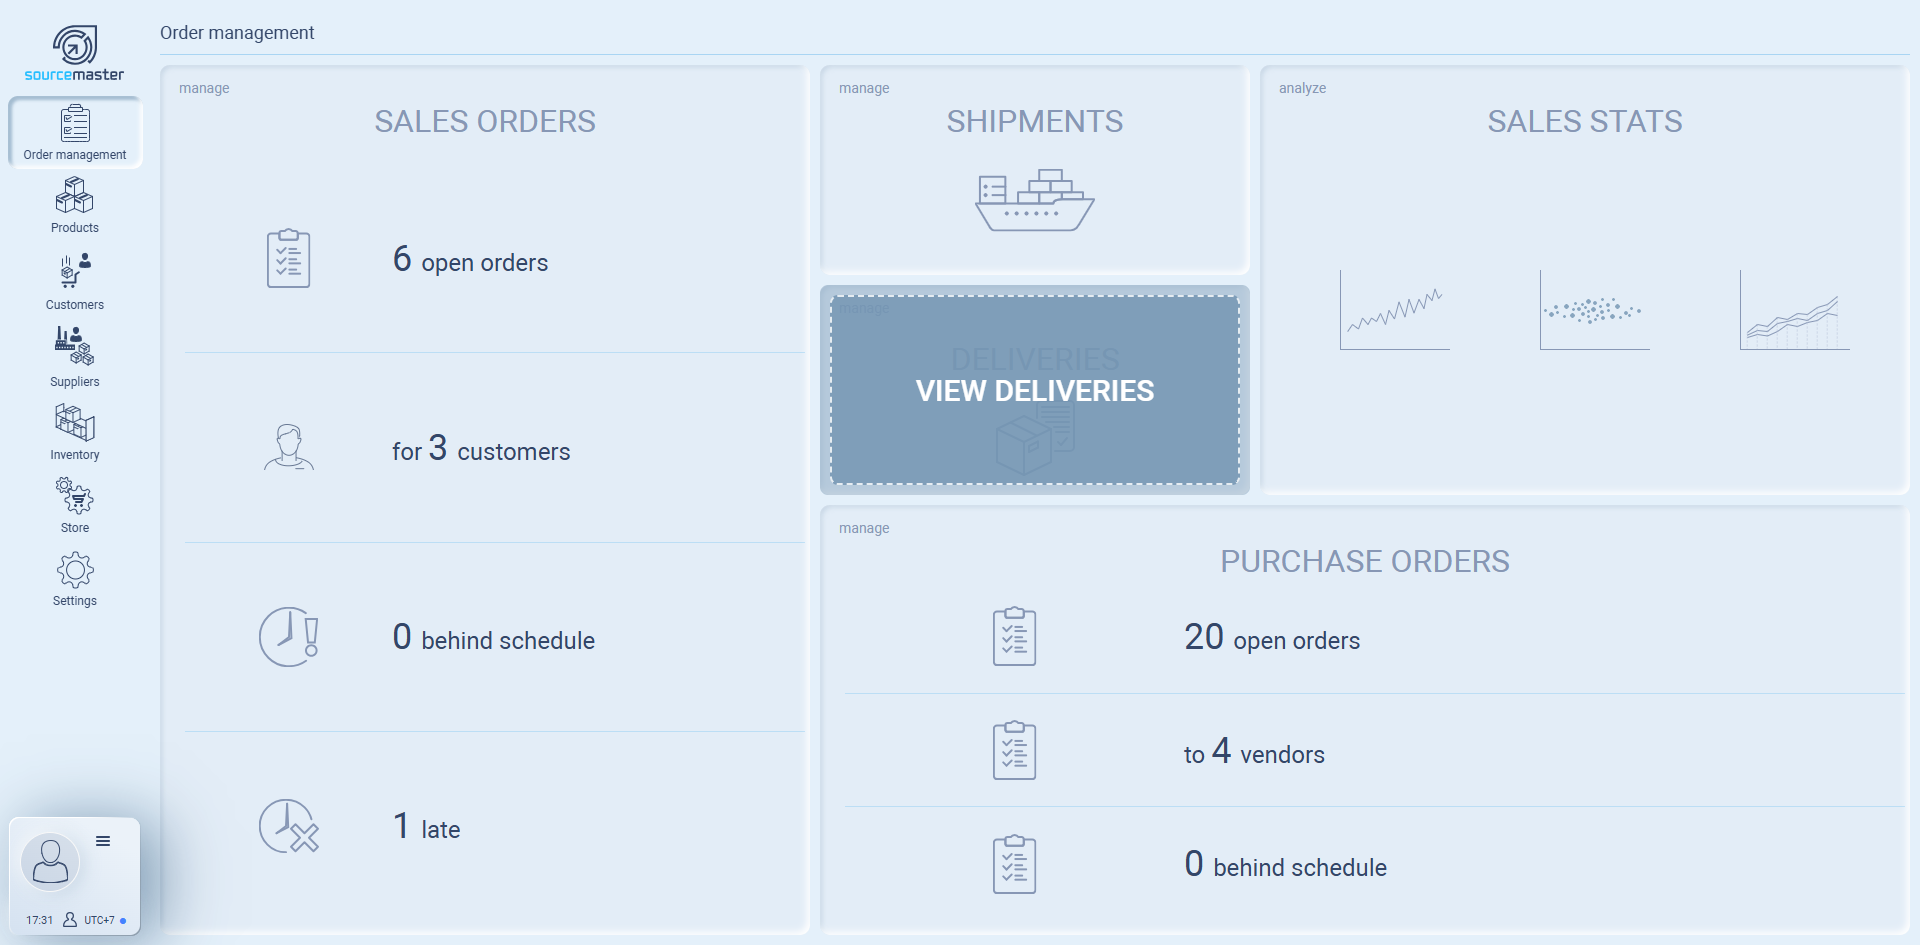
This means the order has finished its full cycle — confirmed, shipped, and delivered — and is now part of your completed delivery records.
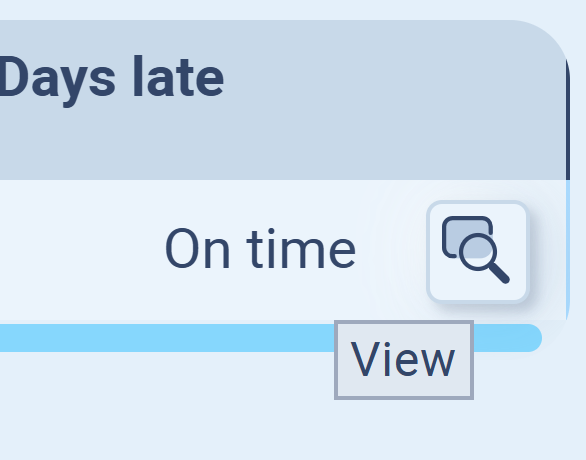
How to Review Delivered Orders
-
Go to Order Management → Deliveries
-
You’ll see a list of all completed deliveries, including shipment numbers, order codes, and lead times.
-
The system also shows:

-
Lead time (ordered → shipment) – How long it took to ship after the order was placed.
-
Lead time (ordered → delivery) – Total duration until the customer received it.
-
Delivery status – e.g. On time, Late.
-
-
Click View to open the Sales Order.
This view gives you a quick operational snapshot — how efficiently orders are being fulfilled, whether deliveries are on schedule, and where improvements can be made in future trade cycles.
💡 If this doesn’t solve your issue or you have more questions, feel free to reach out through our [contact form]. We’ll get back to you within 2–3 business days.