Before adding products, suppliers, or customers, it’s best to set up your company profile. This ensures your orders, invoices, and reports all show the correct details.
If you running a single Entity
If your business operates under one legal entity, you only need to create one company record.
Go to Settings → Company Information.

Example:
.png)
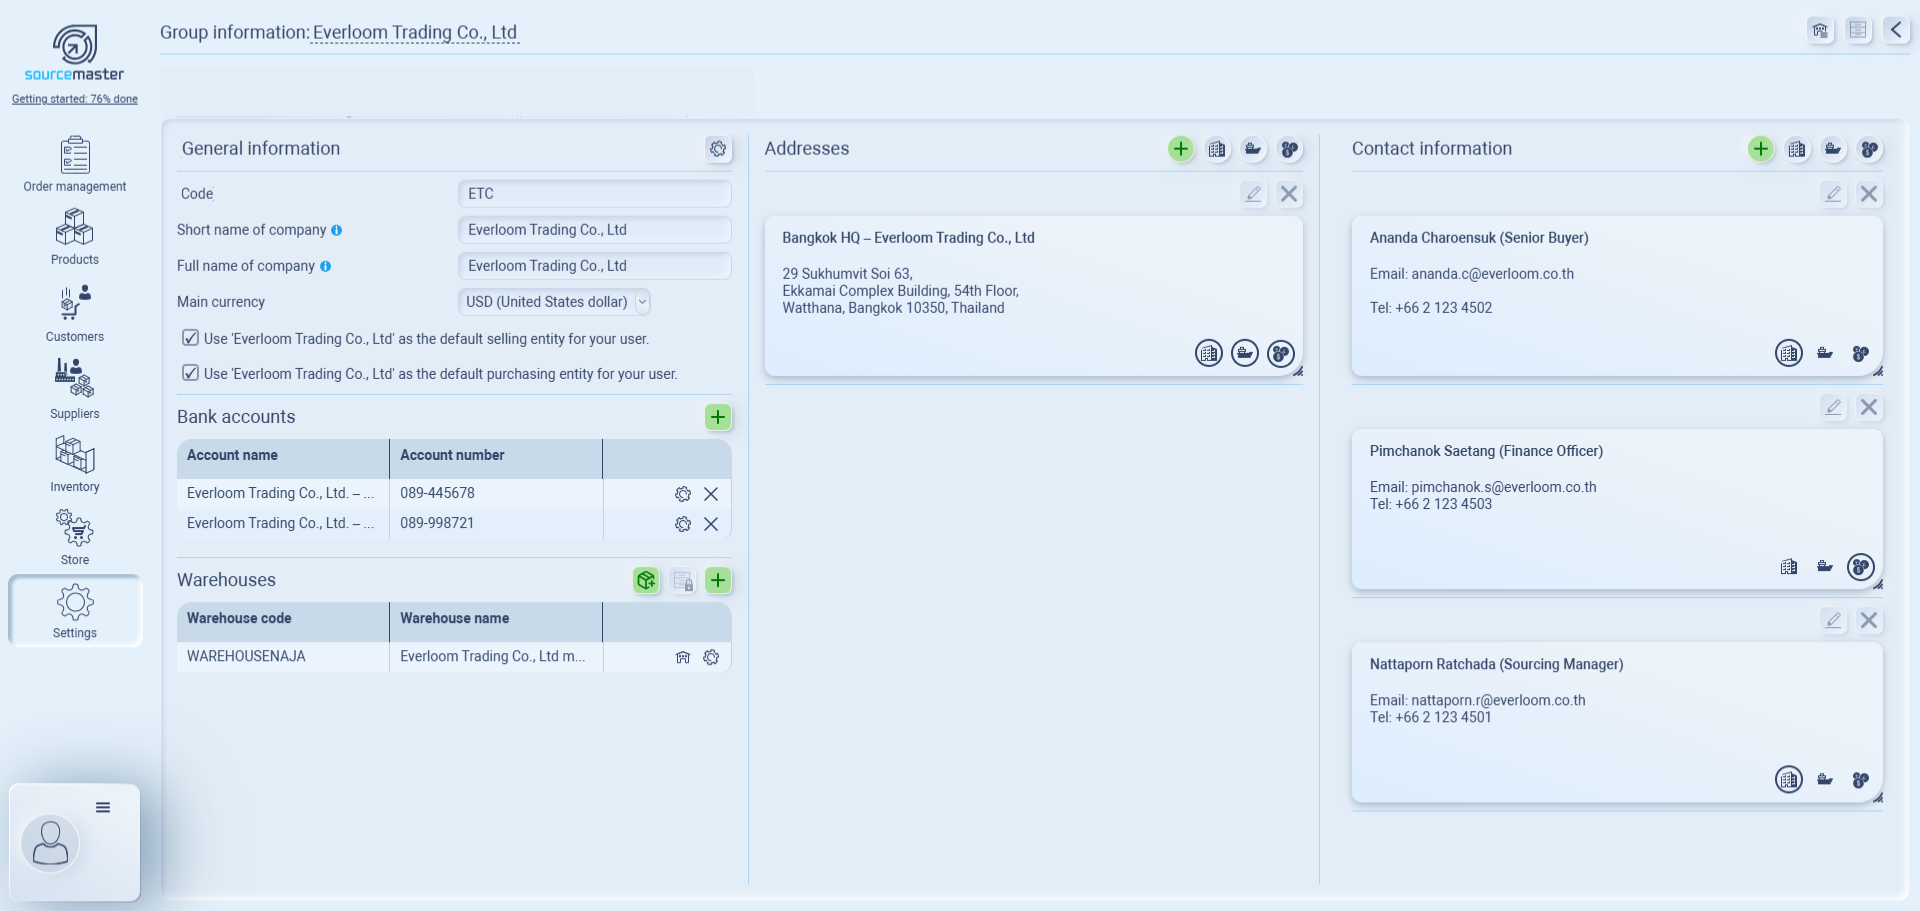
1. General Information
-
Enter Short Name (internal reference).
-
Enter Full Name of Company (appears on invoices & documents).
-
Select your Main Currency.
-
Tick the boxes:
-
✅ Use this entity as the default selling entity
-
✅ Use this entity as the default purchasing entity
-
👉 Example:
-
Short Name: ETC
-
Full Name: Everloom Trading Co., Ltd.
-
Currency: USD
2. Bank Accounts
Store your payment details so they show up automatically on invoices.
-
Click + to add a new account.
-
Enter Account Name, Account Number, and Currency.
-
Add multiple accounts if needed.
👉 Example:
-
Account 1: Everloom Trading – HSBC Business | 089-445678 | USD
-
Account 2: Everloom Trading – Bangkok Bank | 089-998721 | THB
3. Warehouses
If you run a single entity, Sourcemaster creates 3 types of warehouses by default:
-
Main Warehouse – your primary stock location
-
Supplier Warehouse (unspecified) – for supplier-side stock
-
Transit Warehouse – for customer returns in transit
You can only customize your own warehouse(s) by clicking the gear icon ⚙ next to it.
Inside a warehouse, you can:
-
Change settings – choose warehouse rules (e.g., accept finished goods, direct ship to customers).
-
Add beginning balance (optional) – record your starting stock.
-
Import: download the template, prepare your stock list, then upload.
-
Manual: set a date → click + → add Item Code, Name, Quantity, Cost/Unit.
-
✅ If skipped, the warehouse starts at zero stock.
-
-
Add address & contact –
-
Each warehouse can have one address and one contact only.
-
These details are tied specifically to that warehouse.
-
👉 Example (Main Warehouse customized):
-
Address: Harborline Fulfillment, 1780 E Sepulveda Blvd, Carson, CA 90745, USA
-
Contact: Ashley Brooks – Warehouse Supervisor | ashley.b@harborline3pl.com | +1 (310) 555-0142
-
Beginning Balance (04 SEP 2025): 200 pcs T-Shirt Black @ $5/unit
3. Warehouses
When you run a single entity, Sourcemaster automatically creates 3 warehouses for you:
-
Main Warehouse – your primary stock location
-
Supplier Warehouse (unspecified) – for supplier-side stock
-
Transit Warehouse – for customer returns in transit
You can only customize warehouses you create (including Main) by clicking the gear icon ⚙ next to it.
Example:![]()
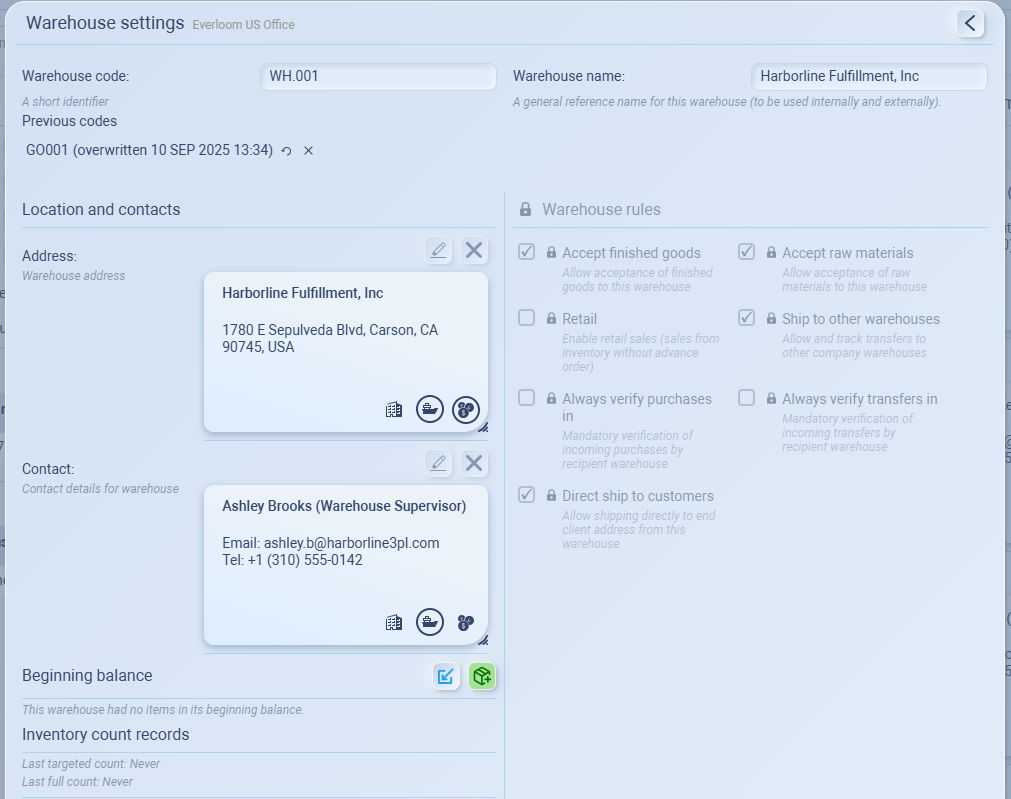
Inside Warehouse Settings
General Info
- Warehouse Code: a short identifier (e.g., WH.001).
- Warehouse Name: a clear reference name (e.g., Harborline Fulfillment, Inc.).
Location & Contacts
You can add address and contact for this warehouse here
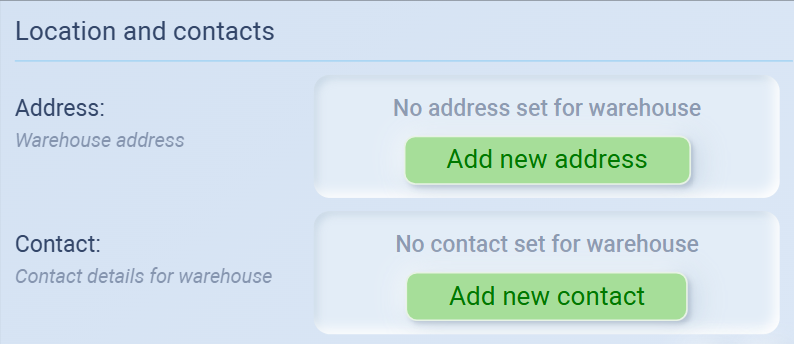
Each warehouse can have one address (the warehouse location) and one contact (the staff responsible for this warehouse), both tied directly to that warehouse.
You can also use these tags to categorize type of address/contact by toggle on it

-
Address Tags
-
🏢 = Legal reference (main warehouse address)
-
🚢 = Shipping address (used for deliveries)
-
💲 = Billing address (linked to finance)
-
-
Contact Tags
-
🏢 = Purchasing contact (for purchasing team)
-
🚢 = Shipping contact (for logistics team)
-
💲 = Billing contact (for finance/AP team)
-
Beginning Balance (Optional)
Set your starting inventory for this warehouse, by clicking Add stock button
You can set your starting inventory by:
-
Import: download the template, fill item data (code, name, quantity, cost/unit), upload.

-
Manual: choose a date → click + → add Item Code, Name, Quantity, Cost/Unit.

✅ If skipped, the warehouse begins with zero stock and only counts new purchases.
Inventory Count Records
Shows when the warehouse was last stock-counted. Useful for reconciliation and audits.
4. Company Addresses & Contacts
In the Company Information section, you can add:
-
Addresses → physical locations linked to your company.
-
Contacts → people responsible for different functions in your company.
Each company can have multiple addresses and multiple contacts.
Adding an Address
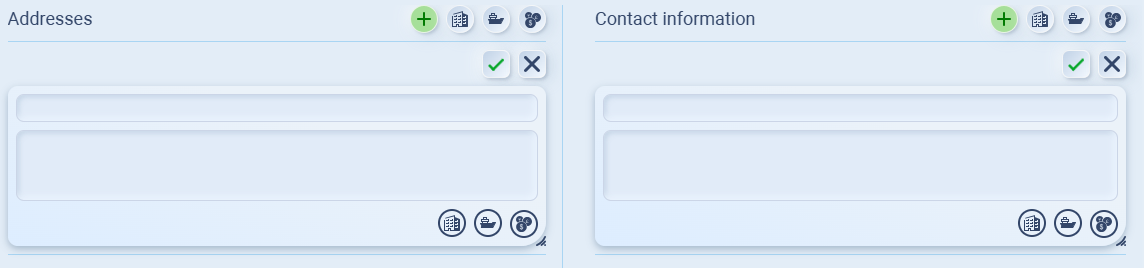
-
Go to Addresses and click ➕ Add.
-
Enter the details:
-
First field = Address title (e.g., Bangkok HQ).
-
Second field = Address details (street, city, country).
-
-
Apply the correct tag(s):
-
🏢 = Legal address (registration, official docs).
-
🚢 = Shipping address (delivery, logistics).
-
💲 = Billing address (finance, invoices).
(You can toggle multiple tags. When active, the icon will be circled.)
-
-
Click ✅ Confirm to save or ❌ Cancel to discard.
👉 Example:
-
Title: Bangkok HQ – Everloom Trading Co., Ltd.
-
Address: 29 Sukhumvit Soi 63, Ekkamai Complex Building, 54th Floor, Bangkok 10350, Thailand
-
Tags: 🏢 Legal, 💲 Billing
👤 Adding a Contact
-
Go to Contact Information and click ➕ Add.
-
Enter the details:
-
First field = Contact name and role (e.g., Ananda Charoensuk – Senior Buyer).
-
Second field = Contact details (email, phone).
-
-
Apply the correct tag(s):
-
🏢 = Purchasing contact (for purchasing team).
-
🚢 = Shipping contact (for logistics team).
-
💲 = Billing contact (for finance/AP team).
(Tags work the same way — toggle on/off, circled when active.)
-
-
Click ✅ Confirm to save or ❌ Cancel to discard.
👉 Example:
Name: Jane Doe – Finance Officer
Details: janedoe@everloom.co.th | +66 2 123 4503
Tags: 💲 Billing
💡 If this doesn’t solve your issue or you have more questions, feel free to reach out through our [contact form]. We’ll get back to you within 2–3 business days.