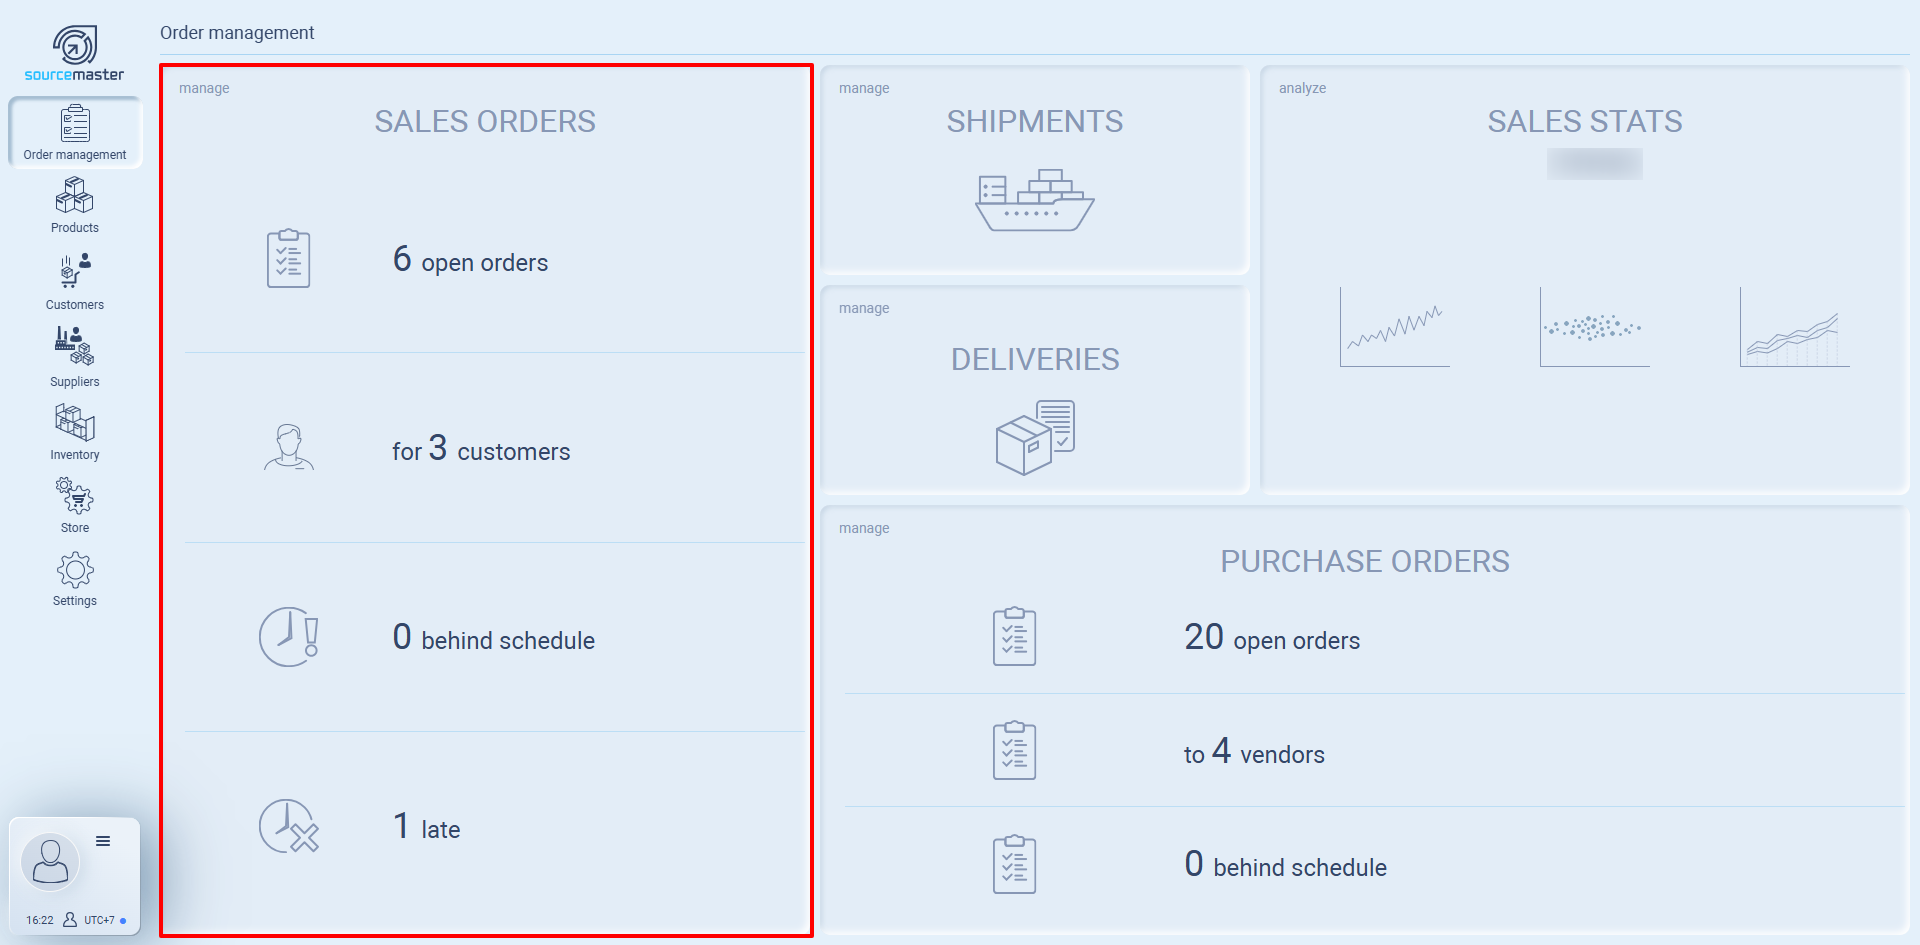
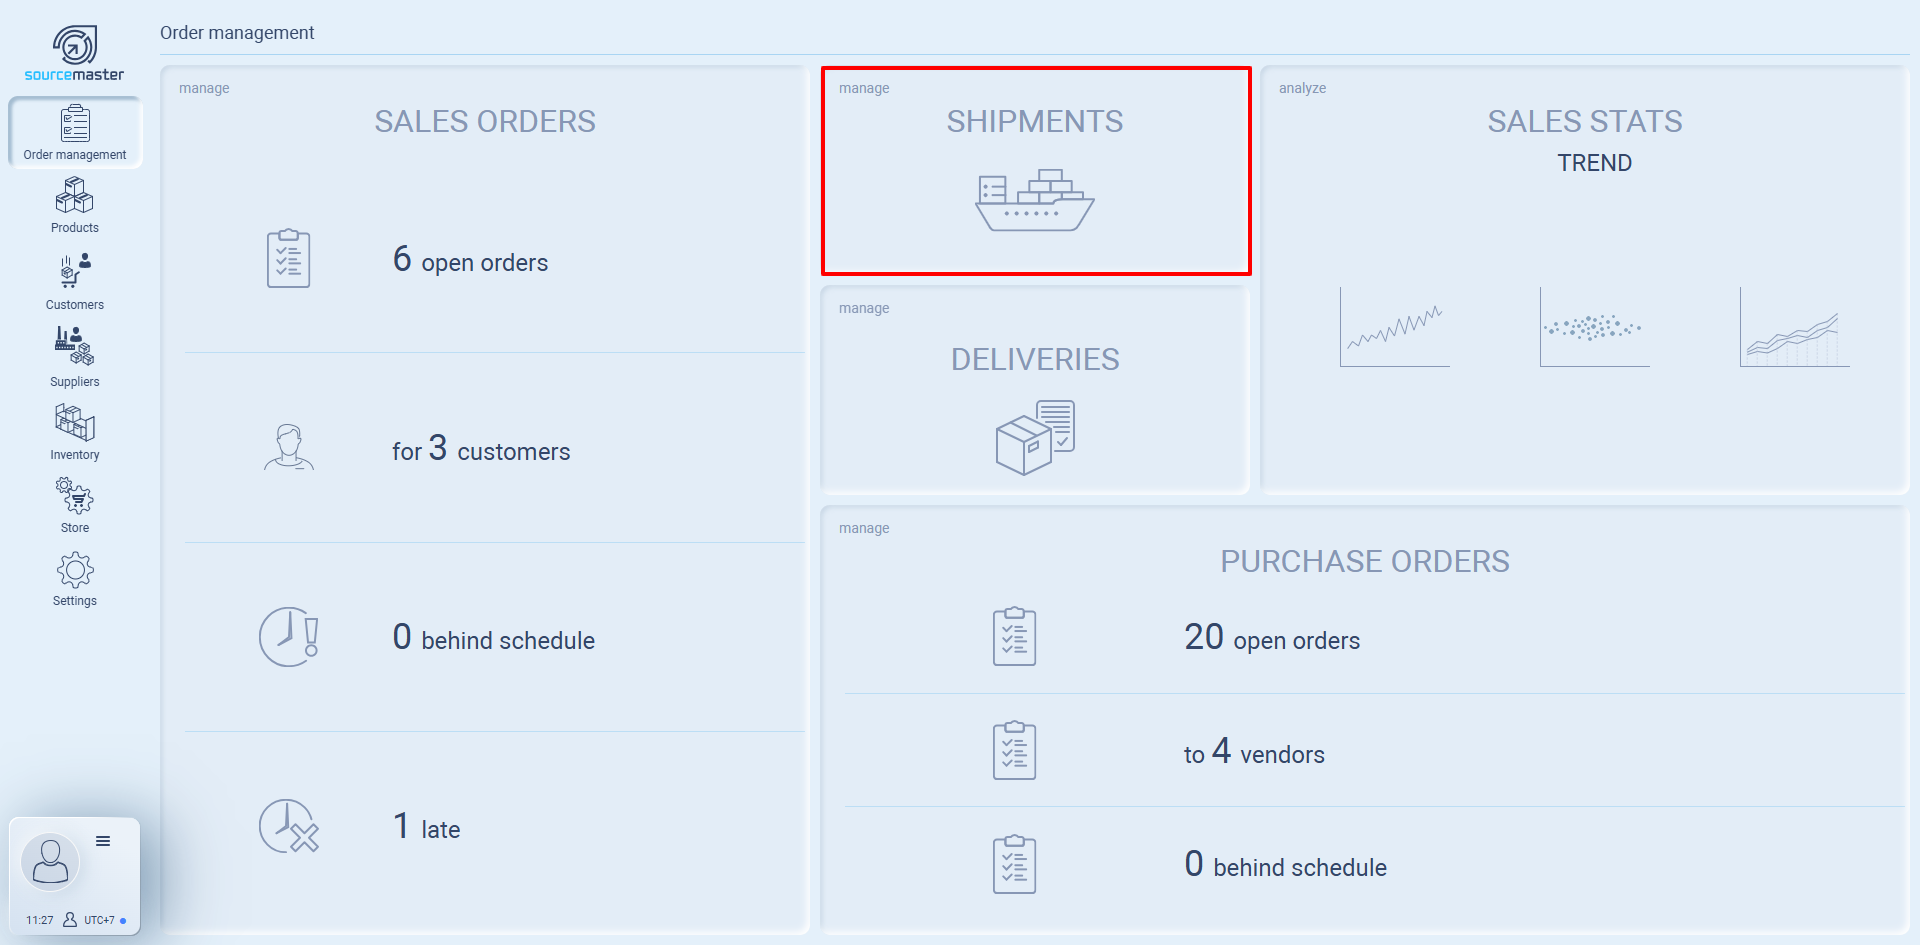
Sales Orders
-
Shows all open sales orders from your customers.
-
Displays counts of:
-
Total open orders
-
Number of customers with active orders
-
Orders behind schedule
-
Late orders
-
-
Use this section to monitor customer demand and make sure nothing slips through the cracks.
Purchase Orders
-
Lists orders you’ve placed with suppliers.
-
Displays counts of:
-
Total open purchase orders
-
Number of vendors you’re working with
-
Orders behind schedule
-
-
Helps you track supplier commitments and follow up on delays.
Shipments
-
Manage outgoing shipments to customers.
-
Keep track of what has been dispatched and what’s pending.
-
Useful for logistics and customer service teams to check delivery readiness.
Deliveries
-
Monitor incoming deliveries from suppliers or warehouses.
-
Ensures visibility on what’s arriving, when, and in what condition.
Transfer Pricing
-
Handle inter-company or multi-entity transactions.
-
Useful for businesses operating across regions, currencies, or subsidiaries.
-
Maintains accurate internal cost structures without manual calculation.
Sales Stats (Trend & Performance)
-
Visual reports to analyze your sales activity.
-
Trend: See how sales are progressing over time.
-
Performance: Check team efficiency, order cycles, and bottlenecks.
Sourcing Stats
-
Analyze supplier reliability and sourcing performance.
-
Useful for reviewing vendor efficiency and planning future procurement.
How to Use Order Management
-
From the left menu, click Order Management.
-
Select the section you want to manage:
-
Sales Orders → add or track customer orders.
-
Purchase Orders → create or follow supplier requests.
-
Shipments/Deliveries → update logistics status.
-
Transfer Pricing → manage inter-company pricing.
-
-
Use Stats panels for quick insights into performance and trends.
Sales Orders in Sourcemaster
The Sales Orders section lets you manage all customer orders in one place. From here, you can check which orders are active, monitor delays, and create new orders directly.
Accessing Sales Orders
-
Go to the Order Management tab from the left-hand menu.
-
In the Sales Orders panel, hover your cursor to reveal two options:
-
All Open Orders – View and manage every ongoing customer order.
-
Create New Order – Start a new sales order for a customer.
-
Sales Orders Overview
On the main Sales Orders card, you’ll see quick stats:
-
Open Orders – Number of customer orders currently active.
-
For Customers – How many unique customers have open orders.
-
Behind Schedule – Orders that are delayed but not yet marked as late.
-
Late – Orders past their promised delivery date.
These metrics help you instantly gauge order health and identify where to act.
All Open Orders
-
Displays a list of every active customer order.
-
You can filter by customer, due date, or status.
-
Use this to track progress, update statuses, or check if any orders are falling behind.
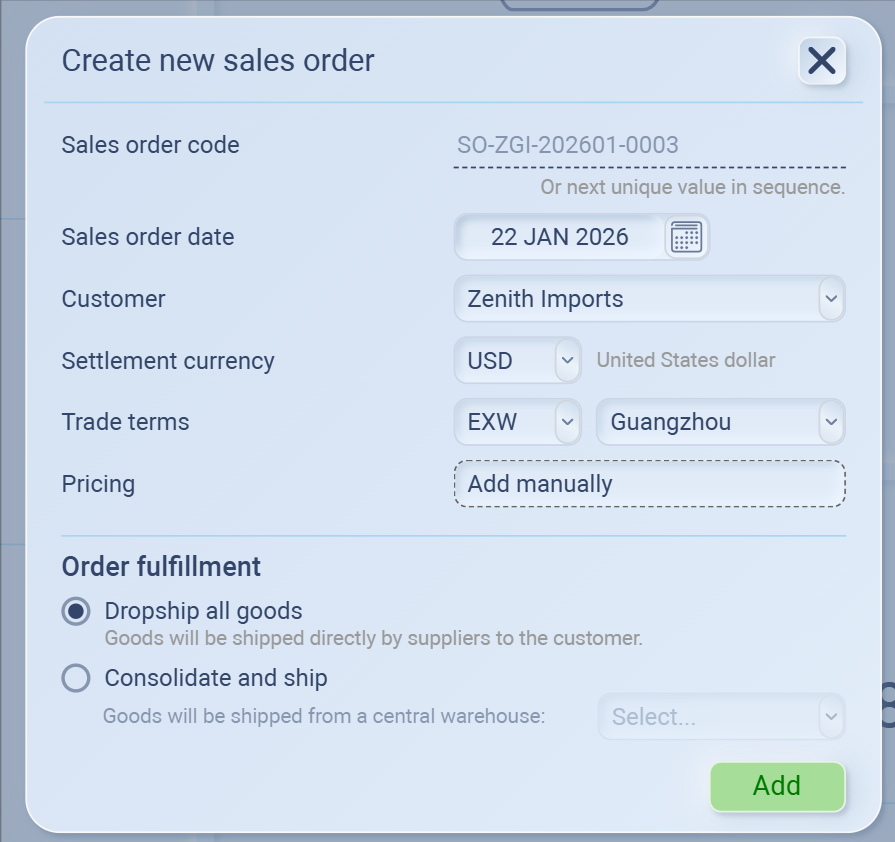
Create New Sales Order
-
When you click the green “+” button, a form will open for you to set up the new order.
Required Fields
-
Sales Order Code
-
Unique code to identify the order (you can create your own format, e.g., SO-2025-001).
-
-
Sales Order Date
-
Defaults to today’s date but can be changed.
-
-
Seller
-
Select the selling entity (must be created first in your Sellers or Company setup).
-
-
Customer
-
Choose the customer from your database (customers need to be added in the Customers module before they appear here).
-
-
Settlement Currency
-
Pick the currency for the order (USD, HKD, GBP, CNY, EUR, etc.).
-
-
Trade Terms (Incoterms)
-
Select the international trade terms (EXW, FOB, CIF, DDP, etc.).
-
Defines responsibility for shipping, insurance, and delivery.
-
-
Location
-
Assign the delivery or shipment location (must be pre-created in your system).
-
-
- Once all fields are filled, click Add to save the order.
-
After selecting seller, customer, currency, and trade terms, you’ll configure Pricing and Order Fulfillment before saving the order.
-
Pricing
-
Add manually – Enter order pricing directly (customized per deal).
-
(If integrated catalog/price list is set up, you may be able to pull pricing automatically instead of manual entry.)
Order Fulfillment Options
-
Dropship all goods
-
Goods are shipped directly from your suppliers to your customer.
-
Use this if you don’t handle warehousing and want suppliers to fulfill the order directly.
-
-
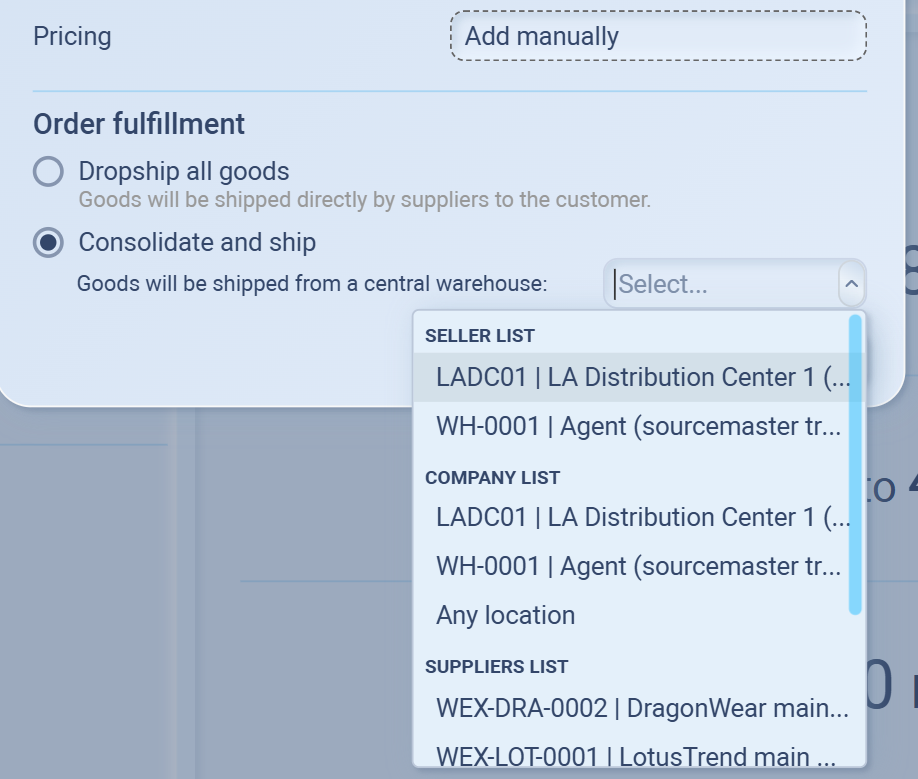
Consolidate and ship
-
Goods are shipped to your central warehouse first, then sent together to the customer.
-
Use this when you need to:
-
Combine items from multiple suppliers,
-
Repack or relabel products,
-
Control quality before shipping.
-
-
You’ll need to select the warehouse location in this option.
FYI: You can also select Any location if multiple warehouses are available and you want flexibility.
-
Finalize the Order
-
Review all details:
-
Order code, date, seller, customer, currency, trade terms, pricing, and fulfillment.
-
-
Click Add to create the order.
-
The order will now appear in the Sales Orders dashboard under:
-
Awaiting Supplier Assignment (if supplier isn’t linked yet), or
-
In Progress (if supplier is already assigned).
-
-
-
When to Use Consolidate and Ship
Multi-supplier orders: You want to gather goods from several suppliers before sending them to the customer.
Quality control: Inspect, repackage, or relabel goods at your facility before shipping.
Cost efficiency: Reduce shipping costs by combining items into a single shipment.
Any Mode of Transport
-
EXW (Ex Works) – Buyer picks up goods at seller’s premises and bears all risks/costs from there.
-
FCA (Free Carrier) – Seller delivers goods to a carrier chosen by buyer at an agreed place.
-
CPT (Carriage Paid To) – Seller pays for transport to destination, risk passes once goods are handed to carrier.
-
CIP (Carriage and Insurance Paid To) – Like CPT, but seller also covers insurance for buyer.
-
DAP (Delivered At Place) – Seller delivers goods to destination, buyer pays import duties.
-
DPU (Delivered at Place Unloaded) – Seller delivers goods, unloaded, at buyer’s location. (New in 2020, replaces DAT).
-
DDP (Delivered Duty Paid) – Seller covers all costs including delivery, insurance, and import duties.
Sea & Inland Waterway Transport
-
FAS (Free Alongside Ship) – Seller delivers goods alongside the ship at port of loading.
-
FOB (Free On Board) – Seller loads goods on ship; risk transfers once loaded.
-
CFR (Cost and Freight) – Seller pays transport to destination port, risk transfers once shipped.
-
CIF (Cost, Insurance, and Freight) – Like CFR, but seller also provides insurance to destination port.
Adding Items to a Sales Order
After creating a new Sales Order, the system will open the order in Draft status. Here, you’ll add products and define quantities, pricing, and allocations.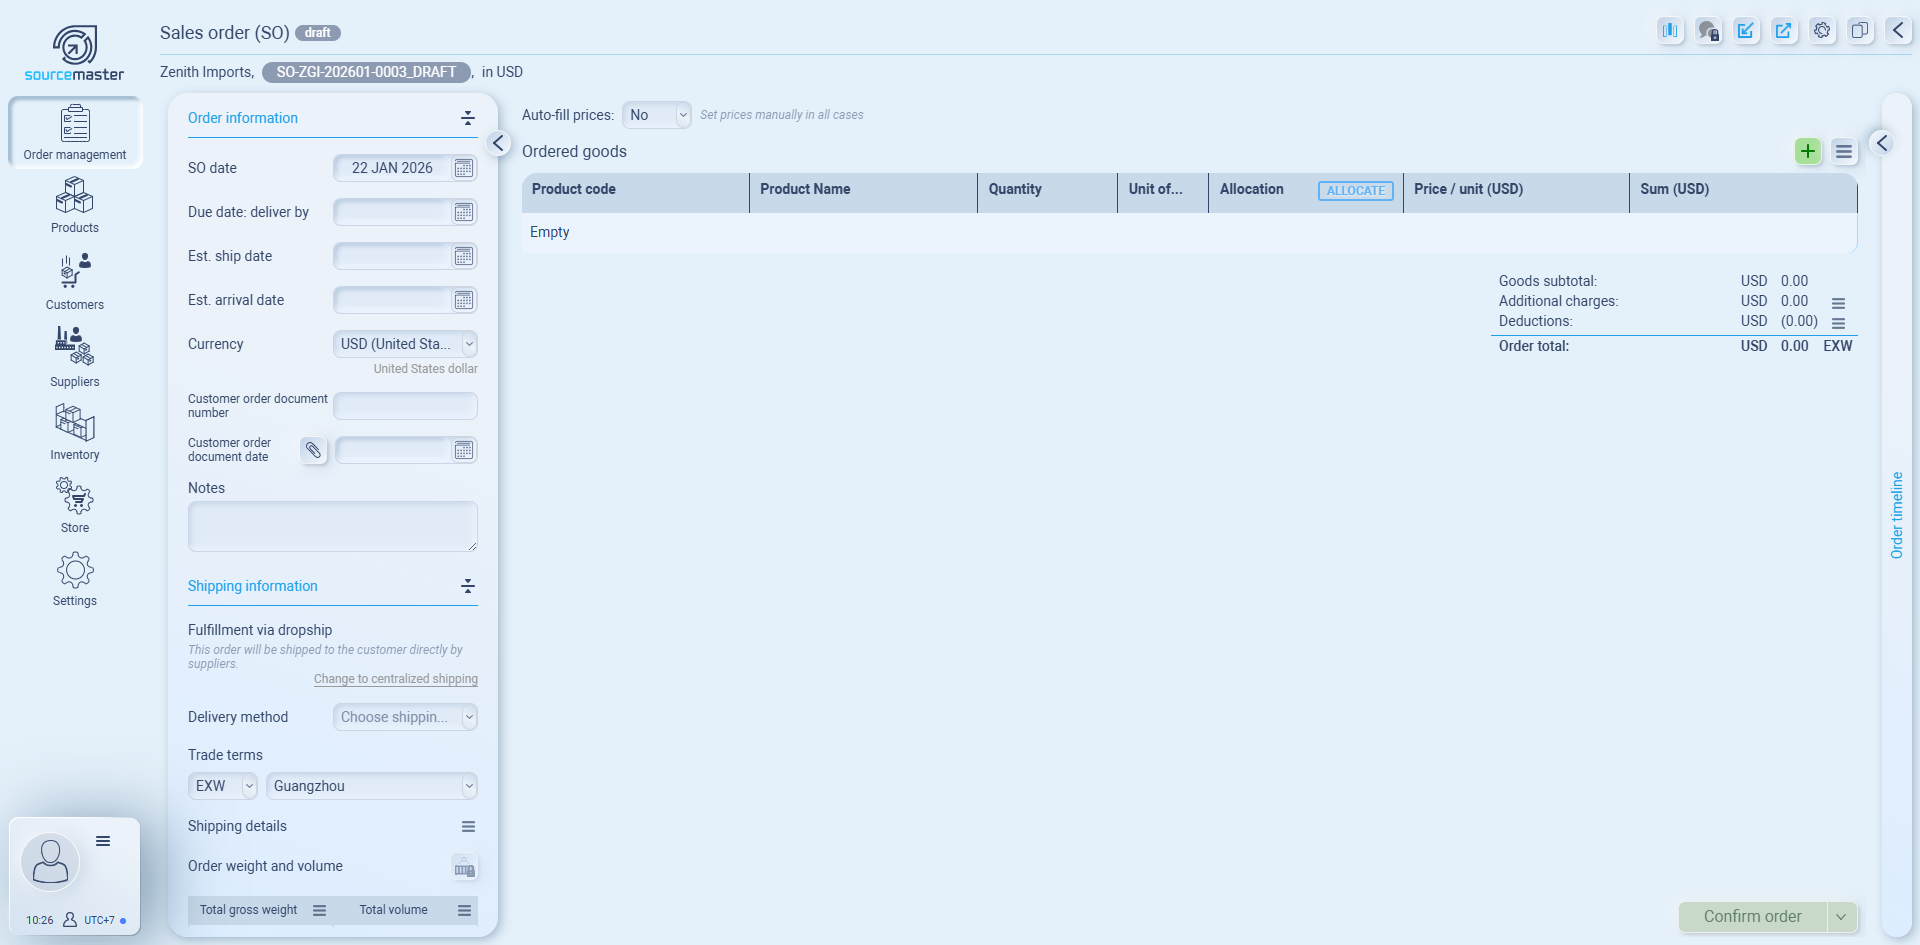
Ordered Goods Table
-
Product code / Product name – Choose from your product catalog.
-
Quantity – Enter the amount ordered.
-
Unit of measure – Example: pcs, cartons, kg.
-
Allocation – Assign which supplier(s) will fulfill the goods.
-
Price / unit – Add the agreed unit price (or use auto-fill if available).
-
Sum – Total cost for that line item.
👉 Use the green “+” button to add a new product line to the order.
Order Summary (right-hand side)
-
Goods subtotal – Total cost of all line items.
-
Additional charges – Add shipping, handling, or other surcharges.
-
Deductions – Discounts or rebates applied.
-
Order total – Final payable amount, calculated automatically.
Order Timeline (right panel)
-
Tracks all actions and updates to the order.
-
Useful for audit trail and internal collaboration.
Confirming the Order
Once all items, pricing, and supplier allocations are complete:
-
Review the order total.
-
Click Confirm order (bottom right).
-
The order will move out of Draft status and into the Sales Orders dashboard under the correct category:
-
Awaiting supplier assignment,
-
In progress,
-
or Shipped.
-
Order Information Panel
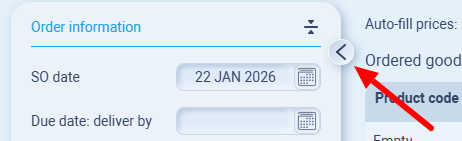
The Order Information Panel provides all the key details of a Sales Order, including logistics, billing, and payment settings. You can expand it by clicking the arrow button on the left side of the order draft screen.
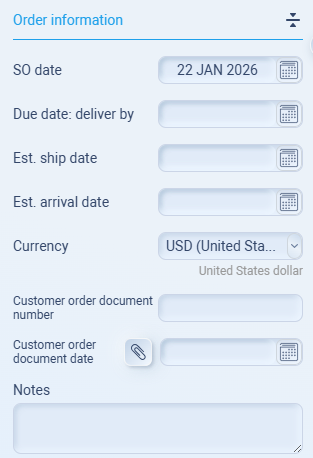
1. Order Information
-
SO date – The creation date of the sales order.
-
Due date: deliver by – The customer’s required delivery deadline.
-
Estimated ship date – Planned shipment date.
-
Estimated arrival date – Expected arrival at the customer’s destination.
-
Currency – Locked to the settlement currency selected during order creation.
-
Customer order document number – Reference number for the customer’s purchase order (PO).
-
Customer order document date – Date of the customer’s PO.
-
Notes – Any special remarks, instructions, or internal reminders.
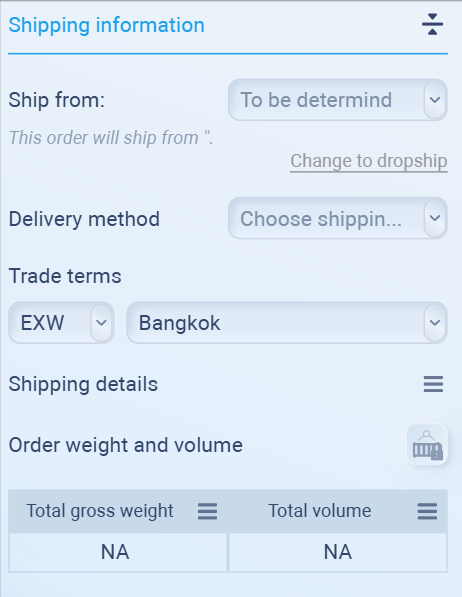
2. Shipping Information
-
Ship from – Select the warehouse or origin location. If unknown, it will show “To be determined.”
-
Change to dropship – Switch fulfillment from consolidation to direct supplier → customer shipping.
-
Delivery method – Choose the shipping method (e.g., sea freight, air freight, courier).
-
Trade terms (Incoterms) – Define delivery responsibility (EXW, FOB, CIF, DDP, etc.).
-
Shipping details – Add logistics notes such as container info, vessel schedules, or tracking numbers.
-
Order weight and volume – Record cargo weight and dimensions for customs and freight.
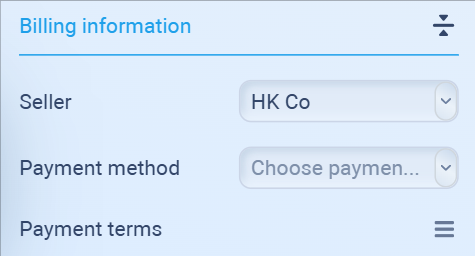
3. Billing Information
-
Seller – The selling entity for the transaction (pre-filled from order setup).
-
Payment method – Currently supports Bank Transfer (Wire).
-
Payment terms – Opens a detailed payment schedule editor.
Payment Terms Define when and how the customer pays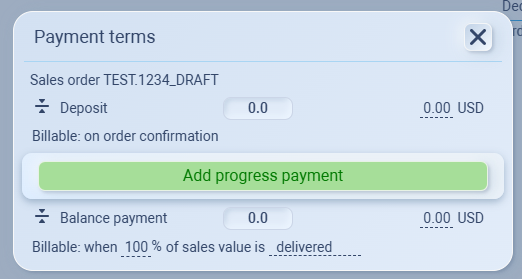
-
Deposit – Amount or % due at order confirmation.
-
Progress payments – Add milestone-based partial payments (e.g., on shipment, on arrival).
-
Balance payment – Final payment due once the order is fully delivered.
Example setup for a $10,000 order:
-
Deposit: 30% ($3,000) due at confirmation.
-
Progress Payment: 20% ($2,000) due when goods ship.
-
Balance: 50% ($5,000) due on delivery.
Top-Right Menu Functions (Sales Order)
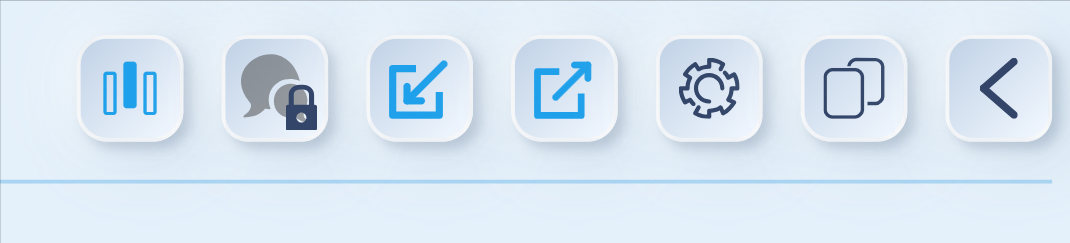
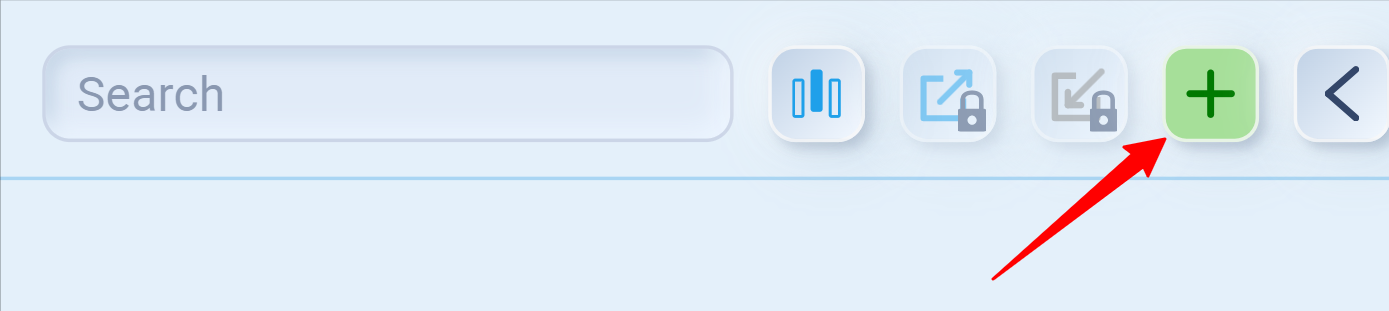
At the top-right corner of every Sales Order screen, you will find a set of quick-access tools.
1. Column Management Menu
-
Show or hide columns in the ordered goods list (Unit of Measure, Allocation, Price per Unit, Sum).
-
Lets you customize the view for reviewing order details.
2. Comments (Internal Notes)
-
Add team-only notes or remarks.
-
Keeps internal context without sharing with customers.
3. Import Ordered Items
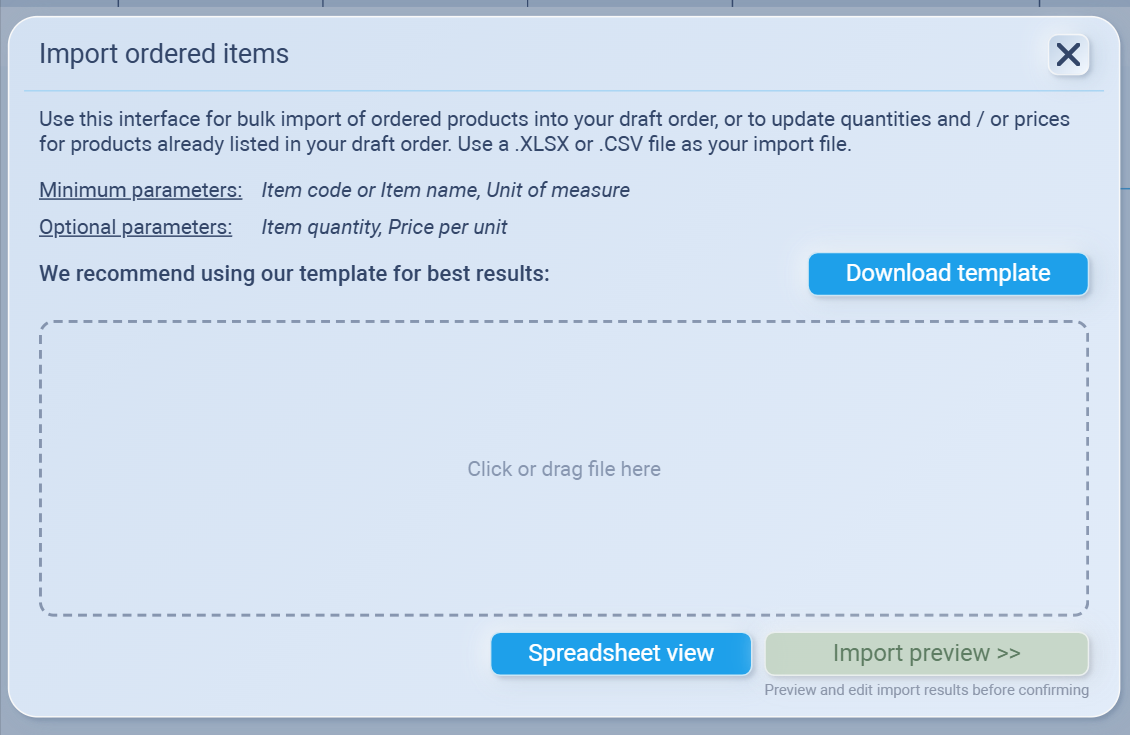
-
Bulk upload products into your draft order with Excel (.XLSX) or CSV (.CSV).
-
Required: Item code/name + Unit of measure.
-
Optional: Quantity, Price per unit, Address (Ship from/Ship to).
-
Best practice: Use the system’s provided template.
4. Export Ordered Items (Excel)
-
Download the list of products in Excel format.
-
Useful for record-keeping or sharing with suppliers/customers.
5. Additional Order Settings
-
Configure advanced order options such as extra charges/deductions, custom numbering, or workflow settings (depending on company setup).
6. Copy Order
-
Duplicate the current sales order.
-
Saves time when creating similar or repeat orders.
7. Return to List
-
Exits the current order view and takes you back to the Sales Order list.
-
Handy for quickly moving between orders.
Shipments
The Shipments section in Sourcemaster allows you to track and manage all goods leaving your warehouse, whether pending, in progress, or completed. Each shipment is linked to a sales order and provides full visibility into logistics details, making it easier to stay on top of international trade operations.
Shipment Dashboard
When you open the Shipments panel, you’ll see a table displaying all shipment records. You can filter shipments by status (including pending ones) or by date range.

Columns include:
-
Shipment # – Unique identifier of the shipment.
-
From warehouse – The warehouse location where goods are shipped from.
-
To destination – The delivery destination or customer’s location.
-
For sales order – The related sales order number linked to this shipment.
-
Shipping date – Scheduled date when goods are dispatched.
-
Delivery date – Expected arrival date.
-
Goods weight – Total weight of items in the shipment.
-
Goods volume – Total cubic volume of items in the shipment.
-
Freight amount – Shipping cost associated with the shipment.
Creating a Shipment
To create a new shipment:
-
Go to the top-right menu and click the green plus (+) button.
-
Fill in the shipment details:
-
Warehouse of origin
-
Destination
-
Linked sales order
-
Dates (shipping & delivery)
-
Freight, weight, and volume details
-
Shipment Details Panel
Clicking a shipment record opens a detailed panel where you can manage shipment information:
-
Shipment number & linked sales order
-
Warehouse and destination details
-
Dates (planned vs actual)
-
Logistics data – weight, volume, freight charges
-
Status updates – pending, in transit, or delivered
Order Timeline (if any)
On the right panel, you can view the Shipment Timeline showing the step-by-step status updates. This helps track progress and spot potential delays.
Top-Right Menu (Shipments)
-
Search bar – Quickly find shipments by number or related order.
-
Column management – Choose which columns to display in the shipment table.
-
Export shipments – Download shipment records in XLSX format.
-
Create shipment (+) – Add a new shipment.
Delivery List Columns
Each delivery record contains key fields to monitor fulfillment:
-
SO# (Sales Order Number) – The reference number of the linked Sales Order. Clicking it usually lets you drill down into the order details.
-
Notes – Any special remarks, comments, or delivery-specific instructions.
-
Items – The list of goods included in that delivery (with quantities).
-
Customer – The buyer or recipient of the delivery.
-
SO Date – The date the Sales Order was first created.
-
Shipped On – The date when goods physically left the warehouse or origin.
-
Delivered On – The date when goods were confirmed as received by the customer.
-
Lead Time: Ordered → Shipment (days) – Number of days between order creation and shipment. Useful for measuring warehouse/dispatch speed.
-
Lead Time: Ordered → Delivery (days) – Number of days between order creation and final delivery. Tracks total fulfillment cycle.
-
Days Late – Shows how many days the delivery exceeded the promised or scheduled delivery date. (If delivered on time, this will show zero.)
Settings Menu (Top-Right Buttons)
Located on the top-right corner of the Deliveries panel:
-
Search Bar – Quickly filter deliveries by Sales Order, customer name, or note keyword.
-
Column Management (grid icon) – Opens a dropdown where you can choose which fields to display or hide.
-
Export (square with arrow icon) – Export the Deliveries list into external formats (CSV/Excel/PDF). Useful for reporting.
-
Open in Full View (expand icon) – Maximizes Deliveries into a standalone full-page table for easier navigation.
-
Back (arrow icon) – Returns to the main Order Management dashboard.
Column Management Menu
When you click the column selector (grid icon), you can toggle the visibility of fields:
-
✅ Notes – Show/hide delivery notes.
-
✅ Items – Show/hide delivered product details.
-
✅ Customer – Show/hide customer names.
-
✅ SO Date – Show/hide order creation dates.
-
✅ Shipped On – Show/hide shipping dates.
-
✅ Delivered On – Show/hide delivery confirmation dates.
-
✅ Lead Time: Ordered → Shipment (days) – Show/hide warehouse processing speed.
-
✅ Lead Time: Ordered → Delivery (days) – Show/hide overall fulfillment speed.
-
✅ Days Late – Show/hide delay tracking.
This lets each user customize their Deliveries dashboard — e.g., a logistics manager may keep lead times visible, while a finance manager may hide them and focus on customer, items, and dates.
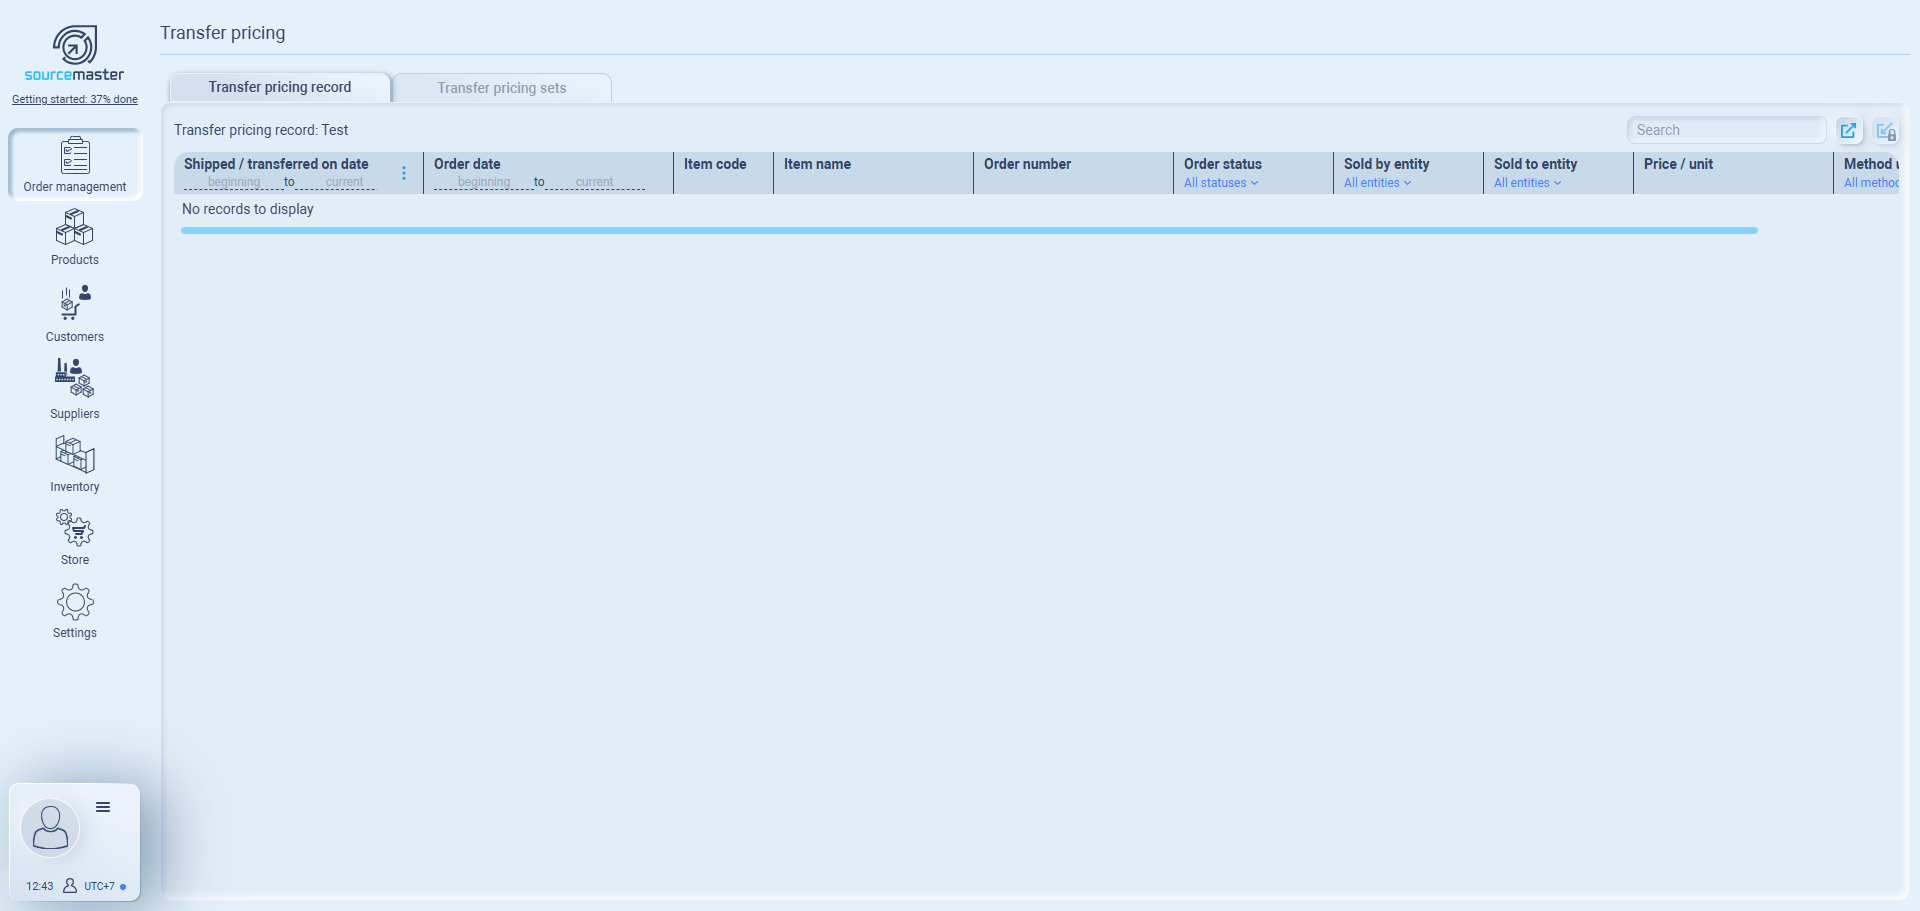
Transfer Pricing
The Transfer Pricing module helps you manage internal sales between your company entities across different countries.
This is essential for businesses that operate multiple entities (e.g., a sourcing office in China, HQ in Bangkok, and a sales office in the US) and need to record transactions at fair market prices for compliance, accounting, and tax purposes.
When to use Transfer Pricing
You need transfer pricing when:
-
Your company has two or more legal entities in different countries.
-
Products are purchased by one entity, then resold internally to another before reaching the final customer.
-
You must show regulators that these internal sales are priced fairly, not just at zero profit.
For example:
-
Your China entity buys chopsticks from a local supplier.
-
It sells them to your Bangkok HQ with a small profit margin.
-
Bangkok HQ then sells to your US entity, which invoices the final customer.
Each step is recorded properly with transfer prices, so every entity has legitimate revenue and cost records.
1. Transfer Pricing Records
This tab stores the history of applied transfer pricing per order. Each record shows:
-
Transaction details (dates, order number, items).
-
Which entity sold and which entity purchased.
-
Method used to calculate the transfer price (cost-plus, resale margin, etc.).
-
Final price/unit recorded.
💡 Think of this as your compliance ledger. It proves that internal sales between entities were priced using a legitimate method, not arbitrary numbers.
2. Transfer Pricing Sets
This tab allows you to create predefined groups of transfer pricing rules. Instead of setting each transaction manually, you can:
-
Define pricing groups with validity dates.
-
Assign them to entity pairs (e.g., “China → Bangkok” or “Bangkok → US”).
-
Load items by category or copy from an existing catalog.
-
Choose the calculation method (cost-plus, resale margin, profit share, etc.).
📌 Example:
-
You create a pricing set “CHI→BKK 2025” with Cost Plus 10% rule, valid Jan–Dec 2025.
-
Every time your China company sells chopsticks to Bangkok company, Sourcemaster automatically applies that markup.
-
Records of those transactions show up in the Transfer Pricing Record tab.
you can click + on the top-right to create transfer pricing group
Create Transfer Pricing Group – Field Explanations
1. Pricing group code
-
System-generated ID (e.g., PRG-001).
-
Used internally for reference, not visible to clients.
-
Helps track multiple groups if you create several rules (e.g., CHI→BKK, BKK→US).
2. Prices quoted in
-
Select the currency in which transfer prices are set.
-
Example: If your China entity sells to Bangkok, you may quote in USD or CNY depending on how you want to standardize pricing.
-
Important for keeping financial statements consistent.
3. Pricing group name
-
Internal name, not shown to clients.
-
Best practice: Name by entity pair + method + year.
-
Example: CHI→BKK Cost+10% 2025.
-
4. Pricing group description
-
Extra notes for internal clarity.
-
Example: Applied for chopsticks & tableware category, valid for 2025 shipments, based on cost-plus markup.
5. Date range
-
Define the validity period of the pricing rule.
-
From: Immediate or a chosen date.
-
To: Open-ended (default) or a fixed date.
-
Example: 01/01/2025 – 31/12/2025 for an annual policy.
-
Why: Keeps you compliant with audit trails and avoids accidental “forever” rules.
6. Create pricing group from scratch
-
Lets you build the group manually.
-
Auto-load categories: Add all products from a specific category into the pricing group automatically.
-
Example: Auto-load Tableware category so chopsticks, bowls, plates all follow the same transfer rule.
-
7. Copy item list from an existing group/catalog
-
Saves time if you already built a pricing group.
-
Example: You copy CHI→BKK 2024 set, then just adjust margin/validity for 2025.
-
“Copy prices from source” option will bring forward the same pricing rules.
8. Applicable from / Applicable to
-
Defines the selling entity and buying entity.
-
Example: Applicable from: China Co. → Applicable to: Bangkok HQ.
-
This is the backbone: It tells Sourcemaster which internal trade path the rule applies to.
9. Confirm and return
-
Saves the group as a draft.
-
Must be approved before it becomes active.
-
Once active, when you create a sales order between the defined entities, Sourcemaster will auto-fill transfer prices using this group.
⚡ Example in Practice
You set up CHI→BKK Cost+10% 2025.
Valid Jan–Dec 2025.
Applies only to Tableware category.
Whenever your China entity sells chopsticks to Bangkok HQ, Sourcemaster automatically calculates cost + 10%.
The transaction then shows up in the Transfer Pricing Record tab for audit tracking.
Purchase Orders (PO)
A Purchase Order tells a supplier what you want to buy, in what quantity, when, and where to deliver. In Sourcemaster (SM), POs also connect to your Sales Orders, Inventory, and Shipments so nothing falls through the cracks.
Where to start
From the Order management dashboard
-
Hover the Purchase Orders tile → choose Active POs (to view) or Create purchase order (to make a new one).
Create Purchase Order
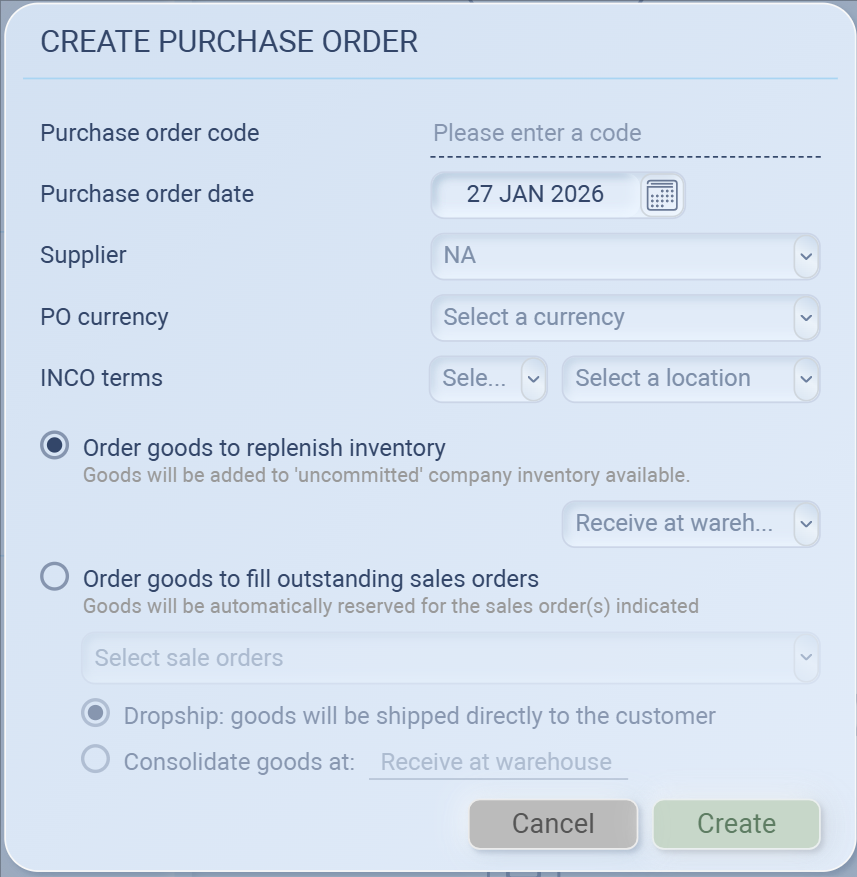
When the Create purchase order window opens:
Purchase order code
Enter your internal reference (e.g., PO-2025-0008). Leave blank if you use auto-numbering later.
Purchase order date
Defaults to today. Change if you’re backdating or planning ahead.
Buyer
Choose the company/entity that is buying.
If your entity isn’t listed, create it first under Settings → Company / Entities.
Supplier
Pick the vendor you are ordering from.
If you don’t see them, add the supplier under Suppliers.
PO currency
Currency you’ll use on the PO (USD, CNY, EUR, etc.). This drives pricing and later reports.
INCOTERMS
Choose trade term and location (e.g., FOB Shanghai, CIF Los Angeles).
This tells who pays for freight/insurance and when risk transfers. Pick the location too.
How do you want to fulfill this PO?
You’ll pick one of these modes. It decides where stock goes and whether it ties to a customer order automatically.
option 1: Order goods to replenish inventory
-
Use when you’re stocking up.
-
Goods go into your warehouse as Available (uncommitted).
-
Choose Receive at warehouse (which warehouse/location).
Good for: bulk buys, buffer stock.
option 2: Order goods to fill outstanding sales orders
-
Use when you already have one or more Sales Orders to fulfill.
-
Click Select sales orders and tick the SO(s) you want to cover.
-
SM will automatically reserve these goods for those sales orders once received.
You’ll also choose between:
-
Dropship – supplier ships directly to your customer.
-
No warehouse handling on your side.
-
Perfect for cross-border trading or when timing is tight.
-
-
Consolidate goods – supplier ships to your warehouse first.
-
You’ll combine items from multiple suppliers, then ship to the customer together.
-
Good for: just-in-time buying tied to live orders.
Once you done, click Create
-
Your PO lands in Draft & pending purchases.
-
Open it to add items (products, qty, unit price), add notes/attachments, and Confirm when ready.
-
After confirming, it moves to Supplier orders in process.
Tip: if you buy by packs but sell per piece, set Units of Measure in Products (e.g., 1 pack = 100 pcs). This keeps math clean on both PO and SO.
Adding items to a PO (after creation)
-
Open the PO.
-
Click + Add item to insert products, quantity, unit of measure, and Price / unit.

-
(Optional) Use Import items if you have a spreadsheet (CSV/XLSX).
-
Check the Sum on the right; add Additional charges (freight, insurance) if you want them tracked on the PO.
-
Save (stays Draft) or Confirm (moves to In process).
Pricing details (PO)
-
Open the PO.
-
Click the menu icon next to the green + above the items table → Pricing details.
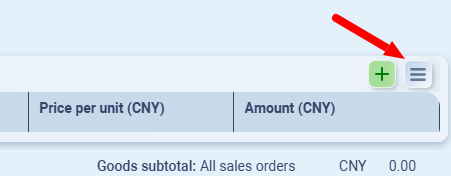
-
Set Auto-fill prices: Yes (use price list/last cost) or No (manual).
-
In the grid, enter/review Purchase price for each line. The Amount updates (Qty × Price).
-
Save/Close the sheet (changes write back to the PO).
-
Back on the PO, add Additional charges / Deductions from the totals menu ≡, then Confirm accepted by supplier when ready.
-
If supplier is an internal entity, choose the correct transaction pathway (for transfer-pricing docs).
-
The sheet’s Total is lines only; freight/insurance are added on the PO totals panel.
Receiving / Dropshipping
-
If replenishing or consolidating
-
When the supplier ships, create a Shipment (or mark shipped if you track externally).
-
On arrival, Receive against the PO into the selected warehouse. Stock becomes available (or pre-allocated if tied to SOs).
-
-
If dropshipping
-
You’ll still update Shipment/Delivery records so SM knows the customer received goods (even though items never touched your warehouse).
-
The linked Sales Order will progress automatically when you confirm delivery.
-
Tracking your POs
On the Purchase Orders page:
-
Draft & pending purchases – needs confirmation or edits.
-
Supplier orders in process – watch Ordered on, Supplier, Items, Total, and Prepped date.
-
Completed purchases for open orders – received or fully shipped, but associated SO may still be open (e.g., waiting for final delivery).
Use Search (top-right) to find by code, supplier, or notes. Most lists support quick sorting by date or totals.
Purchase Order panels
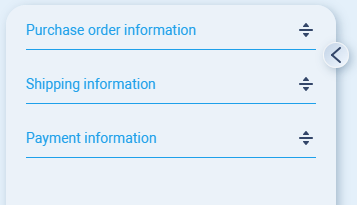
When a PO opens you’ll see a left sidebar with three collapsible panels:
-
Purchase order information
-
Shipping information
-
Payment information
Use the tiny chevron ˃ to collapse/expand the sidebar if you need more space.
1) Purchase order information
PO date
The date you’re issuing the PO. It prints on the PO PDF.
Last updated
Auto-filled by the system whenever someone edits the PO.
PO due date
Your requested need-by date from the supplier. Helpful for “behind schedule” tracking.
Est. goods prepped date
Supplier’s ready date (when goods are expected to be packed and ready for pickup). Use this to plan booking, container cut-offs, etc.
Order currency
The currency used for this PO’s item prices and totals. (Changing currency after adding lines will force you to recheck prices.)
Buyer
Which of your entities is buying (e.g., Bangkok HQ, China Jacket). If it’s wrong, change it here.
Notes
Free text for packing notes, QC instructions, color boxes, etc.
Link just below (“add a supplier order number”) lets you store the supplier’s confirmation number.
Tip: Fill PO due date + Est. goods prepped date for realistic timelines and better late/early reporting.
2) Shipping information
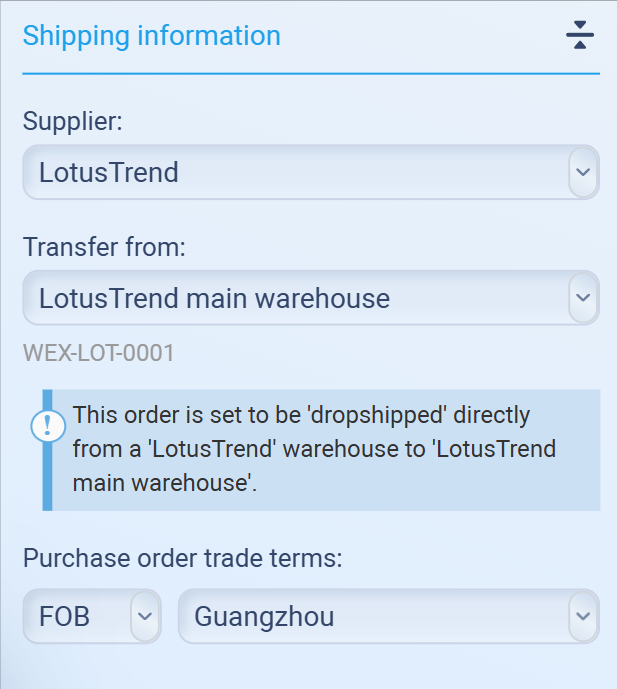
What you see here depends on how you created the PO:
-
Replenish inventory → you’ll see Receive at: Warehouse and a blue info box: “The goods in this order are not committed to any particular customer… They will be added to open inventory.”
-
Fill outstanding sales orders → you’ll be able to pick the Sales Order(s) and choose Dropship (supplier → customer) or Consolidate (supplier → your warehouse → customer).
Supplier:
The vendor you’re buying from (shown for context).
Transfer from:
Supplier location or their warehouse (if stored in your data). Optional but useful when preparing bookings.
Receive at:
Where you’ll receive stock if not dropshipping (your warehouse/location). If you don’t see any, add one in Inventory → Warehouses.
Purchase order trade terms
Your Incoterms + location for this PO (e.g., EXW Shanghai, FOB Ningbo, CIF Los Angeles).
This indicates who pays freight/insurance and when risk transfers.
Tip: Set Receive at before you confirm the PO; it avoids mistakes when you record the goods receipt.
3) Payment information
If your supplier has default terms saved, you’ll see “Per standard supplier terms.”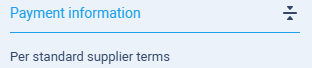
What to do next (quick checklist)
-
Add line items with the green + (or import via the drop-down next to it).
-
If needed, add Additional charges (freight/insurance) or Deductions (discounts) from the totals box menu ≡.
-
Make sure Incoterms and Receive at (or Dropship) are correct.
-
Click Confirm accepted by supplier (bottom-right) once your supplier confirms.
PO settings
-
Column manager – show/hide item table columns.
-
Use: Tick/untick to show or hide columns:
-
Item name
-
Quantity ordered
-
Price per unit (shown in the PO currency, e.g., CNY)
-
Amount (qty × price, in PO currency)
-
-
-
Import items (XLSX/CSV) – bulk add lines.
-
Export items (XLSX) – download current lines. *still unavailable*
-
PO settings – edit PO code/numbering.
-
Duplicate – copy as new draft. *still unavailable*
-
Back – return to PO list.
Sales Stats (Trend)

Sales Stats shows how your sales move over time so you can spot growth, seasonality, and outliers. In Sourcemaster (SM), these charts read directly from your Sales Orders and Deliveries, so you’re always looking at live numbers.
Where to start
From the Order management dashboard
-
Hover the Sales Stats tile → under TREND choose:
-
Aggregate sales (totals by day/week/month)
-
Order cloud (each order as a dot—size & timing)
-
Seasonal sales (month-over-month seasonality)
-
Tip: Set your date range, entity/seller, and currency first—those filters carry across all Trend widgets.
1) Aggregate sales
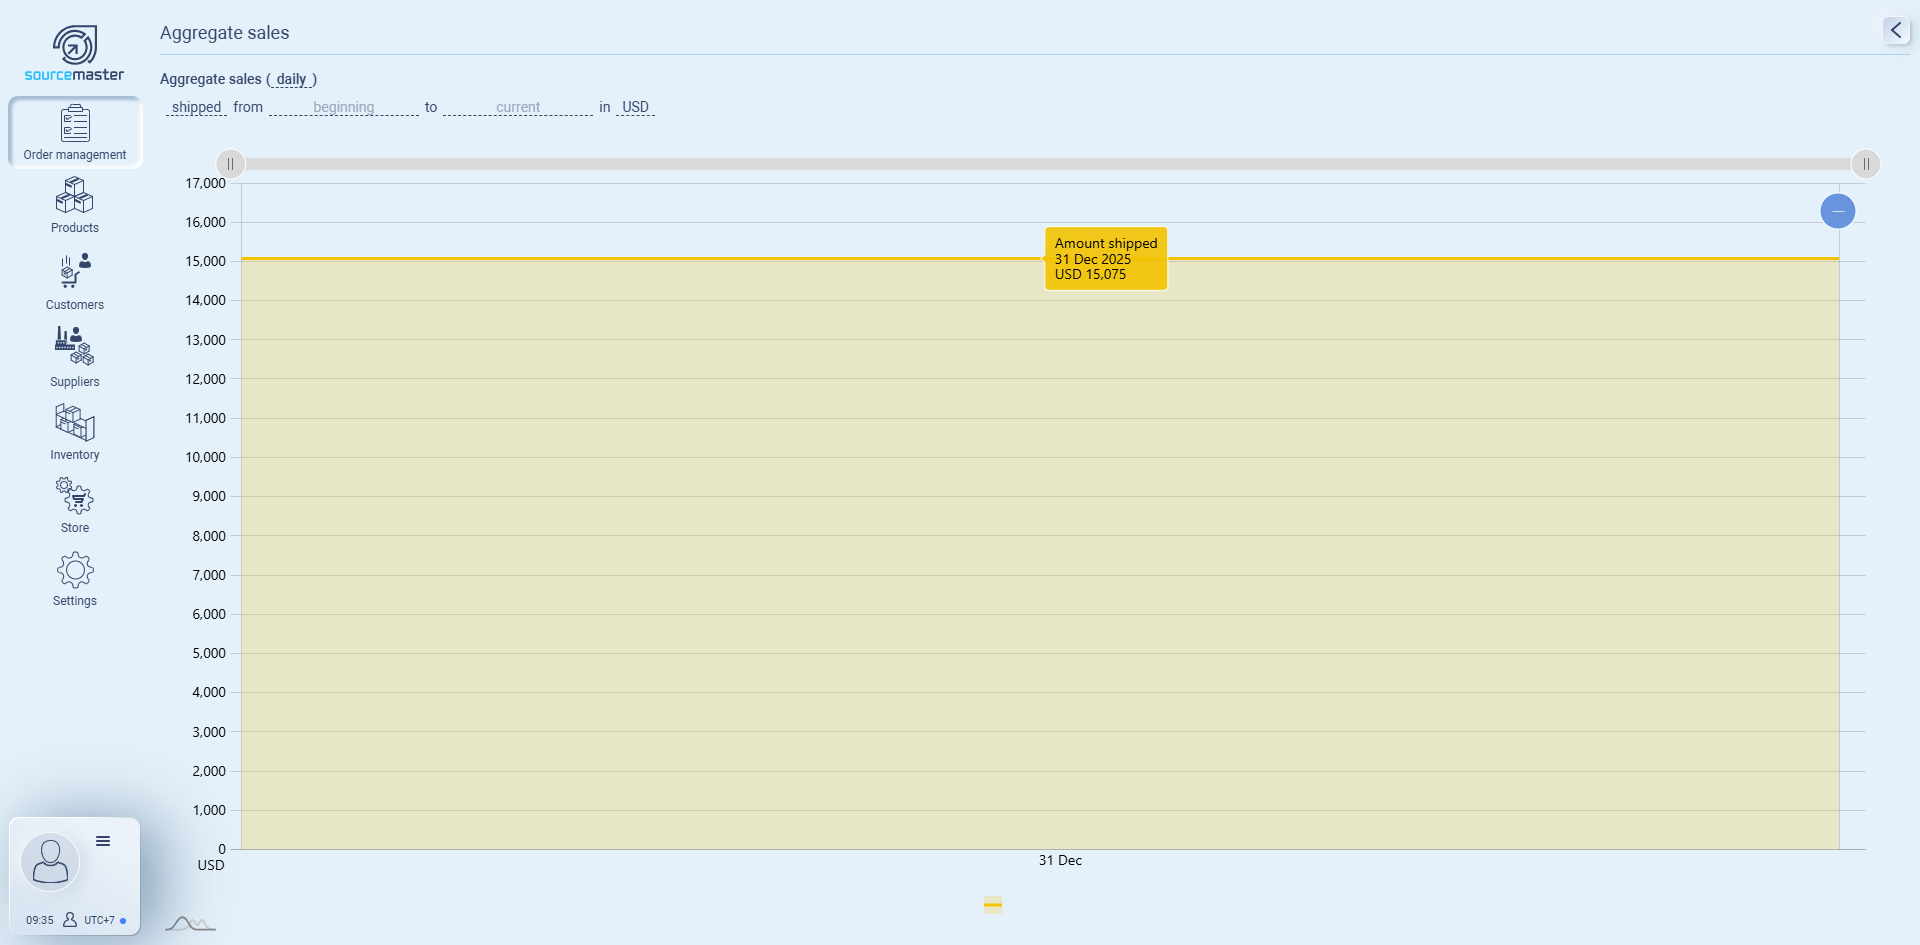
-
Open Sales Stats → TREND → Aggregate sales.
-
Set:
-
Basis: shipped (actual) or ordered (booked).
-
Period: daily / weekly / monthly.
-
Date range (from … to …) and Currency.
-
-
Read the line chart to see totals by period.
-
Hover for exact values.
-
Apply page filters (seller, customer, product) to narrow the view.
Use it for: growth trend, seasonality, campaign impact.
-
2) Order cloud
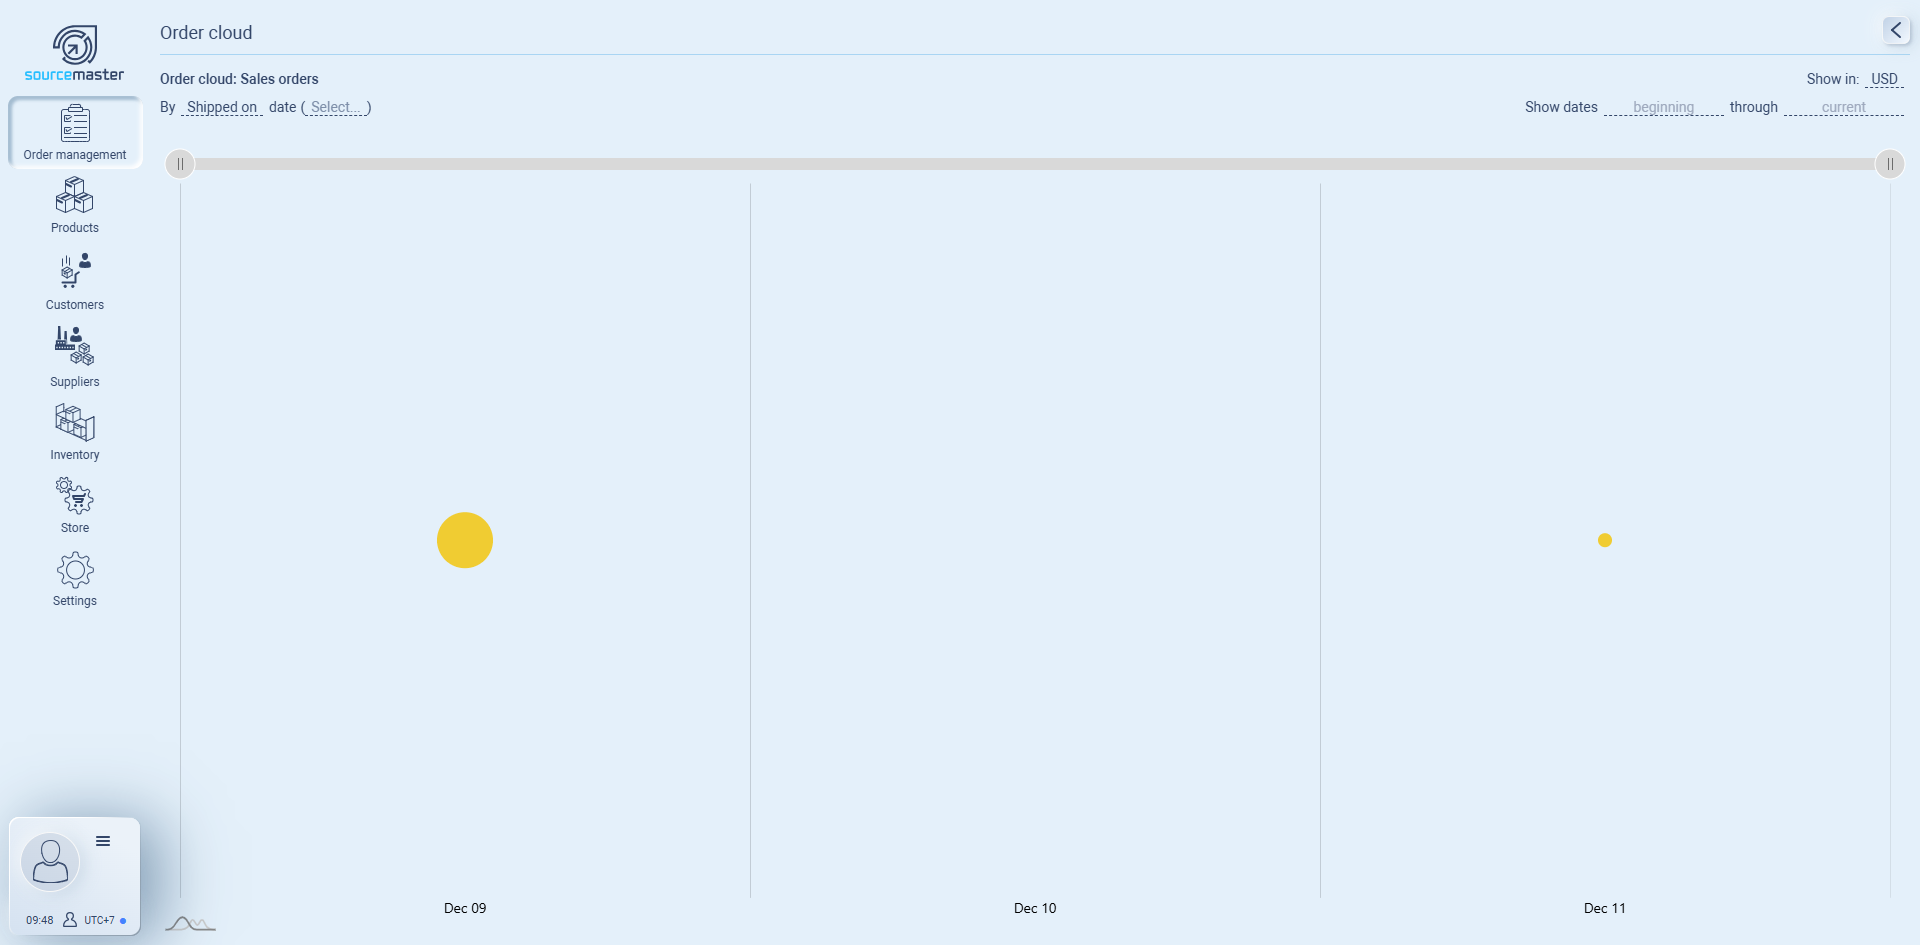
-
Open Order cloud.
-
Set:
-
Dataset: Sales orders.
-
Date key: Shipped on (or Ordered on).
-
Show dates and Date range; choose Currency.
-
-
View the scatter plot: each dot = an order; position shows when and how big it was.
-
Hover to see order amount/date.
Use it for: outliers (very large/small deals), bursts of activity, client clustering.
-
3) Seasonal sales
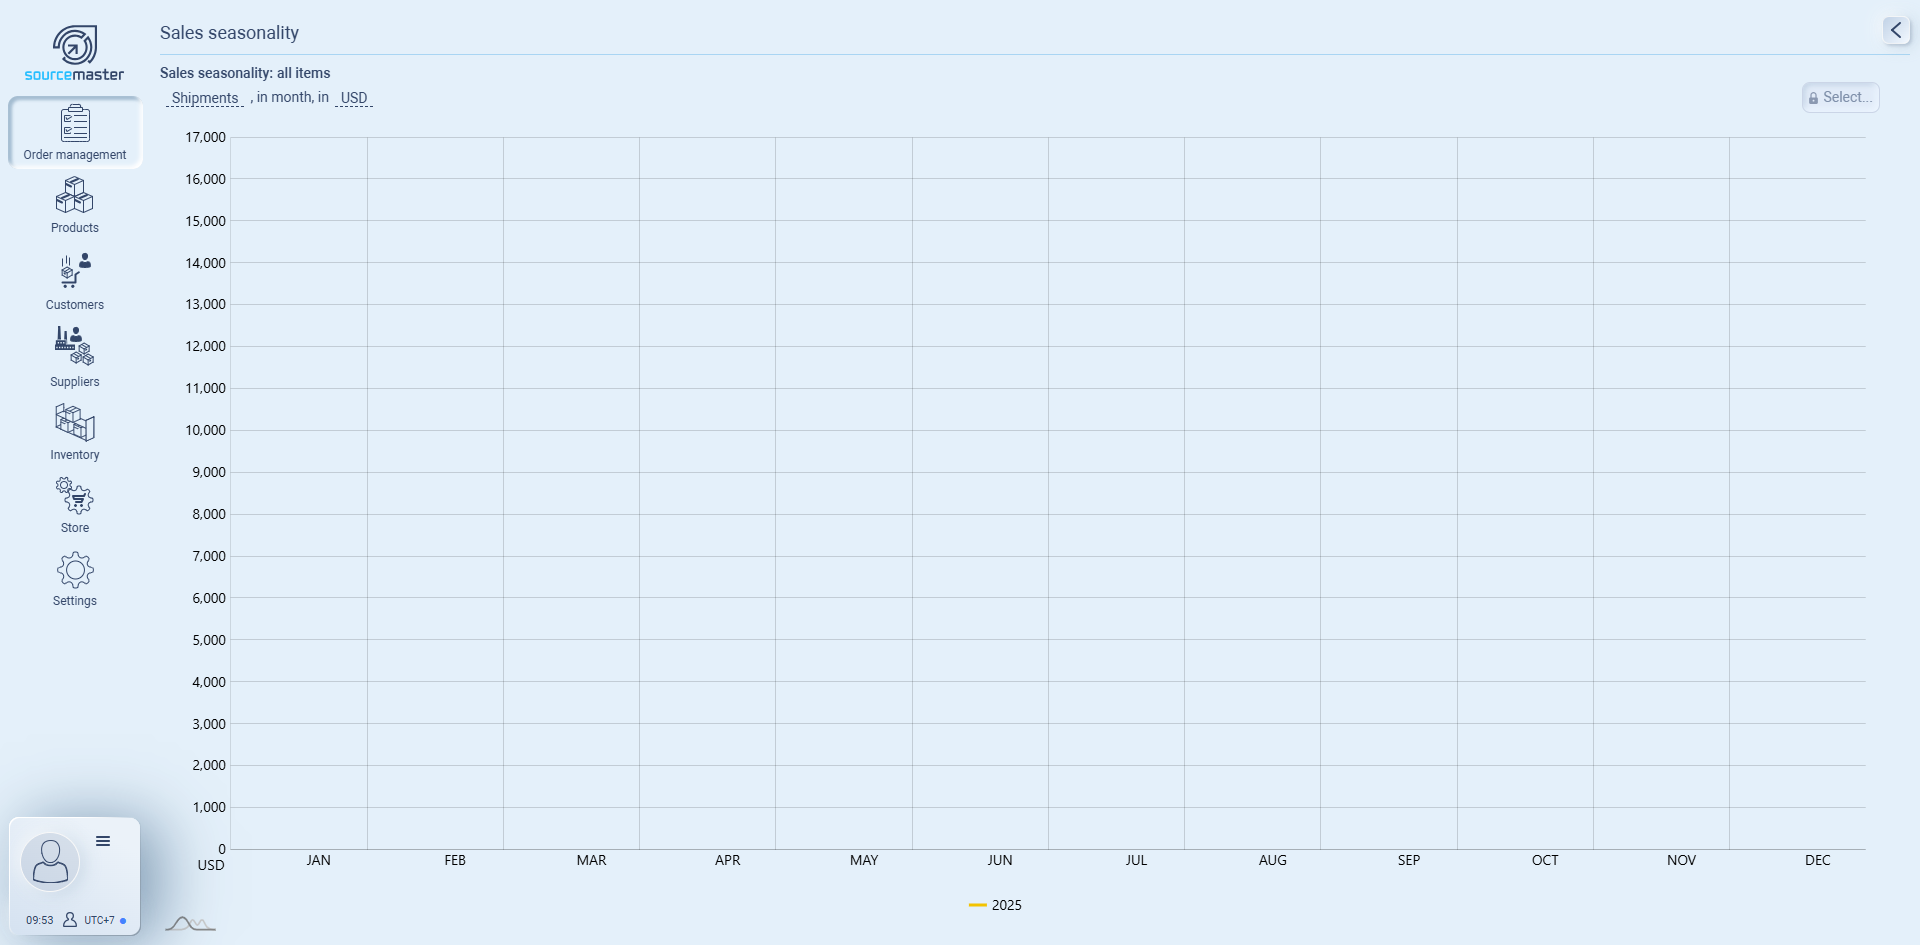
-
Open Seasonal sales.
-
Choose scope (All items or a specific item/category), in month, and Currency.
-
The chart stacks months across years to reveal seasonality.
Use it for: purchase planning, staffing, promo timing.
Tip: Set your default filters/currency once, then reuse them for all three widgets.
💡 If this doesn’t solve your issue or you have more questions, feel free to reach out through our [contact form]. We’ll get back to you within 2–3 business days.