Activate Customer Portal (B2B Branded Shop)
Use this page to activate your customer portal — also known as your B2B Branded Shop.
The portal allows customers to log in, view product catalogs, and place orders directly under your company’s brand identity.
You can customize the portal link, add your own logo, and set languages for your customers.
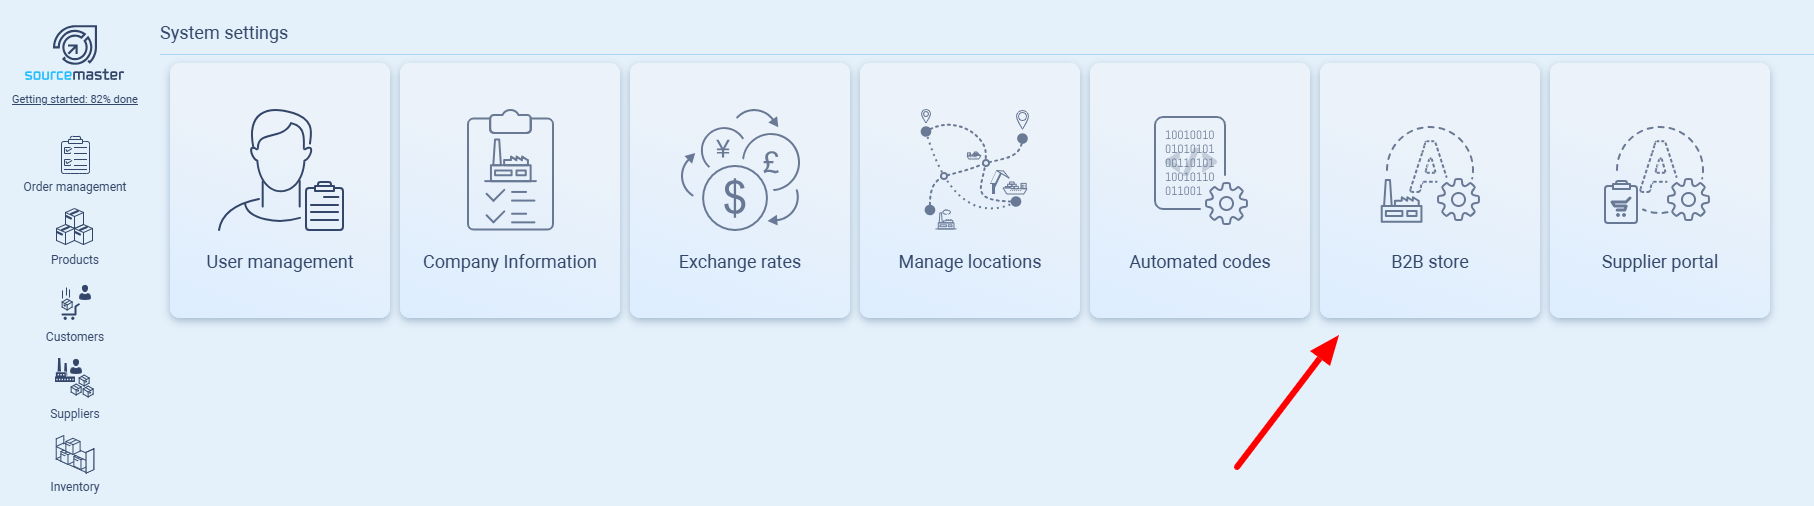
Accessing the B2B Shop Settings
-
Go to Settings › B2B Store.
-
The configuration page contains:
-
Customer Login URL
-
Branding Settings
-
Language and Background options
-
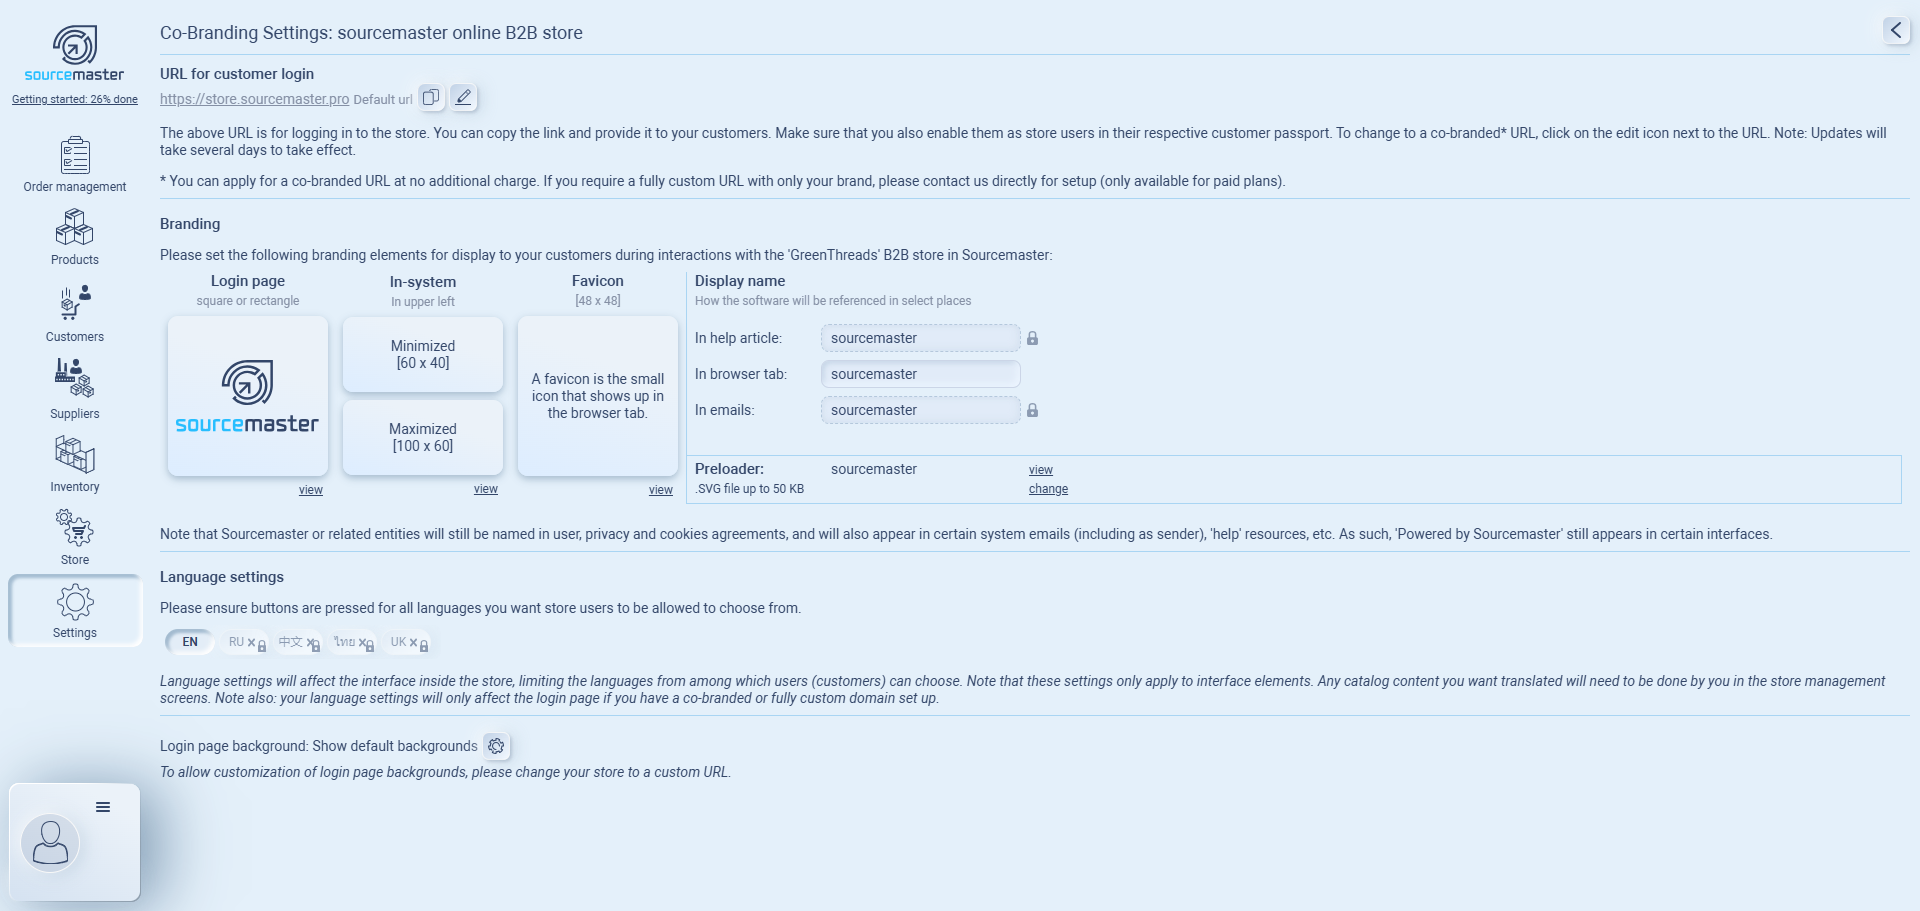
Customer Login URL
The Customer Login URL is the link your customers use to access your branded shop.
-
By default, every account has the link:
https://store.sourcemaster.pro -
You can copy this link to share with customers, or edit it to create a co-branded URL.
 Please be advised that once you submit a request to edit your URL, it will require approval, which may take approximately 1 to 3 days.
Branding
Your branding settings define how your B2B shop looks to your customers.
You can upload company logos, change the favicon, and edit the display name.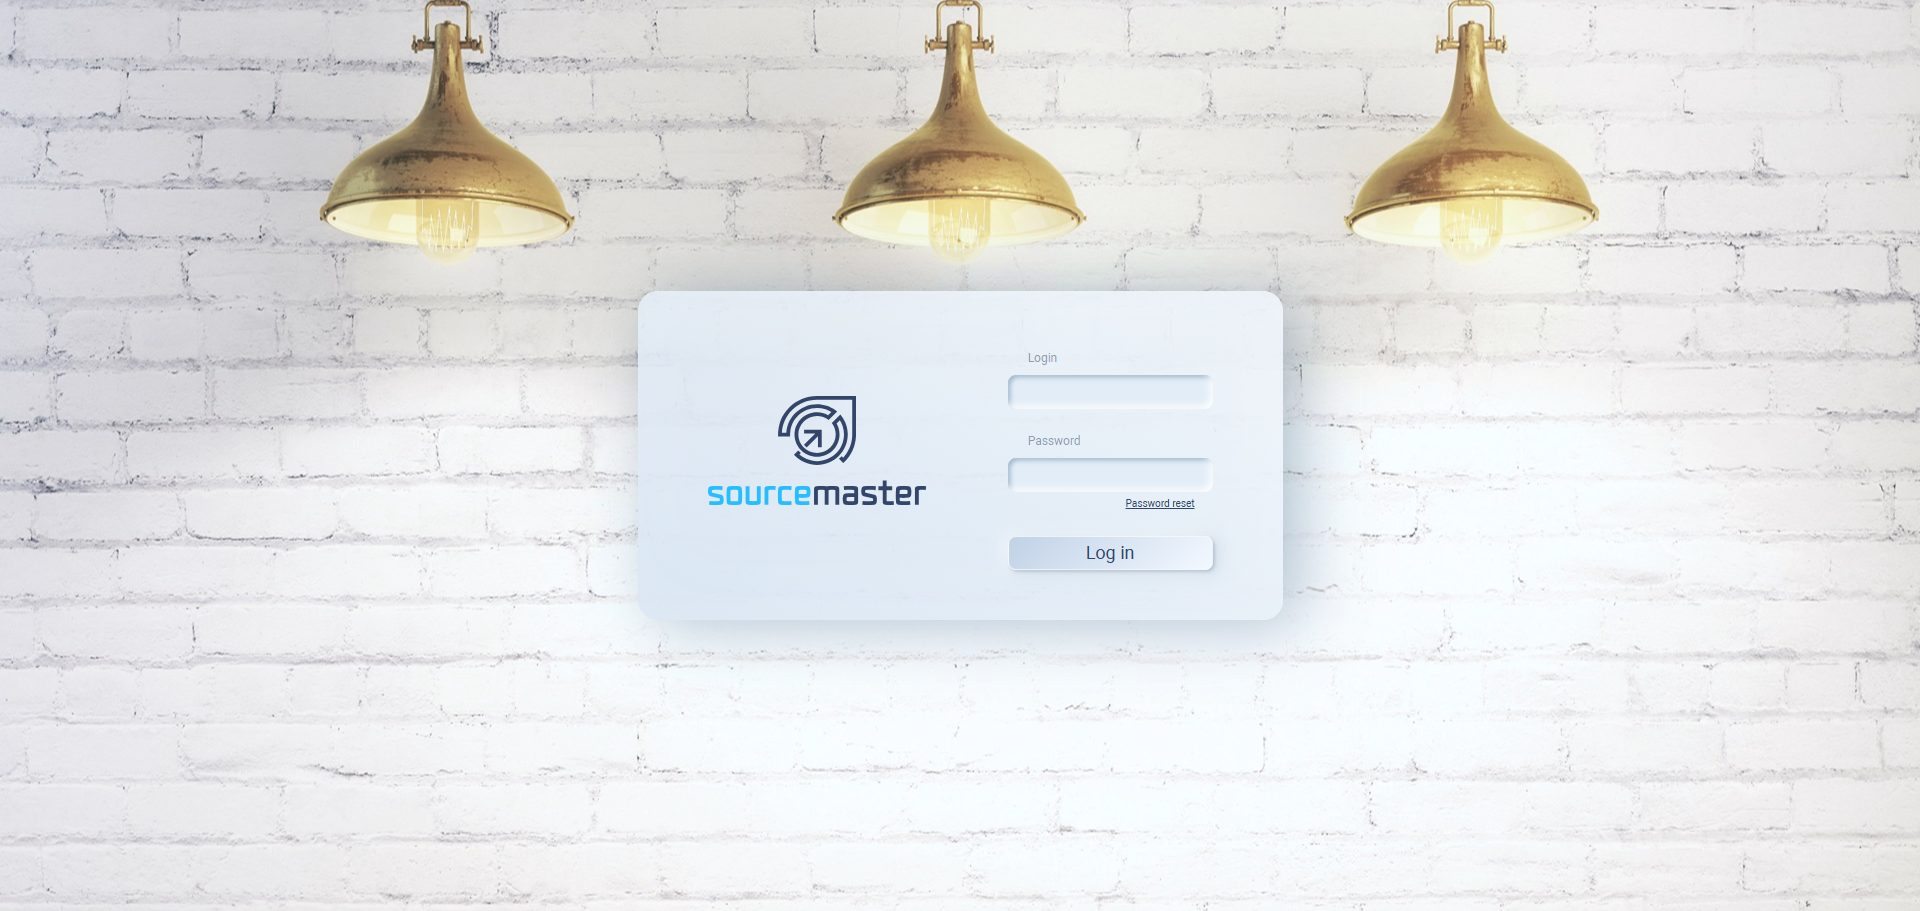
Updating your branding assets:
-
Hover over the desired section (Login Page, In-System, or Favicon) until icons appear.
-
Click the upload icon ⬆️ to replace the existing image.
-
Click View to preview your changes in the live store.
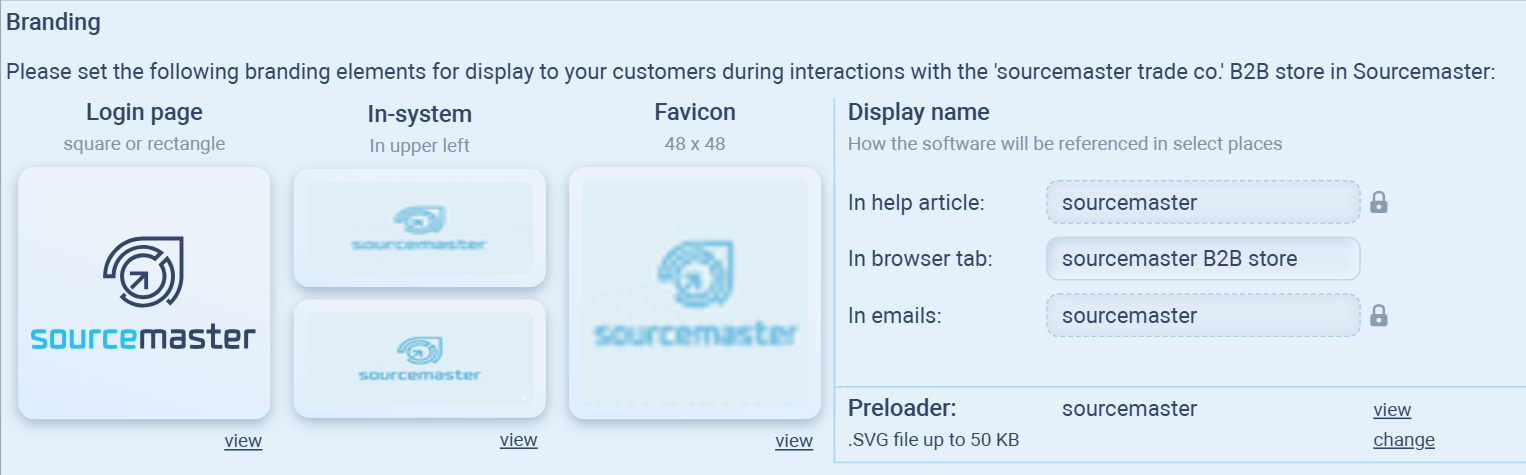
File specifications:
| Element | Description | Format | Size |
|---|---|---|---|
| Login Page Logo | Image shown on the store login page. | JPEG | 1920 × 1080 px, ≤1 MB |
| In-System Logo (Header) | Logo displayed inside your B2B interface. | PNG or JPEG | 60 × 40 px (minimized) / 100 × 60 px (maximized) |
| Favicon | Icon in browser tabs and bookmarks. | PNG | 48 × 48 px |
| Display Name | Your company name shown in help pages, browser titles, and system emails. | Text | — |
Editing the login page background:

-
Click the settings icon ⚙️ next to Login page background.
-
Choose one of two options:
-
Show default backgrounds — use the system standard image set.
-
Custom background — upload your own image.
-
-
Custom backgrounds require a custom or co-branded URL.
-
File format: JPEG
-
Size: 1920 × 1080 px, ≤1 MB
-
-
Click View to preview how your background looks on the live login page.
✅ Example:
Everloom uploads a minimal blue gradient image (everloom_bg.jpg) to replace the default white background.
Their login page now appears with the Everloom logo centered over a soft blue gradient.

Previewing Your Store
After updating your settings:
-
Click View beside each element or at the bottom of the page.
-
The system opens your store in a new browser tab.
-
Confirm that:
-
The login page displays the correct logo and background.
-
The in-system header shows your company name.
-
The selected languages appear correctly.
-
✅ Tip:
You can edit branding anytime.
Changes take effect immediately for all users under your store URL.
Example: Completed Setup
| Element | Example Value | Description |
|---|---|---|
| URL | store.everloom.sourcemaster.pro | Co-branded customer login page |
| Login Page Logo | Everloom_brand_banner.jpg | Displays company name and colors |
| In-System Logo | Everloom_symbol.png | Shown on header when logged in |
| Language | English, Chinese | Multilingual UI for global buyers |
| Background | everloom_bg.jpg | Soft blue minimalist design |
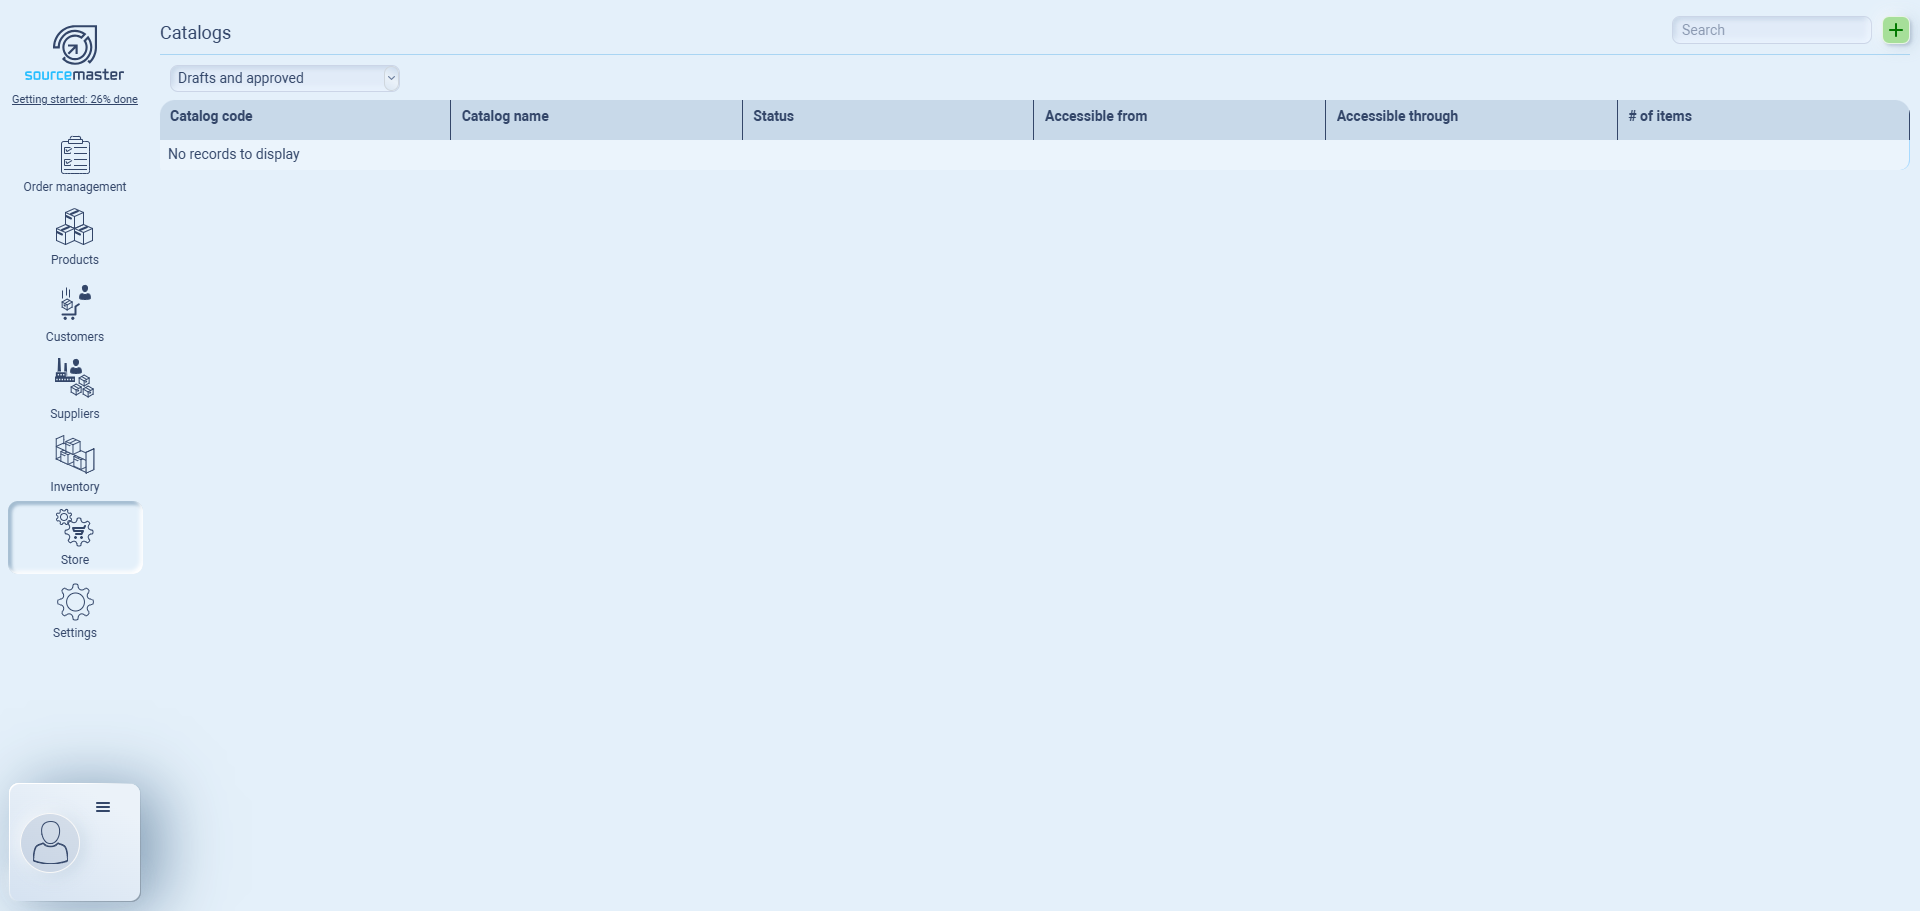
Opening Your Store
Once you’ve finished setting up your B2B Branded Shop under Settings › B2B Store, you can now open the shop interface to start managing your online catalogs.
-
Go to Store on the left-hand navigation panel.
-
You’ll arrive at the Catalogs page. This page lists all active and draft catalogs available for your customer portal.
-
Use the filter at the top to view:
-
Drafts and Approved catalogs (default view).
-
Approved Only, to see what’s live in your shop.
-
-
To create a new catalog, click the ➕ Add button in the upper-right corner.
Catalogs Overview
Each catalog represents a curated product list that customers can access through your B2B shop.
You can define:
-
Catalog Code and Name — used for internal tracking and display.
-
Status — draft, pending, or approved.
-
Accessible From / Through — defines which customer(s) or portal(s) can view this catalog.
-
# of Items — number of products in the catalog.
Creating a New Catalog
After clicking the ➕ Add button on the Store › Catalogs page, a setup window appears.
This is where you define your new catalog’s internal details before publishing it to customers.
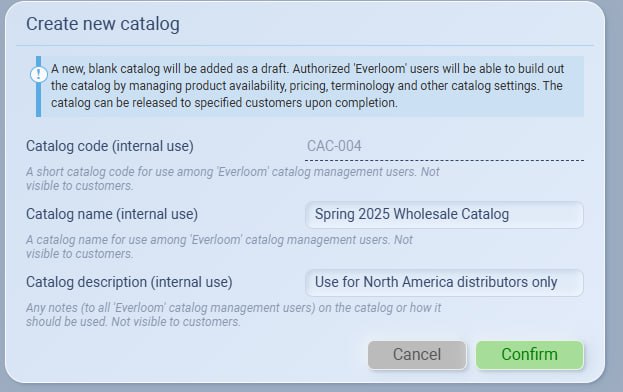
Step 1: Review the system message
At the top, you’ll see a note confirming that a copy of the base catalog will be added as a new draft.
Only authorized catalog management users will be able to edit product listings, pricing, and terminology.
Step 2: Fill in the required fields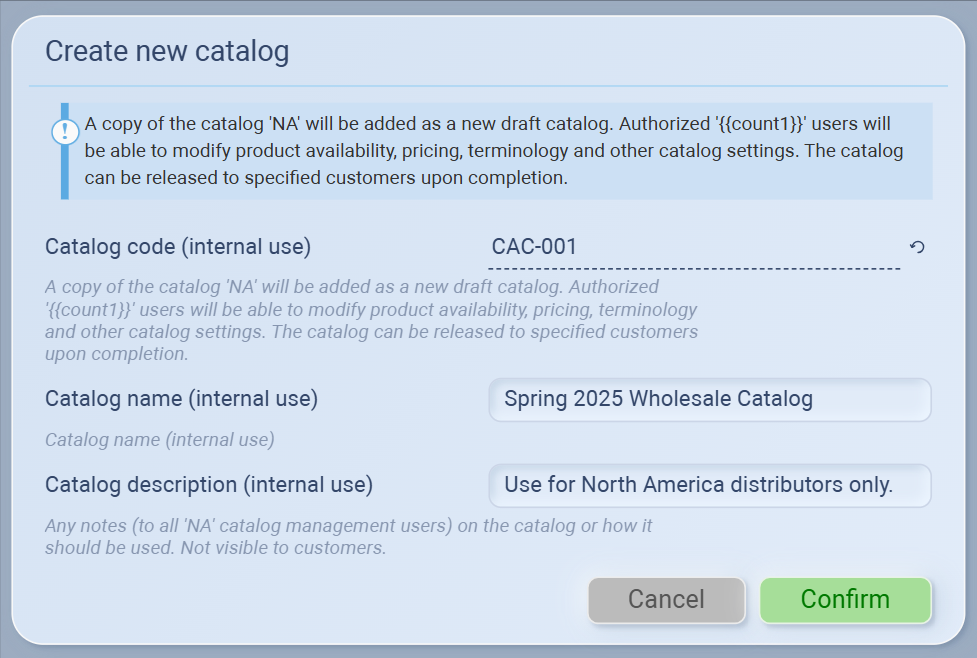
| Field | Description | Example |
|---|---|---|
| Catalog code (internal use) | Auto-generated code used to identify the catalog. | CAC-001 |
| Catalog name (internal use) | A short name used internally to describe the catalog. Not visible to customers. | Spring 2025 Wholesale Catalog |
| Catalog description (internal use) | Internal notes or usage instructions for team members. | Use for North America distributors only. |
Step 3: Confirm creation
Click Confirm to save the new catalog. It will appear as a Draft in your Catalogs list and can now be edited or released to specific customers.

✅ Tip:
Use a clear naming format (e.g., Season + Region + Type) so catalogs are easy to identify later, such as:
Spring 2025 – APAC Retail
Autumn 2025 – Europe Wholesale
Adding Products to a Catalog
Once your catalog is created, you can start adding products to make it available to customers in your B2B store.
Step 1: Open Catalog Settings
On the Catalogs page, find your newly created catalog and click the gear icon (⚙️) labeled “Catalog settings.”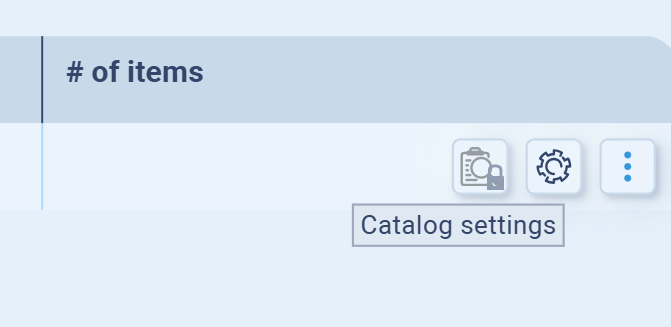
This opens the catalog setup interface
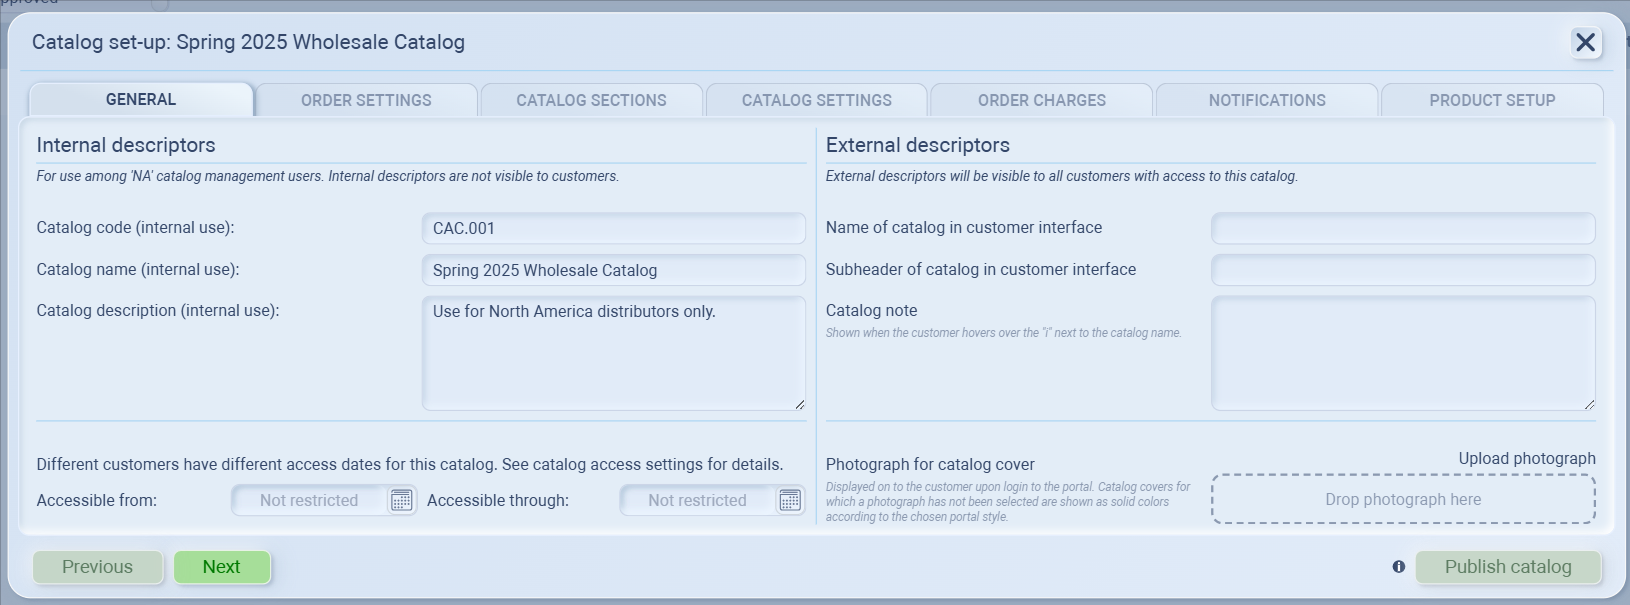
Step 2: Review General Information (General tab)
You’ll land on the GENERAL tab first.
Internal descriptors
Used only within your team.
-
Example: Code CAC.001, Name Spring 2025 Wholesale Catalog, Description For NA distributors only.
External descriptors
Visible to customers in the store.
-
Name: Spring 2025 Collection
-
Subheader: Available to verified distributors
-
Note: Optional info shown on hover
-
Cover photo: Upload a banner (JPEG, under 1MB)
Accessible period
Set when the catalog is visible to customers.
-
Accessible from: Start date
-
Accessible through: End date
Leave as Not restricted for continuous access.
You can later customize access per customer in Catalog Access Settings.
Think of this page like your store layout:
-
Internal descriptors are what’s behind the counter — only your team sees them (like catalog code, internal notes).
-
External descriptors are what’s on the shelf — customers see these in your portal (catalog name, tagline, cover photo).
You can also set an accessible period — the time window when customers can view this catalog.
Leave it as Not restricted for always-on access or set start/end dates for seasonal catalogs (e.g. Apr 1–Jun 30, 2025).
Order Settings
This tab defines how orders behave for this catalog.
Seller
Select which entity is responsible for sales.
(Useful for multi-entity setups — choose which branch or company issues the sales order.)
Currency of catalog
Determines the currency displayed in product prices and used for all orders from this catalog.
Trade terms (Incoterms)
Specify delivery or shipping terms, such as FOB, CIF, or EXW.
Minimum order amount
Set the minimum total value required for customers to confirm an order.
Payment terms
To configure how payments are structured, click the edit icon beside Payment terms.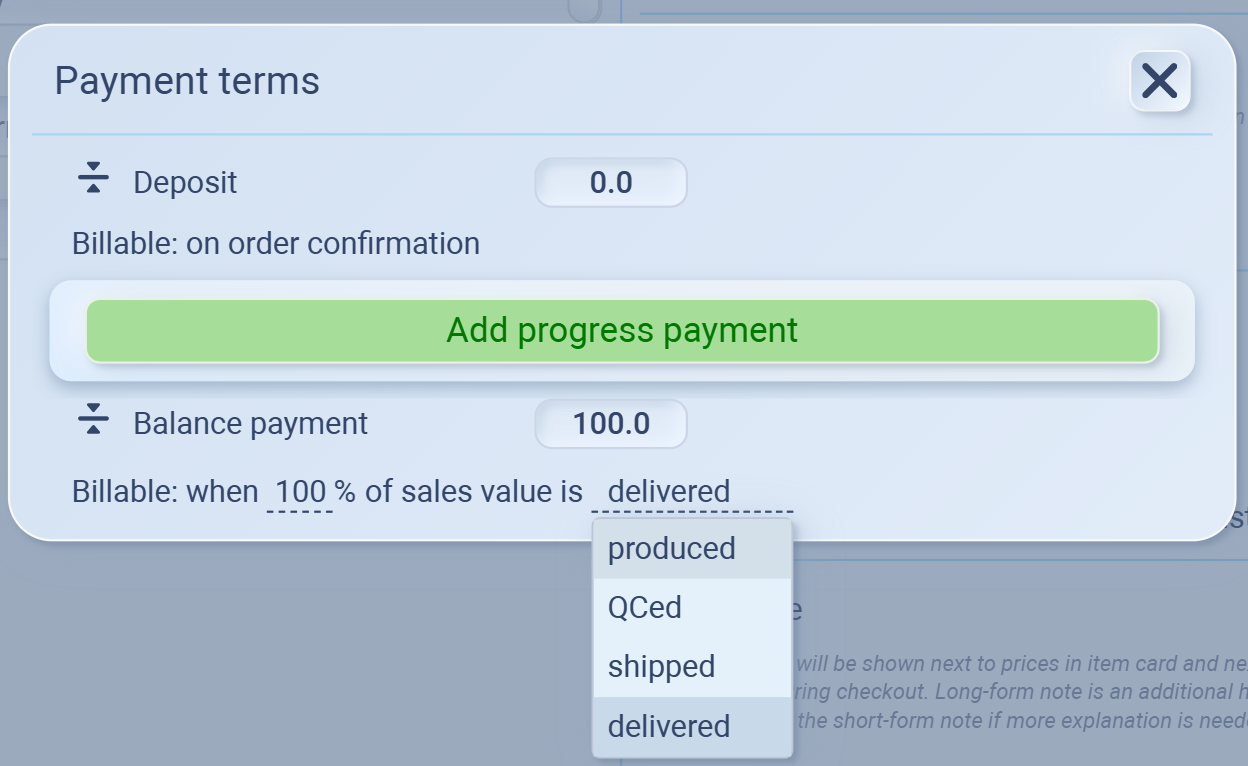
You can break down payments into multiple stages to match your order process:
-
Deposit – The initial amount billed upon order confirmation.
-
Progress payment – (Optional) Add one or more stages between deposit and final payment.
-
Balance payment – The remaining amount billed once all goods are delivered.
You can define when each payment becomes billable, meaning when the system will generate an invoice or mark it as due.
Each stage (Deposit, Progress, or Balance) can be linked to a specific event, such as:
On order confirmation – immediately after the customer confirms an order.
When production starts – once manufacturing or assembly begins.
After QC completed – after products pass quality check.
On delivery – when goods are shipped or fully delivered.
💡 Example:
You might set 30% deposit on order confirmation, 50% progress payment after production starts, and 20% balance billable when the entire order is delivered.
This flexibility helps tailor your catalog for wholesale or pre-order operations
Catalog Sections
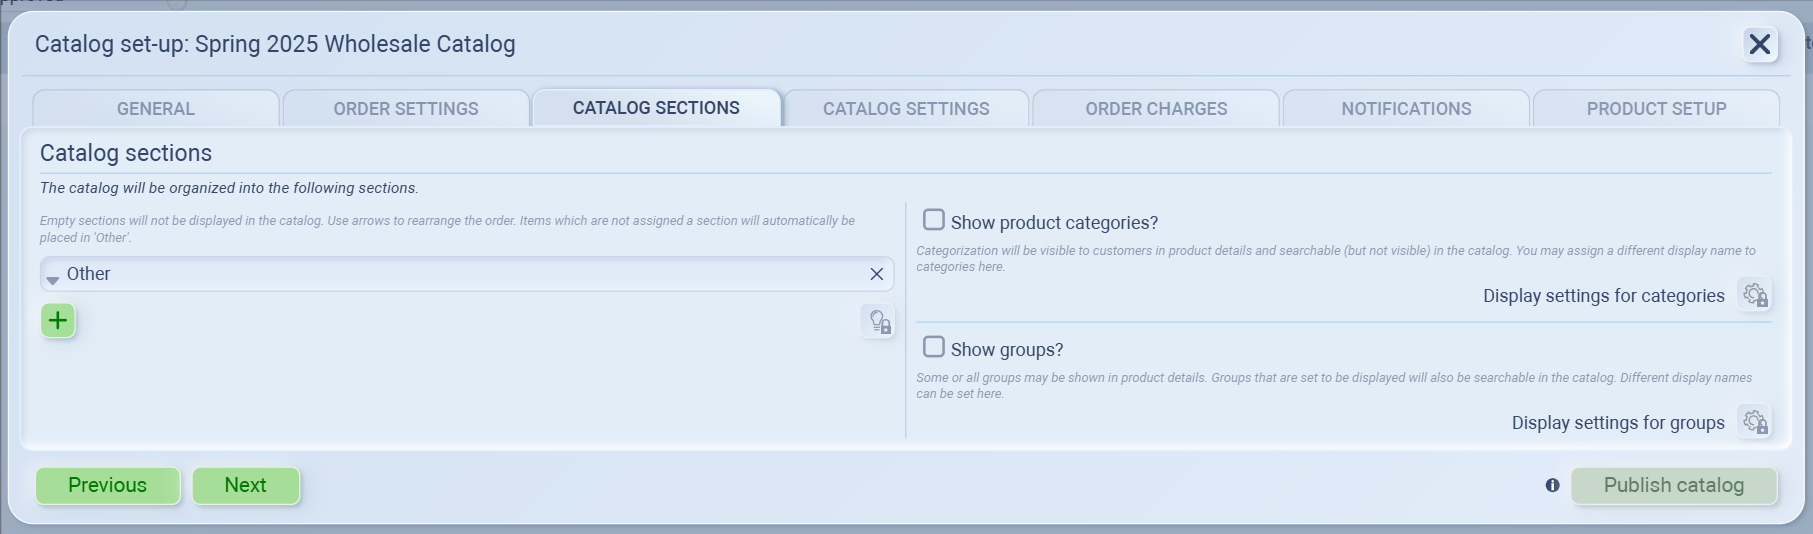
Organize how your products appear in the customer catalog.
-
Click the ➕ icon to create new sections (e.g. “Spring Collection”, “Clearance Items”, “New Arrivals”).
-
Any unassigned items will automatically appear under Other.
-
You can rearrange section order using the arrows.
If you want to show product categories or groups, you can enable them here —
but note that both are managed from the Products section, not within the catalog setup itself.
💡 Tip: Think of “sections” as the front-end layout of your catalog, while “categories” and “groups” come from your product database.
Catalog Settings
This tab controls how your catalog behaves when customers place orders.
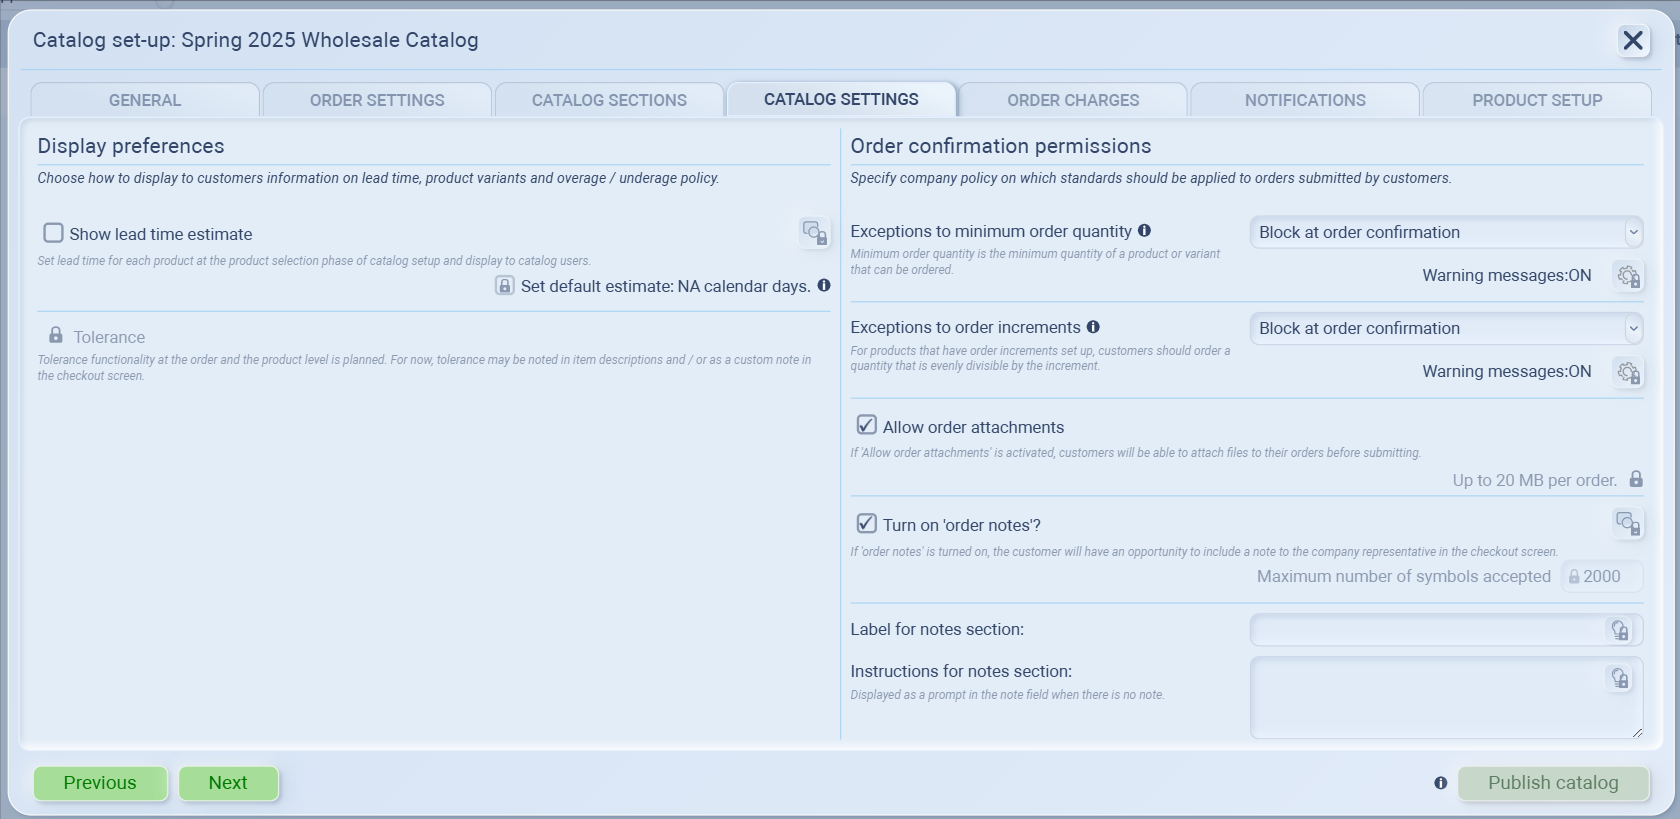
Display Preferences
-
Show lead time estimate – enable this if you want customers to see estimated delivery or production time.
To activate:-
Check Show lead time estimate.
-
Check Set default estimate: NA calendar days.
-
Edit the NA field to set the number of days (e.g., 7 days).
-
-
Tolerance – reserved for future use. (Will support overage/underage flexibility once released.)
Order Confirmation Permissions
Define how strictly orders are validated when customers check out:
-
Exceptions to minimum order quantity – choose to allow with warning or block order confirmation.
-
Exceptions to order increments – apply the same control for products that must be ordered in batches (e.g., 10, 20, 30).
-
Allow order attachments – customers can upload reference files such as purchase orders or artwork (up to 20MB per order).
-
Turn on order notes – let customers leave a short message at checkout (e.g., “Deliver after July 5”).
💡 Tip:
If your catalog serves B2B clients or made-to-order items, showing lead times and enabling attachments helps manage expectations and reduce back-and-forth communication.
Order Charges
This tab lets you define any extra fees or costs that appear on a customer’s order — such as freight, handling, or packaging fees.
-
Click the ➕ icon to add a new charge.
You can set:-
Fixed amount (e.g., $50 flat shipping)
-
Percentage of goods amount (e.g., 5% handling fee)
-
-
Charges listed here will automatically be added to the order total at checkout.
Make sure your freight, shipping, and tax policies align with the catalog’s Incoterms configuration.
💡 Tip:
If your pricing depends on region or order size, you can manage those conditions manually in your price lists or use variable rates in the future (this feature is planned).
Notifications
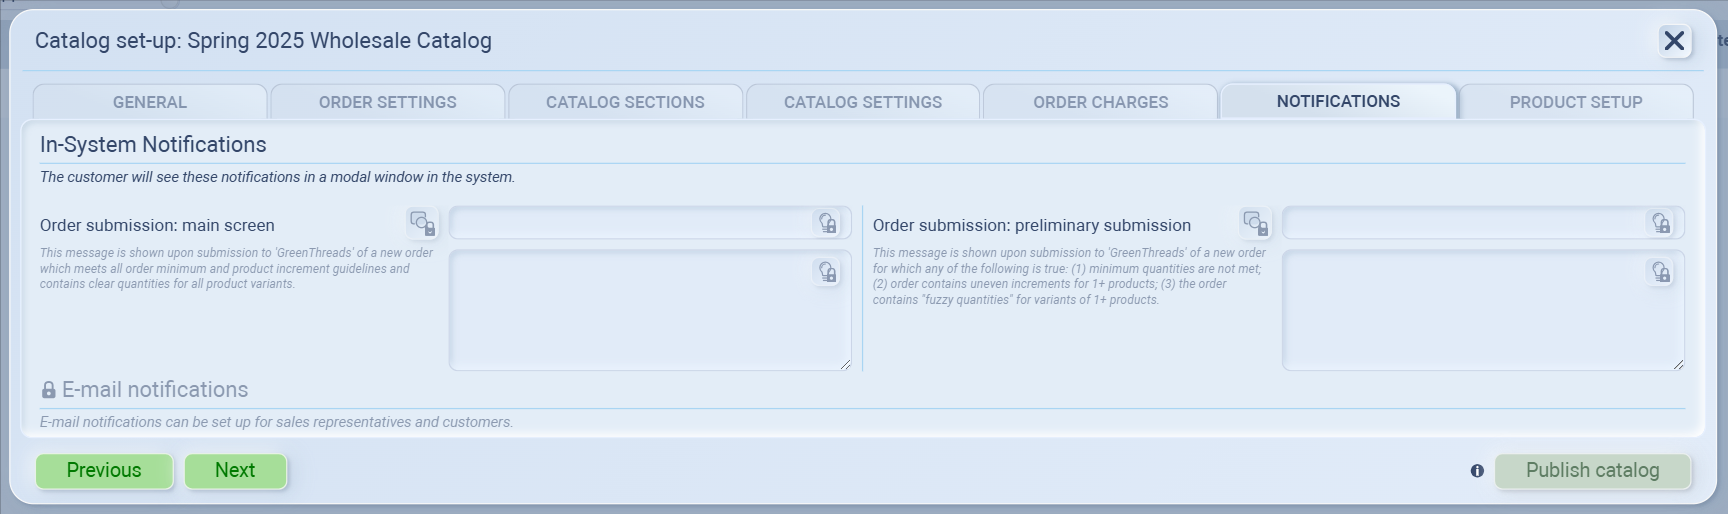
Notifications let you control the messages your customers see when submitting orders through the portal.
In-System Notifications
These appear directly in the customer’s screen when they submit an order.
-
Order submission: main screen
Message displayed when an order is successfully submitted and meets all order rules (e.g., quantities and increments).
Example: “Thank you! Your order has been received and is now under review.” -
Order submission: preliminary submission
Message shown when the order doesn’t meet one or more conditions (e.g., minimum quantity not reached or uneven product increments).
Example: “Some items in your order need adjustment. Please review quantities before final submission.”
Email Notifications
(this is under development and will be available soon.)
Will allow automatic emails to be sent to customers or sales reps upon order submission and approval.
💡 Tip:
Use these notifications to make your customer’s experience smoother—acknowledge successful submissions or guide them when corrections are needed.
Product Setup
Once all catalog settings are configured, it’s time to add your products. This step defines what customers will see and purchase in your B2B store.
Adding Products
You can add items to your catalog in two ways:
1. Manual Add
Click the ➕ icon to create a new product entry.
From the dropdowns, select your product by code or name.
Once added, you can edit the following fields directly:
-
Sale price
-
Minimum order quantity
-
Display name / Display unit
-
Section (if you’ve created catalog sections earlier)
Use the search bar at the top to find and adjust products quickly.
2. Bulk Import
For catalogs with many products, use the Import feature for faster setup.
-
Click the Import icon beside the search bar.
-
Download the provided template (recommended for best accuracy).
-
Fill in product details in Excel or Google Sheets.
-
Drag and drop your completed file (.XLSX or .CSV) into the import box.
-
Click Spreadsheet view to preview and confirm the import before saving.
Minimum required fields:
-
Item Code or Item Name.
Optional (recommended) fields:
-
Display code, Display name, Display unit, Sale price/unit, Minimum order quantity, Order increment, Usually ships in.
💡 Tip: Using the import template ensures column names and formats align perfectly for smooth upload.
Publishing Your Catalog
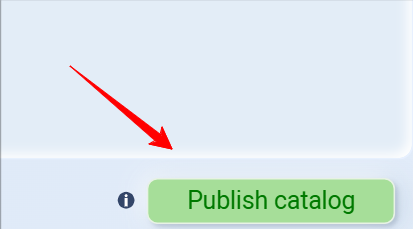
When all products are added and reviewed:
-
Click Publish Catalog in the bottom-right corner.
-
The catalog will now be available to customers who have access permission.
You can still return and edit your catalog later — updates won’t affect already submitted orders but will reflect in future customer views.
💡 If this doesn’t solve your issue or you have more questions, feel free to reach out through our [contact form]. We’ll get back to you within 2–3 business days.