Automated Codes
To help you keep your system consistent and error-free, sourcemaster lets you automatically generate unique codes for orders, products, warehouses, and other operations.
These codes act as identifiers across your workflows, reducing manual entry and ensuring every record follows a unified structure.
Why Automated Codes Matter
Codes make it easier to:
-
Track orders, products, and warehouses without duplication.
-
Maintain consistency across multi-entity operations.
-
Identify transactions quickly through predefined formats (e.g., SO-CMR-202510-0001).
Where to Find It
Go to Settings › Automated codes to view and customize how codes are generated for each module.
You’ll see four main sections:
-
Systemwide symbols – Define separators and suffix rules used across all codes.
-
Order management – Configure code formats for sales, purchase, and shipment orders.
-
Counterparties and entities – Set rules for customer, supplier, and entity abbreviations.
-
Inventory operations – Customize code formats for warehouse and inventory event tracking.
Systemwide Symbols
In sourcemaster, systemwide symbols define how codes are automatically structured across all modules (orders, products, entities, etc.).
These settings control the separators and symbols used when generating or customizing codes.
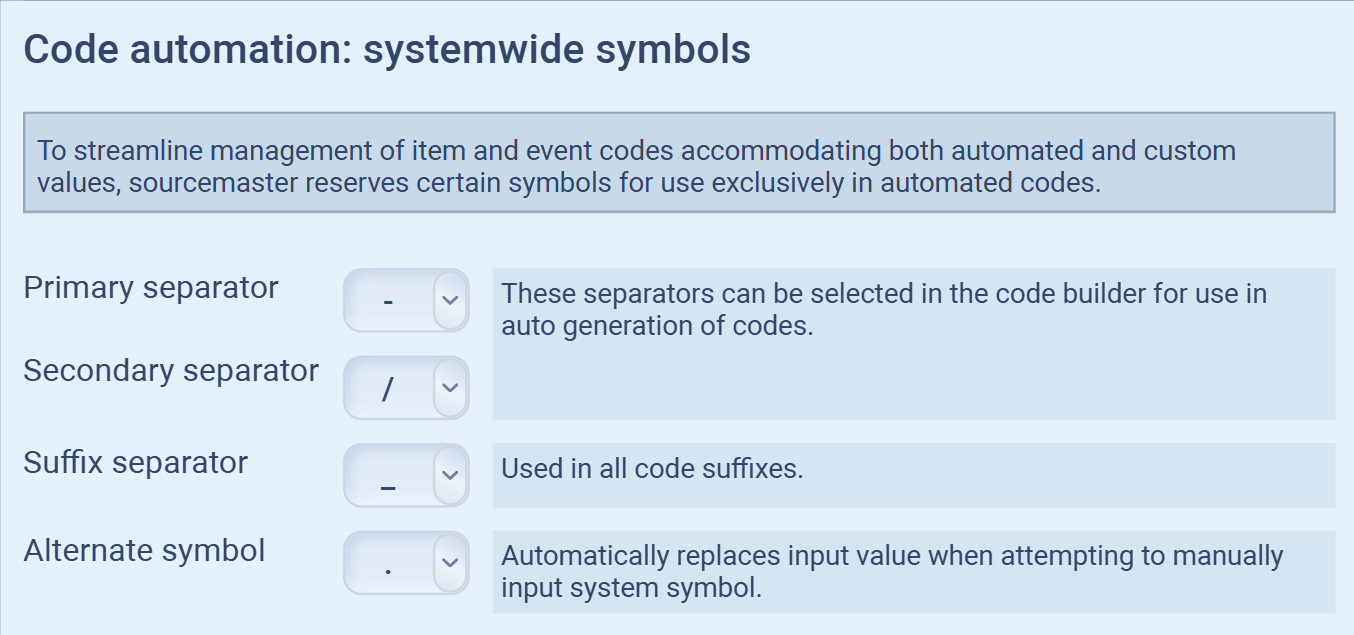
How to Configure Systemwide Symbols
-
Go to Settings › Automated codes.
-
Under Code automation: systemwide symbols, you’ll find four key options:
-
Primary separator — The main divider used in all automatically generated codes.
Example: SO-CMR-202510-0001 uses a hyphen (-) as its primary separator. -
Secondary separator — Used for nested code structures, often between different groups or layers of information.
Example: SO/CMR/202510/0001 -
Suffix separator — Defines the character that separates the main code from its suffix (commonly _ or .).
-
Alternate symbol — Automatically replaces reserved system symbols when users manually input restricted characters.
Example: entering / may be replaced by . automatically.
-
-
Click Save or move to the next section to define code formats for specific areas (e.g., Orders, Products, Inventory).
✅ Tip: Use simple, readable separators like - or /. Complex or inconsistent symbols may cause confusion when sharing or exporting data.
Order Management Codes
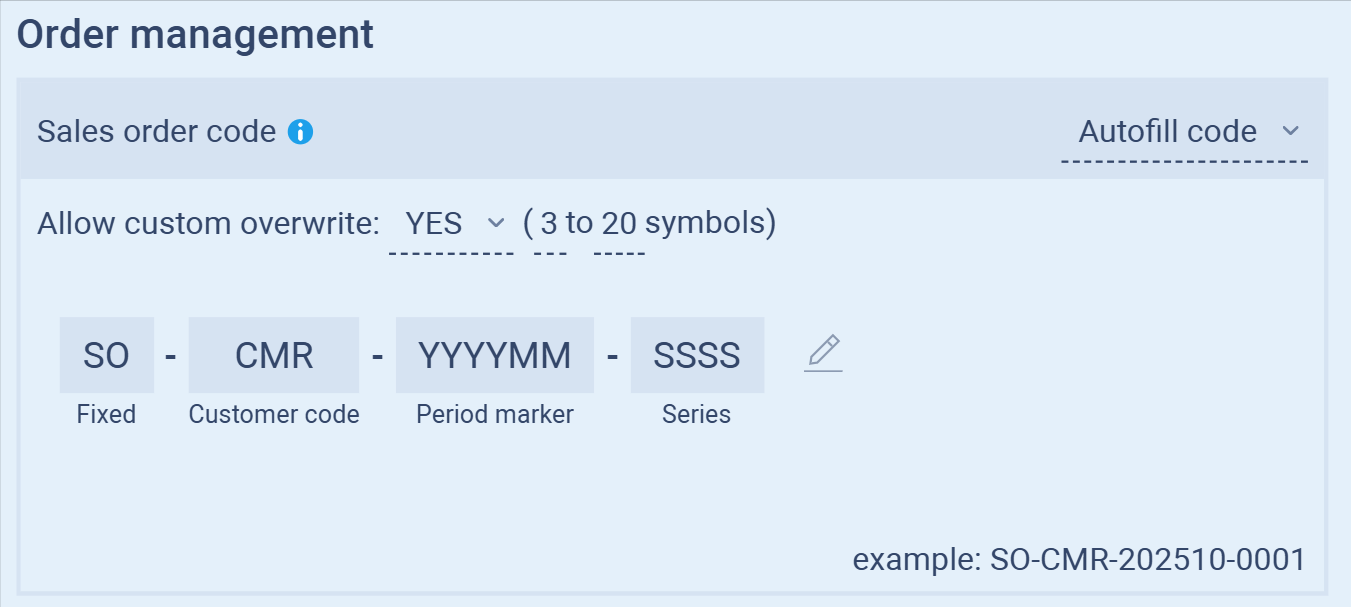
In sourcemaster, each sales, purchase, and shipment order automatically receives a unique code.
These codes help you track every transaction quickly and avoid duplicate records.
Sales Order Code
Each new sales order will follow the format shown below:
Example: SO-CMR-202510-0001
| Code Segment | Description |
|---|---|
| SO | Fixed prefix for sales orders. |
| CMR | Customer code — automatically pulled from your customer record. |
| YYYYMM | Period marker — represents the year and month of creation. |
| SSSS | Series — sequential number assigned by the system. |
How to Configure
-
Go to Settings › Automated codes › Order management.
-
Under Sales order code, adjust the following options:
-
Allow custom overwrite: Choose whether users can manually edit the generated code (recommended: YES for flexibility).
-
Symbol limit: Set the allowed range of characters (3–20 symbols).
-
-
Use the editable fields to modify or rearrange the components (e.g., add your company prefix).
-
Click Autofill code if you want sourcemaster to automatically generate the structure using defaults.
Once saved, all new sales orders will automatically use this format.
✅ Tip: Keep your prefix short and descriptive (like “SO” for Sales Order or “PO” for Purchase Order) to make reports and exports easier to read.
Shipment Code
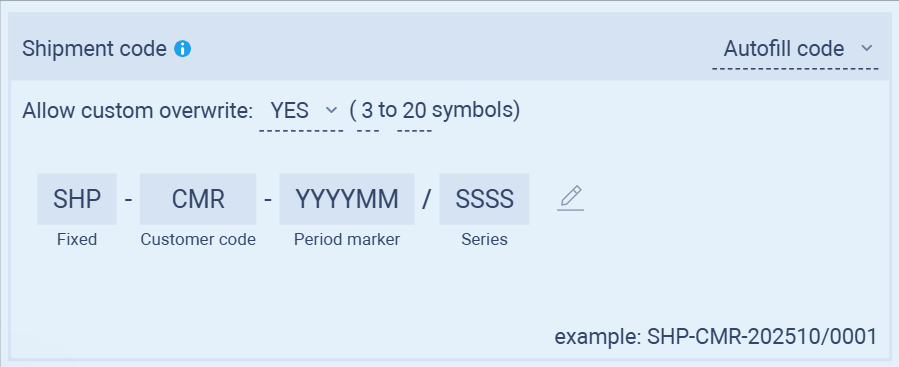
Shipment codes help you organize and track deliveries linked to sales or purchase orders.
Each shipment is automatically assigned a structured code to ensure traceability across transactions and reports.
Example: SHP-CMR-202510/0001
| Code Segment | Description |
|---|---|
| SHP | Fixed prefix identifying a shipment record. |
| CMR | Customer code — automatically generated from the related customer. |
| YYYYMM | Period marker — the year and month when the shipment is created. |
| SSSS | Series — sequential number generated by the system. |
How to Configure
-
Go to Settings › Automated codes › Order management.
-
Scroll to the Shipment code section.
-
Adjust the settings as needed:
-
Allow custom overwrite: Choose YES if you want to manually edit shipment codes when necessary.
-
Symbol limit: Defines how many characters can be included in the code (3–20 symbols).
-
-
Edit or rearrange the code structure by selecting or removing segments (Fixed, Customer Code, Period Marker, Series).
-
Click Autofill code to apply the standard format automatically.
After saving, all new shipment records will follow this structure.
✅ Tip: Align your shipment code format with your sales order codes. This keeps your reports and audit trails consistent and easier to trace.
Counterparties and Entities
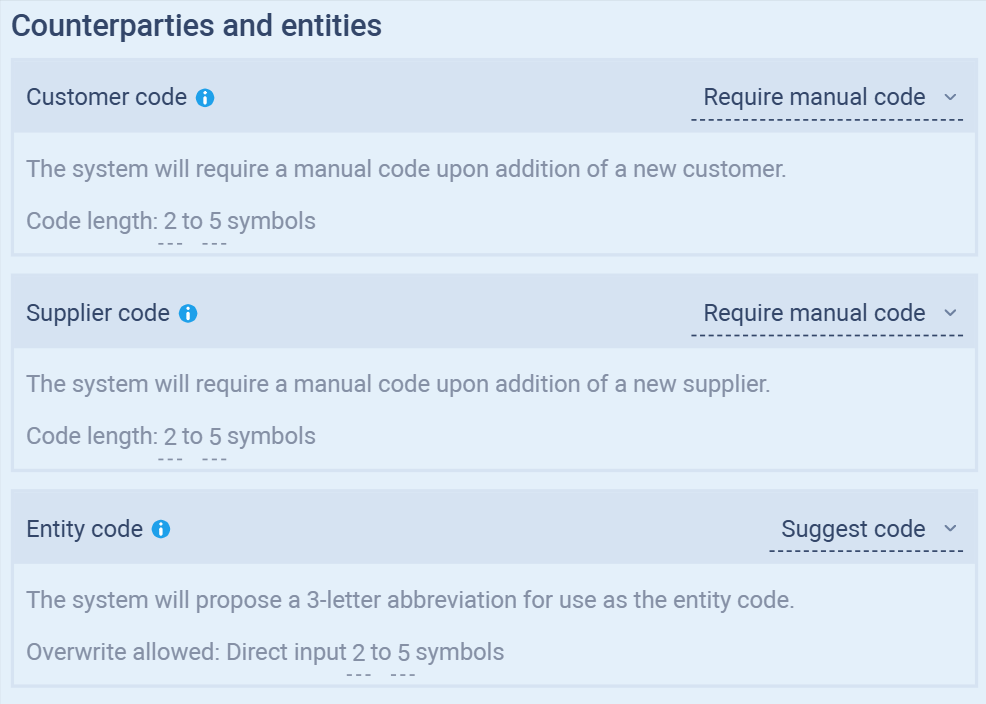
In Sourcemaster, counterparties (customers, suppliers, and entities) each have a unique code that identifies them throughout your workflows.
These codes help you link records across sales orders, purchase orders, shipments, and reports with full traceability.
You can choose how these codes are created using three generation modes: Autofill, Suggest, or Require manual code.
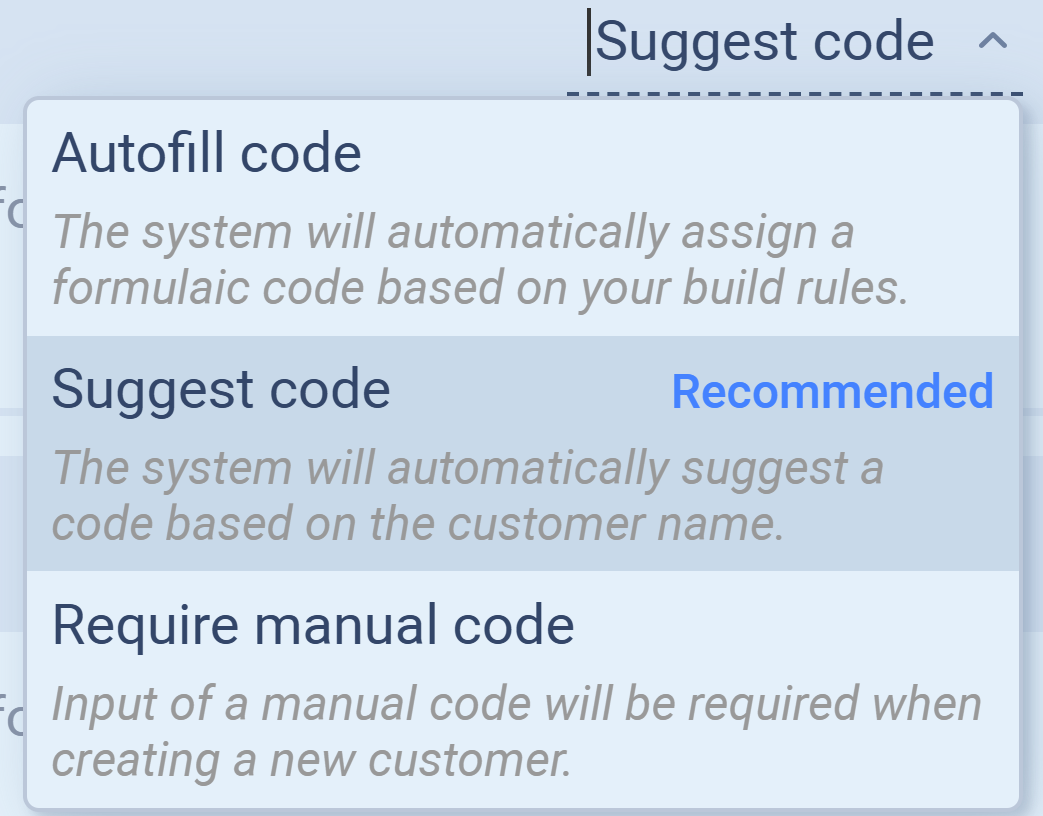
Each offers a different balance between automation and control.
Code Generation Modes
1. Autofill Code
The system automatically assigns a structured code when a new record is created.
How it works:
-
A formulaic code is generated instantly according to your build rules (set under Automated Codes).
-
You can define the format (e.g., prefix, series, separators).
-
No user input is needed during record creation.
Example:
C-0001 (for customers) or S-0001 (for suppliers)
When to use:
-
Ideal for teams handling large volumes of data where speed and consistency matter.
-
Prevents accidental duplicates or inconsistent naming.
Tip: Use Autofill Code if you prefer a standardized pattern across all records and rarely need manual customization.
2. Suggest Code (Recommended)
The system automatically proposes a short code — usually a 3-letter abbreviation — based on the name of the customer, supplier, or entity.
How it works:
-
When you add a new record, Sourcemaster suggests a code like GLO for Global Mart or SUP for Superior Trading.
-
Users can manually edit or overwrite the suggested code.
-
Overwrite length: 2–5 symbols.
Example:
-
System suggestion: GLO
-
Manual overwrite (optional): GMRT
When to use:
-
Ideal for teams that want auto-suggestions but still need flexibility.
-
Balances automation with readability, since abbreviations are human-friendly.
Tip: Choose Suggest Code if you want easy-to-recognize names without typing them from scratch.
3. Require Manual Code
Users must manually input a code when creating a new customer, supplier, or entity.
How it works:
-
The system won’t generate or suggest a value.
-
A user must type a code manually following the allowed length (2–5 symbols).
-
Sourcemaster validates that the code is unique before saving.
Example:
-
User enters ABC for a customer or THS for an entity (Thailand Subsidiary).
When to use:
-
Best for teams that already have internal naming conventions or external code systems (e.g., accounting or ERP links).
-
Gives full control to the user for mapping exact abbreviations or company codes.
Tip: Use Require Manual Code when working with standardized or predefined codes shared across multiple systems.
How to Configure
-
Go to Settings › Automated codes › Counterparties and entities.
-
For each section (Customer, Supplier, or Entity code), select your preferred mode:
-
Autofill code
-
Suggest code (recommended)
-
Require manual code
-
-
(Optional) Adjust Overwrite permissions if you want users to modify system-generated values.
-
Click Save to apply changes.
✅ Tip: For most Sourcemaster users, Suggest Code is the best balance between automation and clarity — it keeps codes human-readable while maintaining system consistency.
Product Codes
Product codes keep your item catalog organized and ensure that every product, category, and pricing group can be quickly identified across your orders, inventory, and reports.
Sourcemaster automatically generates unique codes for each product-related record, based on your configured settings.
How to Configure Product Codes
-
Go to Settings › Automated codes › Products.
-
You’ll see four configuration options for managing product-related identifiers:
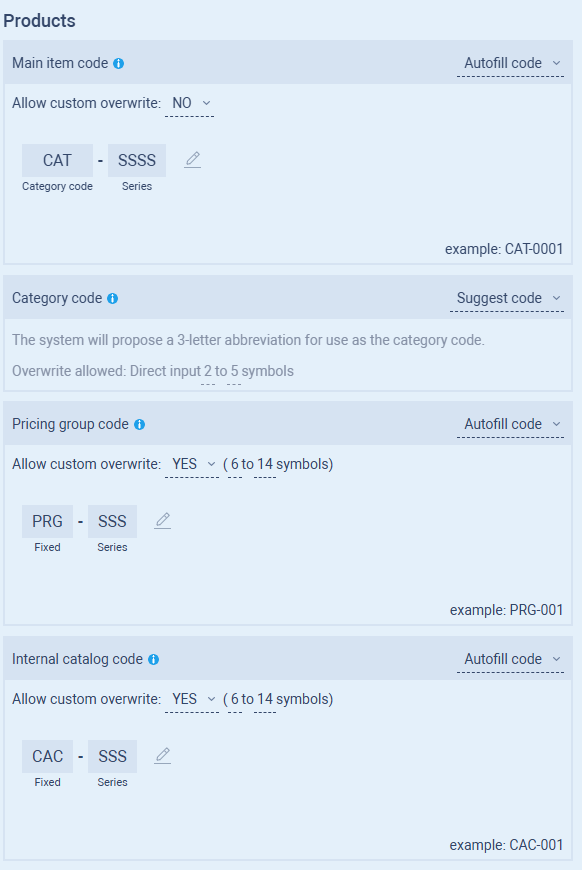
① Main Item Code
Each new product added to your catalog receives a main item code, which serves as its primary identifier throughout Sourcemaster.
Example: CAT-0001
| Segment | Description |
|---|---|
| CAT | Category code (prefix) |
| SSSS | Sequential series number generated automatically |
Configuration options:
-
Autofill code: The system auto-generates a product code based on your build rules.
-
Allow custom overwrite: Choose NO to ensure consistency across your product catalog.
Best for: Businesses that need standardized codes across multiple entities or warehouses.
② Category Code
Category codes help group similar items together (e.g., Electronics, Apparel, Office Supplies).
They’re short, recognizable abbreviations automatically suggested by Sourcemaster.
| Mode | Description |
|---|---|
| Suggest code (default) | The system proposes a 3-letter abbreviation based on the category name. Example: “Stationery” → “STA” |
| Autofill code | The system creates a structured format using a fixed prefix (e.g., CAT-0001). |
| Require manual code | You’ll manually enter category codes when creating new categories. |
Allowed input: 2–5 symbols
Overwrite: Allowed if “custom overwrite” is set to YES.
✅ Tip: Use meaningful abbreviations (like “ELC” for Electronics) to make product listings and order forms more intuitive.
③ Pricing Group Code
Pricing group codes help segment products by pricing models, markets, or customer tiers.
Example: PRG-001
| Segment | Description |
|---|---|
| PRG | Fixed prefix indicating a pricing group |
| SSS | Sequential number auto-incremented per new pricing group |
Configuration options:
-
Autofill code automatically creates the next available code.
-
Allow custom overwrite: Choose YES if you use internal pricing reference codes.
-
Code length: 6–14 symbols.
Use case: Ideal for separating wholesale vs. retail pricing or region-specific price sets.
④ Internal Catalog Code
Internal catalog codes help track your internal product lists, prototypes, or non-public SKUs.
These are generated using a fixed prefix (CAC) and sequential series numbers.
Example: CAC-001
| Segment | Description |
|---|---|
| CAC | Fixed prefix identifying internal catalog entries |
| SSS | Sequential number generated by the system |
Configuration options:
-
Autofill code: Generates automatically when a new internal item is added.
-
Allow custom overwrite: YES by default for internal flexibility.
✅ Tip: Internal catalog codes are not customer-facing. Keep them concise and systematic to simplify reporting and internal communication.
Summary Table
| Code Type | Example | Default Mode | Overwrite | Typical Use |
|---|---|---|---|---|
| Main Item Code | CAT-0001 | Autofill | No | Product identification |
| Category Code | STA | Suggest | Yes | Product grouping |
| Pricing Group Code | PRG-001 | Autofill | Yes | Price segmentation |
| Internal Catalog Code | CAC-001 | Autofill | Yes | Internal item reference |
Inventory Operations Codes
Inventory operation codes keep your warehouse, goods movement, and transfer activities consistent across your system.
Each operation (such as goods transfer or warehouse setup) uses a structured code format to make it easy to trace items from one location to another.
How to Configure
-
Go to Settings › Automated codes › Inventory operations.
-
You’ll find two main configuration areas:
-
Goods Transfer Code
-
Warehouse Code
-
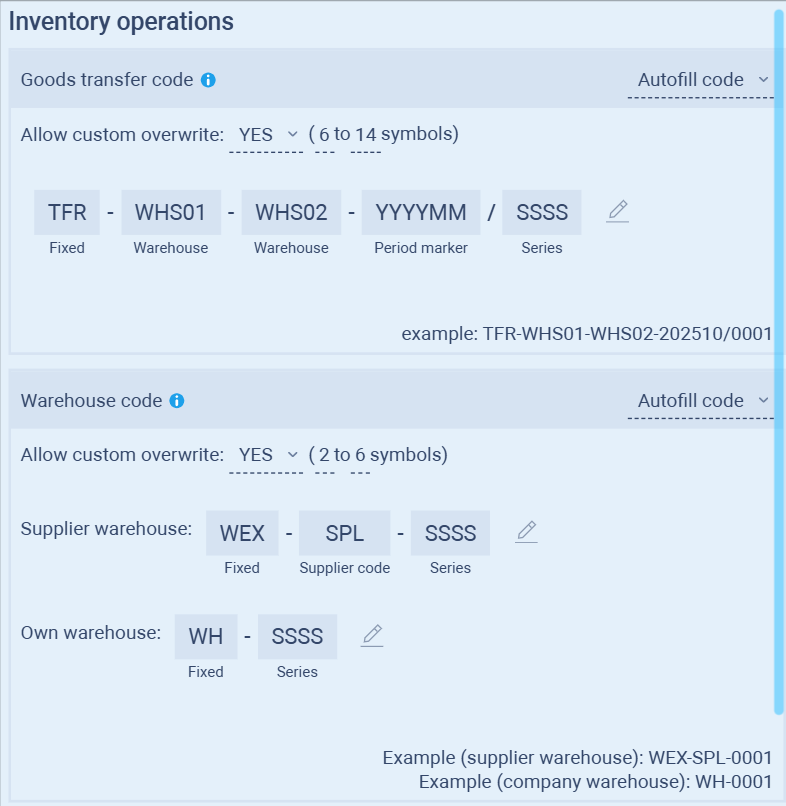
① Goods Transfer Code
Each goods transfer between warehouses is automatically assigned a unique code.
This ensures full traceability of stock movement from one location to another, including date and sequence.
Example:
TFR-WHS01-WHS02-202510/0001
| Code Segment | Description |
|---|---|
| TFR | Fixed prefix identifying a transfer event. |
| WHS01 | Origin warehouse code (e.g., “Warehouse 1”). |
| WHS02 | Destination warehouse code (e.g., “Warehouse 2”). |
| YYYYMM | Period marker — year and month of transfer. |
| SSSS | Series number — sequential count of transfers. |
Configuration options:
-
Autofill code: Automatically generates a formatted transfer ID based on your build rules.
-
Allow custom overwrite: Choose YES if you occasionally need to follow external documentation codes.
-
Code length: 6–14 symbols.
✅ Tip: Use a clear warehouse naming pattern (e.g., WHS01, WHS02) to keep transfer records traceable across multi-location operations.
② Warehouse Code
Warehouse codes identify each location used for storing or handling goods, whether owned or supplier-based.
Supplier Warehouse
Example: WEX-SPL-0001
| Segment | Description |
|---|---|
| WEX | Fixed prefix for supplier warehouses. |
| SPL | Supplier code abbreviation. |
| SSSS | Series — sequential identifier for each new supplier warehouse. |
Own Warehouse
Example: WH-0001
| Segment | Description |
|---|---|
| WH | Fixed prefix for company-owned warehouses. |
| SSSS | Sequential series number. |
Configuration options:
-
Autofill code: Automatically generates the next available warehouse code.
-
Allow custom overwrite: YES by default — allows manual adjustments if warehouse names follow specific regional or entity-based naming rules.
-
Code length: 2–6 symbols.
Inventory Event Codes
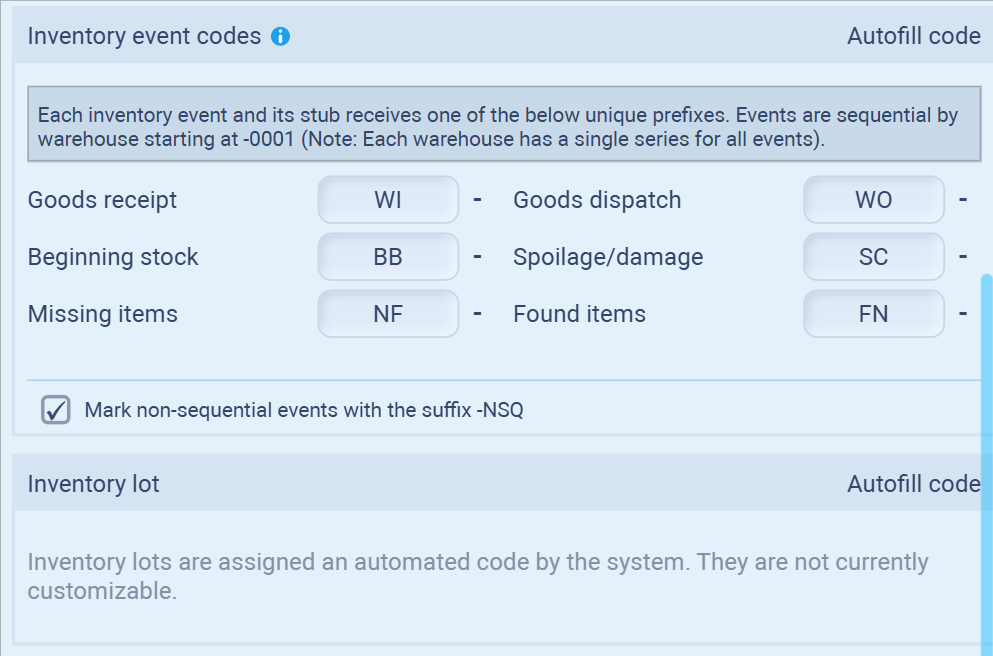
Inventory event codes help sourcemaster record every stock-related action consistently across your warehouses.
Each event type (such as goods receipt, dispatch, or spoilage) uses a dedicated prefix so that all movements are clearly traceable in reports and audits.
How It Works
Each inventory event and its stub is automatically assigned a unique prefix and sequential number based on the warehouse.
-
Every warehouse maintains its own event series starting from -0001.
-
This ensures events are traceable per location without conflicts.
Example:
-
WI-0003 — Third goods receipt for Warehouse A.
-
SC-0010 — Tenth spoilage record for Warehouse B.
Default Event Prefixes
| Event Type | Prefix | Description |
|---|---|---|
| Goods Receipt | WI | Logs incoming goods added to stock. |
| Goods Dispatch | WO | Tracks goods issued or shipped from stock. |
| Beginning Stock | BB | Used to define initial inventory levels when setting up the system. |
| Spoilage/Damage | SC | Records losses due to damage, expiration, or defects. |
| Missing Items | NF | Flags missing quantities found during stock counts or audits. |
| Found Items | FN | Records items discovered during stock reconciliation. |
✅ Tip: Keep the default prefixes unless you already have a warehouse coding standard. They follow common international stock notation conventions (WI = In, WO = Out, etc.).
Marking Non-Sequential Events
Sourcemaster automatically detects non-sequential event numbering (e.g., when an event is manually skipped or inserted).
To flag these:
-
Enable the checkbox “Mark non-sequential events with the suffix -NSQ.”
-
The suffix -NSQ will appear after the event code (e.g., WI-0004-NSQ) to indicate irregular numbering.
This makes it easy to spot gaps in your sequence during audits.
Inventory Lot Codes
Each inventory lot (batch of goods) receives its own automated code.
Lot codes are generated by the system automatically and are not currently customizable.
They help connect batches to related events, shipments, or purchase orders.
Example:
-
A goods receipt event WI-0005 creates a lot code like LOT-0005, automatically linking them in reports.
Example Use Case
| Warehouse | Event | Generated Code | Description |
|---|---|---|---|
| WHS01 | Goods Receipt | WI-0012 | 12th goods receipt in Warehouse 1 |
| WHS02 | Goods Dispatch | WO-0004 | 4th goods dispatch in Warehouse 2 |
| WHS01 | Spoilage | SC-0002 | 2nd spoilage record |
| WHS01 | Found Items | FN-0001 | 1st item recovery event |
✅ Tip:
When investigating inventory discrepancies, filter your reports by event prefix (e.g., “NF” or “SC”) to quickly isolate losses or corrections.
💡 If this doesn’t solve your issue or you have more questions, feel free to reach out through our [contact form]. We’ll get back to you within 2–3 business days.